 | Session Recording |
| Using WinRunner 2000 and TouchPoint Together |  |
This chapter guides you, step by step, through the process of creating a
WinRunner 2000 test for an application (CICSDB2) that uses CICS
and DB2.
You need to have read the chapter Start
Here for the Tutorials and worked through the first
session, Using
Mainframe Express, and the session Session
Recording, before you do this session.
You need to have installed WinRunner 2000, CICS Option, and either SQL
Option or Host Compatibility Option to do this session. This chapter
contains alternative sections depending on whether you installed SQL
Option or Host Compatibility Option (HCO). If you are using HCO you must
also have IBM's DB2 database system installed.
Note: If you have already worked through the TouchPoint
tutorial, Year
2000 Testing, you do not need to carry out the steps
described in the Preparation section. Instead, start Mainframe
Express, open the CICSDB2 project and go straight to the section
entitled Before Running the Application.
Before you can run the CICSDB2 application, you need to carry
out the following preparatory tasks:
- Create a project
- Add files to the project
- Create a DB2 Database and Table
- Modify the build settings
- Build the project
- Set up CICS FCT and PCT Entries
To create the project:
- Start Mainframe Express and click New on the File
menu, then select Project on the New dialog box and click OK.
- Enter cicsdb2 as the name of the project and change the name
of the Project Folder to drive:\mfuser\projects\gsdemo\cicsdb2,
then click Next.
- Select Using this wizard as your chosen method of creating
the project and click Next.
- Leave the default folder for the catalog (drive:\mfuser\projects\gsdemo\cicsdb2)
unchanged and click Next.
- A dialog box is displayed asking which Mainframe Express options this
project uses. It uses CICS and SQL so ensure that both these check boxes
contain check marks and click Next.
- Leave the default CICS region name (CICSDB2) unchanged and
click Next.
- Leave the default folder for the resource definition file (drive:\mfe\config)
unchanged and click Next.
- From the pulldown list, select MCOSIT (Micro Focus CICS option
SIT) for the System Initialization Table (SIT) and click Next.
- If you installed HCO, a dialog box is displayed asking for the name
of the DB2 database. Enter SAMPLE and click Next.
- If you installed SQL Option, a dialog box is displayed asking whether
the project uses a local server and whether that server should be looked
for when the project is opened and whether you should be prompted before
the server is started. Ensure that all three options are checked and
click Next.
- A summary is displayed of all the information that you have entered.
Click Finish to create the project.
If you installed SQL Option, Mainframe Express checks that an SQL server
is running on your computer. If no SQL server is running, it displays a
dialog box asking if you want to start one now. Ensure Start local
server now is checked and click OK.
To add your files to the project:
- Click Add Files on the Project menu.
- In the Add Files to Project dialog box, open the folder \mfuser\projects\gsdemo\cicsdb2\source.
Ensure the Files of Type field is set to All Files (*.*)
(at the end of the pulldown list).
- Select all the files in the folder, then click Add.
The files are added to the project.
- Click Done.
If you click the Copybook entry in the left-hand pane,
you'll see that one of the copybooks (EMPLOY) is marked as not found.
This one will be created when the .bms file is compiled.
If you're using SQL Option, the database used in this session is
installed with Mainframe Express, so you should skip this section. If
you're using HCO you need to create the database:
- Click HCO on the Tools menu, then click Create
Database.
The Create Database dialog box appears.
- Type SAMPLE in the Database field and Sample
database in the Description field, then click
 on the dialog box.
- When it finishes, click OK on the message saying "Request
completed", and then close the Create Database dialog box using its
 button.
If you're using HCO, skip this section. If you're using SQL Option, you
run the SQL wizard with the supplied DDL file to add the table and data.
Note: You only need to create this table once. If you are
re-creating this project for any reason, the table will already exist and
an error message similar to the following is displayed: Table/View "EMP_SALARY"
already exists. If this happens, click OK and then Cancel
and move on to the next section.
- Select the SQL DDL/DML folder in the left-hand pane and then
click EMPSALA.SQL in the right-hand pane.
- Click SQL For DB2 on the Tools menu, then click Execute
SQL EMPSALA.SQL.
The SQL wizard, guided by the .sql file, creates a new table
and index, inserts data, and then exits.
If you're using SQL Option, skip this section. If you're using HCO, you
use the supplied DDL file to add the table and data.
- Click HCO on the Tools menu, then click Configuration.
The Set Defaults dialog box appears. By default HCO assumes the DDL
has an extension of .ddl, but the one supplied has an
extension of .sql. So you need to reconfigure HCO first.
- Click DDL FILE EXTENSION in the Settings list. You
may have to pull the slider down to see it.
- Type SQL in the Value field, then click Save,
click OK on the Save Changes message, then click Cancel.
You can now run the DDL.
- Click HCO on the Tools menu, then click DDL
Processor.
The DDL Processor Tool appears.
- Type SAMPLE in the Database field.
- Click Select DDL on the File menu of the DDL
Processor Tool.
- In the Select DDL File dialog box, open the folder \mfuser\projects\gsdemo\cicsdb2\source.
Ensure the Files of Type field is set to sql Files (*.sql).
- Select empsala.sql and click Open.
This sets the DDL File field to the name of this file.
- Click on the DDL
Processor Tool.
- When it finishes, close the DDL Processor Tool using its
button.
You need to change the COBOL dialect to COBOL for MVS and the
BMS compiler needs to recognize certain features recognized by the SDF BMS
compiler on the mainframe, so:
- Click Project in the left-hand pane, then click Build
settings for project on the Project menu.
- Click the BMS tab, then click Enable SDF features to
put a check mark there.
SDF features are used in the BMS mapset used in this session.
- Now click the COBOL tab and select COBOL for MVS as
the COBOL Dialect.
- Click OK.
To build the project:
- Click Build on the Build menu, or click the Build
button
 on the toolbar.
The build finishes with "Build finished with no errors".
Before you can run this tutorial, you need to create a number of CICS
FCT and PCT entries.
Note: You only need to do this once. If you are re-creating the
project for any reason, the FCT entries will already exist. To check,
click on the CICS tab, right-click on CICS System and
select Viewable Groups. Select CICSDB2 as the only
viewable group and click OK. Now click File Control Table
(FCT) - you should see CONV and EMPL listed under File
Name.
To add File Control Table entries:
- Click the CICS tab at the bottom of the Project View.
- Click File Control Table (FCT). (If you are prompted to
change the groups being viewed, click No.) Now, right-click on
File Control Table (FCT) and select Add new FCT entry.
- Use the Browse button
 to select the file mfuser\projects\gsdemo\cicsdb2\data\conv.dat.
Click Open and then OK. Now use the same process to
select mfuser\projects\gsdemo\cicsdb2\data\empl.dat.
to select the file mfuser\projects\gsdemo\cicsdb2\data\conv.dat.
Click Open and then OK. Now use the same process to
select mfuser\projects\gsdemo\cicsdb2\data\empl.dat.
Note: You only need to do this once. If you are re-creating the
project for any reason, the PCT entries will already exist. To check,
click on the CICS tab, right-click on CICS System and
select Viewable Groups. Select CICSDB2 as the only
viewable group and click OK. Now click Program Control Table
(PCT) - you should see CDB1, CDB4, CDB5, and
CDB6 listed under Transaction ID.
To define CICS transactions for the project's programs:
- Click the CICS tab at the bottom of the Project View.
- Click Program Control Table (PCT). (If you are prompted to
change the groups being viewed, click No.) Now, right-click on
Program Control Table (PCT) and select Add new PCT entry.
- Use Add new PCT entry four times, to add the following
transactions (remember the Transaction ID is case sensitive):
| Transaction ID |
Program |
Description |
| CDB1 |
CDB2PRG1 |
Program to handle the
menu |
| CDB4 |
CDB2PRG4 |
Program to handle
listings |
| CDB5 |
CDB2PRG5 |
Program to handle updates |
| CDB6 |
CDB2PRG6 |
Program to handle
displays |
Before you run the application, check the following:
- CICSDB2 is in the startup list.
- Your debug options are set correctly for this tutorial.
- Your Application Output window is floating on the desktop.
Ensure that CICSDB2 is in the startup list:
- Click the CICS tab.
- Right-click on CICS System.
- Select Startup List.
- If CICSDB2 is not displayed in the start-up list, select it
in the right-hand pane and click Add.
- Click OK to close the Startup List Configuration dialog box.
Check that your debug options are set correctly for running this
tutorial:
- Select Debug from the Options menu.
- Ensure that Step/Run displays Start Debugging dialog is
checked.
- Ensure that Show system programs in call stack is unchecked.
- Click OK.
For the purposes of this tutorial, it is important that the Application
Output Window is floating on the desktop:
- Select Dockable Windows from the View menu, check
Application Output and click Close.
- Right-click within the Application Output window (if you
cannot see the Application Output window click on the Application
Output icon on the taskbar) and ensure that Float on desktop
is checked.
- Close the Application Output window by clicking its
button.
You are now ready to run the application. It is worth spending a few
minutes becoming familiar with the application and what it does:
- Click the Run button
on the toolbar. The Start Debugging dialog box is displayed.
- Click the CICS tab, enter an Initial TRANSID of CDB1
and click OK.
- A number of messages are displayed as the application logs on to the
CICS region and then the application's main menu, as shown in Figure
30-1 is displayed.
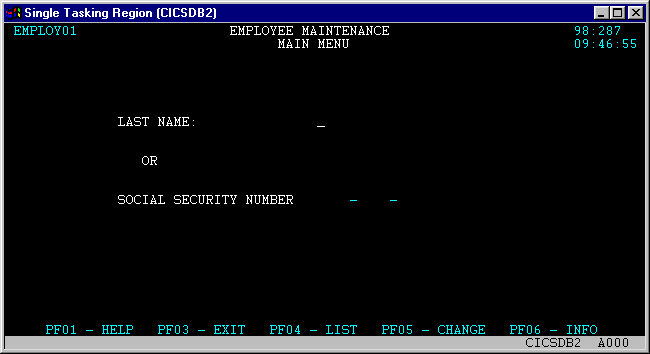
Figure 30-1: Main Menu
- Press the F4 key to display a list of employees. Note the
details that are displayed: name, social security number, office
location and date of hire. In particular, note the format of the date.
- Press the F5 key to display the EMPLOYEE INFORMATION CHANGE
screen. From here you can change any of the employee details. Note the
format of the date of hire on this screen.
- Press the F3 key to return to the main menu.
- Press F3 again to terminate the application.
- Press the Esc key to clear the screen.
- Type EXIT and press Enter (right-hand Ctrl).
- Close the Application Output window by clicking its
button.
Now that you have a general idea about the type of information that this
application manipulates, it will be useful to focus on the section to be
changed, FORMAT-DATE:
- Click the Files tab in the Project View and then double-click
on the COBOL program, CDB2PRG4.CBL.
- Use the Find option on the Search menu to locate the
FORMAT-DATE section.
- Set a breakpoint at the first executable line in that section
(right-click anywhere on that statement and select Set Breakpoint).
Notice that the
 symbol
appears alongside the line. Click the Run button
symbol
appears alongside the line. Click the Run button
 on the toolbar.
- On the Start Debugging dialog box, select the CICS tab, enter
an Initial TRANSID of CDB1 and click OK.
- From the main menu, press F4. The debugger gains focus when
the breakpoint is hit.
- When the debugger is active for CDB2PRG4.CBL unset the
breakpoint (right-click anywhere on the statement and select Clear
Breakpoint) and step through the section (using the F10 key
or the Step button
 on the toolbar) so that you can see what this section of code is doing:
- The data item WS-CALC-DATEN holds the date of hire for
the employee as a Gregorian calendar date in standard form
(YYYYMMDD). The INTEGER-OF-DATE function converts a
Gregorian date from standard form to integer form (the number of
days by which the date succeeds December 31 1600). The returned
value, WS-NUMBER-OF-DAYS, therefore, is an integer that is
the number of days by which the employee's date of hire succeeds
December 31 1600.
- Next, the day of the week on which the employee was hired is
calculated by taking the number of days since December 31 1600 and
dividing it by 7 (to give the number of total weeks) and then using
the remainder to calculate the day of the week where 0 indicates
Sunday, 1 indicates Monday and so on. The result is stored in DAY-SUB.
As DAY-SUB is used as a subscript to access THE-DAY-OF-WEEK
from the table DAY-TABLE (where 1 indicates Sunday, 2
indicates Monday and so on), 1 is added to DAY-SUB.
- The DAY-OF-INTEGER function converts a date in the
Gregorian calendar from integer date form to Julian date form
(YYYYDDD, where YYYY is a year in the Gregorian calendar and DDD is
the number of days since the start of the year). This value is
stored in the data item WS-JUL-DATEN.
- The number of days since the start of the year is moved from WS-JUL-DD
to WS-JULIAN-DAY.
- For display purposes, the information held in WS-CALC-DATE
and DAY-SUB is moved into DATE-FORMAT.
In summary, then, the FORMAT-DATE section takes the
employee's date of hire, converts it to Julian date form in order to
calculate the day of the year on which they were hired and then
formats the date for display purposes.
- Now zoom through the rest of the code by clicking the Run
button on the toolbar.
- When the list of employees is displayed, press the F5 key to
display the first employee's details.
- Press the Tab key to move to the Date of Hire field,
change the date of hire to 01/01/99 (if you have already worked
through the TouchPoint tutorial, Year 2000 Testing, you will not
need to do this) and then press Enter (right-hand Ctrl)
to save the change.
- Press F3 to return to the main menu.
- Press F3 to terminate the application.
- Clear the screen by pressing the Esc key.
- Type EXIT and press the Enter (right-hand Ctrl)
key.
- Close the Application Output and editor windows by clicking
their buttons.
To create a WinRunner 2000 test:
- Click the Tests tab.
- Select New from the Test Case menu.
- Select WinRunner Script and click OK.
- The Define Test wizard is invoked.
- Accept the default name for the test, Test_1, enter a
description of CICSDB2 and click Next.
- Click New on the Define Application Start Parameters
page. The Create Application Start Parameters dialog box is displayed.
- Enter a name of CICSDB2 and a description of CICS/DB2
Application and then click OK. The Testcase Parameters
dialog box is displayed.
- Click the CICS tab, enter an Initial TRANSID of CDB1
and click OK.
- Click Next. The Select WinRunner Script page is
displayed. From here you can create a new test script or select a test
script from a list of all those that already exist.
- Select New and accept the default script name of Script_1
by clicking Next. A summary of the information you have entered
is displayed. From here you can choose to record the test script now, or
simply create the test and leave the recording until later.
- Ensure Record Script Now is checked and click Finish.
WinRunner 2000 is started in record mode.
Once you have created your WinRunner 2000 test and selected to record
the script, WinRunner 2000 is started in record mode and the application
associated with this test is started, using the specified start
parameters.
- From the main menu press F4. Note that the date of hire for
the first user is now shown as FRI 01 JAN 99.
- WinRunner 2000 enables you to capture all, or part of the text on a
screen when you record a script. It then performs a comparision with the
same area of the screen when the script is replayed. Press left-hand
Ctrl and F3 - the cursor changes to a cross. This
enables you to mark an area of the screen to be captured.
- Mark the complete list of users as shown in Figure 30-2 below. Do not
include the text of the column headings or the blank space to the right
of the date. When you are happy with your selection, right-click with
the mouse.
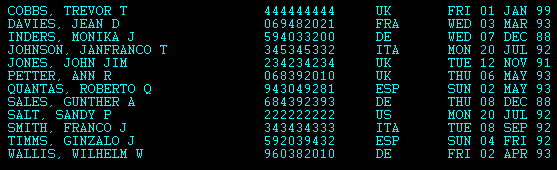
Figure 30-2: Selected Text
Note: It is very important that the area of the screen that
is captured is identical to that shown above. Do not include the blank
space to the right of the date. Later in this tutorial, you are going
to make a change to the application that will result in valid
information being displayed to the right of the date but you do not
want that information to be included in the comparison that is
performed when the script is replayed, as it will automatically cause
the comparison to fail.
- Press F3 to return to the main menu.
- On the WinRunner 2000 toolbar, click the Stop Recording
button
 to stop
recording.
to stop
recording.
WinRunner 2000 has been recording every keystroke made. Your script
should look similar to the one shown below (note, however, that the
numbers will vary):
#Micro Focus WinRunner 2000 Template
type ("<kF4>");
TE_check_text("Prt1",5,7,73,18);
type ("<kF3>");
If your script contains additional keystrokes, (for example, because
you have been clicking on the online version of this Getting
Started to check the instructions), edit the script so that it
resembles that shown above, and then save it.
- Minimize WinRunner 2000 by clicking its
 button.
- Close the CICSDB2 application:
- Press F3 to terminate the application.
- Press the Esc key.
- Type EXIT and press the right-hand Ctrl key.
- Close the Application Output window by clicking its
button.
You can check that the text you have captured is what you expected
before you run your test.
- Click the Tests tab, click WinRunner in the left-hand
pane and then right-click on the test you have just created (Test_1(Script_1))
and select Analyze from the context menu. The WinRunner Test
Results dialog box is displayed.
- Double-click on the capture text event. The data that you
have captured is displayed in the Terminal Display dialog box.
- Click OK to close the Terminal Display dialog box.
- Close the WinRunner Test Results dialog box by clicking on its
button.
Now that the test script has been recorded, it can be played back by
running the WinRunner 2000 test:
- Select the test (Test_1(Script_1)) by clicking on it in the
right-hand pane.
- Select Run from the Test Case menu. The script is
replayed. When it has finished, minimize WinRunner 2000 by clicking its
button and then close
down the CICSDB2 application:
- Press F3 to terminate the application.
- Press the Esc key.
- Type EXIT and press the right-hand Ctrl key.
- Close the Application Output window by clicking its
button.
Once your test has run (notice that the status is now displayed as Pass),
you can analyze the results:
- Select the test by clicking on it in the right-hand pane.
- Select Analzye from the Test Case menu. The WinRunner
Test Results, as shown in Figure 30-3, are displayed.
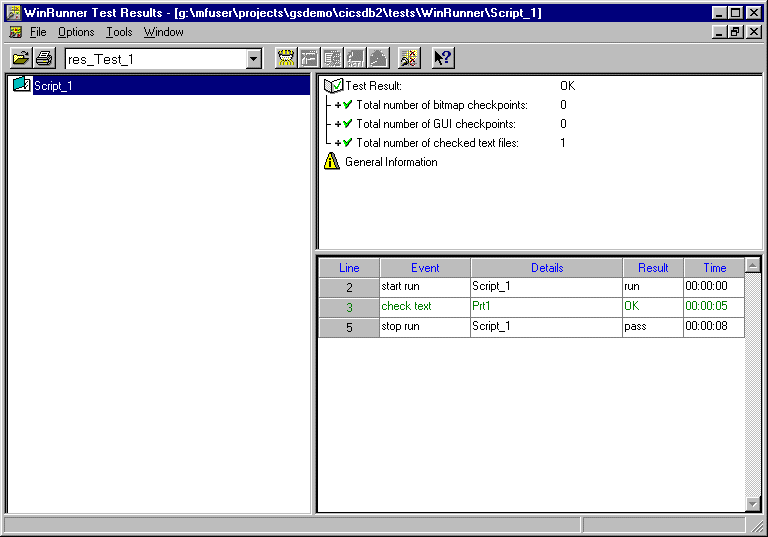
Figure 30-3: WinRunner Test Results
- Notice the check text event. This is highlighted in green to
show that it is successful - as you would expect, as nothing has changed
yet. Double-click on the check text event to display the
Terminal Display dialog box. Note that when a test is run the actual
data is not recorded if it exactly matches the expected data. Click OK
to close the Terminal Display dialog box.
- Close the WinRunner Test Results report by clicking its
button.
Now that the script has been replayed sucessfully you have a baseline
that you can test against, so you can go ahead and make the changes to
your application.
Imagine that you have been asked to update the CICSDB2
application so that the EMPLOYEE LIST screen displays, next to the
employee's date of hire, the day of the year on which that employee was
hired (the figure calculated and stored in WS-JULIAN-DAY by the
FORMAT-DATE section).
- Click the Files tab and then double-click the CDB2PRG4.CBL
program to open the editor.
- Use the Find option on the Search menu to locate the
FORMAT-DATE section.
- Uncomment the second MOVE statement:
MOVE WS-JULIAN-DAY TO WORK-JUL (SUB1)
This will cause the day of the year, held in WS-JULIAN-DAY, to be
displayed on the EMPLOYEE LIST screen.
- Ignore the next four MOVE statements shown below:
MOVE '('                TO WORK-JUL (SUB1) (1:1)
MOVE WS-JUL-DATEN (4:3) TO WS-JULIAN-DAY
MOVE WS-JULIAN-DAY      TO WORK-JUL (SUB1) (2:3)
MOVE ')'                TO WORK-JUL (SUB1) (5:1)
(These statements are used in the tutorial Using WinRunner 2000
and TouchPoint Together.)
- Finally, uncomment the statement
ADD 1 TO DAY-SUB. This
statement is not actually needed, uncommenting it simulates the type of
error that can occur when code changes are made.
- Save and recompile the code by clicking the Compile button
 on the toolbar.
- Close the editor window by clicking its
button.
- Click the Tests tab and run the Test_1(Script_1) test
by selecting it in the right-hand pane of the Tests View and then
selecting Run from the Test Case menu.
As WinRunner 2000 runs, it detects a difference when the list screen
is displayed. Test execution stops and the dialog box shown in Figure
30-4 is displayed:
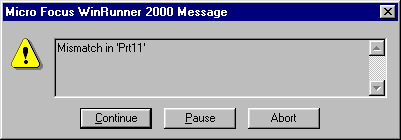
Figure 30-4: WinRunner 2000 Message
- Click the Continue button to continue running the test.
(Clicking on the Pause button returns control to WinRunner
2000 and the cursor is positioned at the line of the script where the
failure occurred. You can continue exeuction by clicking on the Run
from Arrow button  on the WinRunner 2000 toolbar.) You can configure the way in which
WinRunner 2000 behaves when a check_text event fails via the
Tests item on the Options menu. By default, test
execution stops and the dialog box shown in Figure 30-4 is displayed.
If the display of WinRunner messages is disabled, execution will halt
only if Stop when verification fails is enabled.
on the WinRunner 2000 toolbar.) You can configure the way in which
WinRunner 2000 behaves when a check_text event fails via the
Tests item on the Options menu. By default, test
execution stops and the dialog box shown in Figure 30-4 is displayed.
If the display of WinRunner messages is disabled, execution will halt
only if Stop when verification fails is enabled.
- When the test has completed, minimize WinRunner 2000 by clicking its
button and then close
the application:
- Press F3 to terminate the application.
- Press the Esc key.
- Type EXIT and press the right-hand Ctrl key.
- Close the Application Output window by clicking its
button.
The status of the Test_1(Script_1) test is now shown as Fail.
To analyze the results:
- Select the test in the right-hand pane by clicking on it.
- Select Analyze from the Test Case menu. The WinRunner
Test Results, as shown in Figure 30-5, are displayed.
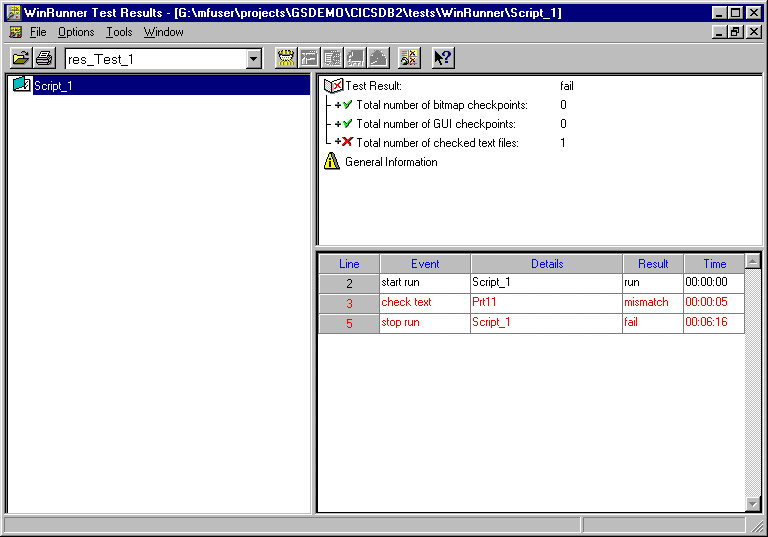
Figure 30-5: WinRunner Test Results
- The check text event is now shown in red to indicate failure.
Double-click on it to display the Check Text Verify Viewer. You
may need to maximize this window to be able to do a full comparison
between the expected and actual data. The Check Text Verify Viewer
is used to compare the expected data with the actual results. At first
glance the data may appear identical but look closely at the day of the
week - in each case the actual data differs by one day. This is the
result of our superfluous
ADD 1 TO DAY-SUB statement.
- Close the Check Text Verify Viewer by clicking its
button.
- Close the WinRunner Test Results window by clicking its
button.
- Click the Files tab and double-click on CDB2PRG4.CBL
to edit it.
- Within the FORMAT-DATE section, comment out the second,
additonal,
ADD 1 TO DAY-SUB statement.
- Re-compile the source code by clicking the Compile button
on the toolbar.
- Close the editor window by clicking its
button.
- Re-run the test by clicking on the Tests tab, selecting the
test and then selecting Run from the Test Case menu.
- When the test has run, minimize WinRunner 2000 by clicking its
button and then
terminate the application:
- Press F3 to terminate the application.
- Press the Esc key.
- Type EXIT and press the right-hand Ctrl key.
- Close the Application Output window by clicking its
button.
- Notice that the status of the test is shown as Pass again.
Review the report by selecting the test and then selecting Analyze
from the Test Case menu.
- The check text event is shown in green to signify an expected
result. Double-click on the check text event - the Terminal
Display dialog box containing the expected data is displayed.
Now that the code has been fixed and re-tested, the tutorial is
complete.
- Close the Terminal Display dialog box by clicking OK.
- Close the WinRunner Test Results window by clicking its
button.
- Close WinRunner 2000 by clicking its
button.
Close the project. If you want to take a break before going on to the
next session, you can close Mainframe Express.
Return to the Tutorials
Map in the chapter Start Here for the Tutorials and
choose which session to go on to next, depending on your interests.
Copyright © 1999 MERANT International Limited. All rights reserved.
This document and the proprietary marks and names
used herein are protected by international law.
| Session Recording |
| Using WinRunner 2000 and TouchPoint Together | |