

| Files and Data Sets | Using Projects | |
This chapter describes the interface of Mainframe Express. It does not present every aspect of the Mainframe Express interface. After reading it, however, you should be able to navigate your way through the most commonly used parts of the interface.
This documentation assumes that you have a basic knowledge of how to use the Windows 95 or Windows NT operating system on your PC. If this is not the case you should read Windows Tips in your Getting Started.
The Mainframe Express window is split into a number of different parts, each with a different function. Depending on the contents of the current project and the configuration options you have selected, not all parts of the interface are visible at all times.
Figure 3-1 shows the Mainframe Express interface.
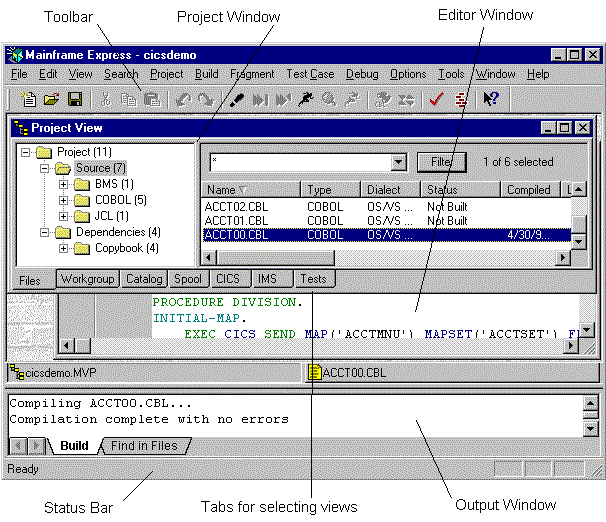
Figure 3-1: The Mainframe Express Interface
The following sections describe the main elements of the interface.
The Project View is the starting point for working with your projects in Mainframe Express. It is usually split into two panes and it presents a number of different views on your project. You switch between the different views by clicking the tabs at the bottom of the Project View.
The possible views are:
Some of these tabs are not available if you have not installed the relevant Mainframe Express options. You can select the same menu options regardless of which view you are using but each view offers different options via popup menus.
When you open a project (.mvp) file, you see the Files View. The Files View comprises two panes: on the left is the Files Tree View and on the right is the Files Details View. The tree view shows the different types of file that make up the current project. Typical entries in the tree view are Source, Dependencies and Data. The Details View shows detailed information about the files of each type shown in the tree view.
The Files Tree View shows all the types of file in your project, graphically represented in a hierarchical tree diagram. For example, at the top of the tree view is Project and all other types of file are items of the Project. One item of Project is Source and typical subitems of Source include COBOL, DBD, MFS and PSB. Each item includes a figure in parentheses, which indicates the number of files in that item, including any subitems. You can expand and collapse your view of items of the tree to see the different types of file that make up your project.
You can use the Files Tree View to specify build settings either for an entire project or for a specific type of file within the project. To do this, right-click the appropriate item. If build settings are available specifically for files of the selected type, click Build Settings for file-type. The settings you change apply only to files of the file-type you selected. If build settings are not available for the type of file you selected, as is the case for Copybook, for instance, the popup menu displays Build Settings for Project. Click this to set build settings for any of the available file types in the project. To change settings that apply to all files in your project, click Project Settings on the Project menu or on the popup menu of any file in the project.
The Files Details View shows all the files of the type you have selected in the Files Tree View. For example, if you have selected the COBOL item in the Files Tree View, the Files Details View lists all COBOL programs. If the selected item in the Files Tree View has subitems, you can also see files of the types specified by the subitems in the Files Details View. For example, if you select the Project item in the Files Tree View you see a list of every source and data file defined in the project.
Only the active version of each source or data file is listed (that is, the version that is found first in the search path, as defined in the Workgroup View). Listing files and load modules - for example, intermediate (.int) and optimized (.gnt) code files - are not listed. However, copybook files that cannot be located in the search path are included. (For more information about search paths, see Workgroup Library Paths, and following sections, in the chapter on Workgrouping.)
For each file, the Files Details View shows some or all of the following information: Name, Type, Dialect, Status, Compiled, Lines, Errors, Warnings, Notices, Location, Level, Options, and Last Updated. You might need to enlarge the pane or scroll it horizontally to see all of these entries. You might also have to adjust the width of the columns to see all of the entries. You can do this by dragging the boundaries of the column headings.
Of particular interest is the Status columns for each source file. There are eight possible entries:
| Status |
Description |
|---|---|
| (No entry) | Up-to-date. The component has been properly compiled and is up to date. |
| No source | There is no source code for the component. |
| Failed | Last compile failed. |
| Unused | A dependency which is not used by any source within the project. |
| Not built | A source component that has not yet been compiled. |
| Out of date | Source, dependency or source's load module has changed since the last compile. |
| Changed | Options have changed since the last compile. |
| Regressed | A source component which is older than the source of the last compile (combined with Out of Date). |
You can use the Files Details View to specify build settings for individual or groups of files:
Right-click the file whose settings you want to change and click Build Settings for filename on the popup menu. The build settings that you subsequently specify override the default settings for files of this type but only for the file you right-clicked.
Select the files whose settings you want to change, right-click and click Build Settings for x files on the popup menu where x is the number of files that you have selected.
The settings that you subsequently specify override the default settings for the files or types of files you have chosen.
For a description of the Workgroup View see the section The Workgroup View in the chapter Workgrouping.
The Catalog View comprises one pane, which shows the properties of all data sets that have been cataloged to Mainframe Express. For each data set, the Catalog View includes information such as organization, format, record length, block size, character set, PC filename and whether or not the data set is cataloged in the mainframe catalog.
To include those data sets which are not cataloged in the mainframe catalog check Show uncataloged datasets; to exclude these data sets, uncheck this again.
You can list the members of a PDS in the Catalog View by double-clicking a PDS entry or by selecting a PDS-name in the field beside Filter.
Catalog entries are listed on the Catalog View. You can modify the list of entries by specifying a filter argument.
The following list shows the information presented by the Catalog View:
| Column |
Description |
|---|---|
| DS Name | MVS data set-name |
| Char | Character set (ANSI (A) or EBCDIC (E)) |
| DSOrg | Data set organization. For more information, see the section Data Set Organizations in the chapter Advanced Data Set Information in your IDE Technical Guide. |
| Recfm | Record format. For more information, see the section Record Formats in the chapter Advanced Data Set Information in your IDE Technical Guide. |
| Lrecl | Logical record length. For more information, see the section Logical Record Length in the chapter Advanced Data Set Information in your IDE Technical Guide. |
| Blksize | Block size |
| Volume | Volume label |
| Cat | Cataloged (yes or no) |
| Crt Date | Date data set was created or last changed in Windows environment |
| Crt Time | Time data set was created or last changed in Windows environment |
| Comp Date | Date data set was compiled (or syntax-checked, for JCL files) |
| Comp Time | Time data set was compiled (or syntax-checked, for JCL files) |
| Chg Date | Date data set was last changed |
| Chg Time | Time data set was last changed |
| Job Crt | Name of job that created the data set (the user ID for files used by Mainframe Express) |
| Job Used | Name of job that last used the data set |
| PC Name | PC filename |
The Spool View shows the properties of spool files that have been created by Mainframe Express. Mainframe Express creates a spool file to show the progress and result of each job run by a project. This emulates the job entry system (JES) facility on the mainframe. You can view the file by double-clicking its entry.
The information displayed for each spool file is as follows:
| Column | Used for | Description |
|---|---|---|
| Job Name | JCL jobs only | Name taken from the JOB statement |
| Job No | All files | Job number - from 1001 for each project |
| Class | All files | Class taken from JOB statement or SYSOUT class |
| Step | SYSOUT files only | PGM job step number - from 001 for each job |
| Proc Step | SYSOUT files only | PROC job step number - from 001 for each job |
| DD Name | SYSOUT files only | Name taken from DD statement or ALLOCATE command |
| Lines | All files | Number of lines in the spool file |
| User Id | All files | The user ID defined for Mainframe Express on this PC |
| Crt Date | All files | Creation date for this file |
| Status | All files | The status of jobs submitted to the mainframe |
Click View System Log to see the log file that Mainframe Express maintains to record all jobs run by a project. Click Reset System Log to delete this log file; a new file is created when you next run a job.
Note: You can also submit jobstreams for running on the mainframe and view the resulting spool output files in the Spool view. See the section Running a Job on the Mainframe in the chapter JCL Support.
The Tests View displays all the project tests that you have created using either TouchPoint or, if you have it installed, WinRunner 2000. The Tests View comprises two panes: on the left is the Tests Tree View and on the right is the Tests Details View.
The Tests Tree View represents the structure of the project's test suite:
All the tests that have been created for a project are displayed in the Tests Details View when Project is selected in the Tests Tree View. The figure in parentheses indicates the total number of tests that exist for the project.
All the application tests that have been created for a project are displayed in the Tests Details View when Open Code Fragments is selected in the Tests Tree View. The figure in parentheses indicates the total number of application tests for the project.
In addition, in the Tests Tree View, any open fragments that you create are listed under this heading, together with the module that they are defined in.
All the fragment tests that have been created for a project are displayed in the Tests Details View when Closed Code Fragments is selected in the Tests Tree View. The figure in parentheses indicates the total number of fragment tests for the project.
In addition, in the Tests Tree View, any closed fragments that you create are listed under this heading.
For a description of the CICS View see the section CICS View in the chapter The CICS Option Interface.
For a description of the IMS View see the section IMS View in the chapter The IMS Option Interface.
Mainframe Express initially displays all relevant entries, whichever tab you select in the Project view. For example, if you select the Project item in the Files Tree View, the Files Details View shows all files defined in your project. There may be times, however, when you do not want to display all entries, when you are interested only in a subset of the available entries. Mainframe Express enables you to filter out any entries you do not want to see for most of the different views available in the Project View.
In all but CICS View and IMS View, the Project View contains a Filter button. To the left of this is one or more fields that you can use to specify the entries in which you are interested. The fields displayed alongside Filter vary depending on the current view. For example, the Files View includes one field that enables you to specify filenames, while the Spool View includes fields for user ID, job name and job number. Regardless of the number of fields, clicking Filter filters the right-hand pane of the Project View so that you see only the entries that fit the masks specified in the field(s) to the left of Filter.
In each field, you can use the wildcard character (*) to specify any number of valid characters.
In addition to the Project View and the main editing window, Mainframe Express makes use of a number of other windows. The following sections describe the function of some of these peripheral windows and how to hide or show them.
Mainframe Express uses the Output window to display any output it creates when working with your projects. By default, you see the Output window near the bottom of the Mainframe Express window, although you can move and resize it to any position and shape you require, or even hide it completely.
To view the line of code responsible for an error message in the Output window, you can either:
You can display help about this error message from the popup menu.
The tabs toward the bottom of the Output window determine the information that the Output window presents. For example, if you select:
Mainframe Express uses the Application Output window to display the output from all programs. The window's title bar changes to describe the type of program you are running. For example, 'Mainframe Express TSO Emulation' and 'JCL Execution - job name'. As with the Output window, you can move, resize or remove the Application Output window.
Mainframe Express only displays the Application Output window when it is needed, but if you display it explicitly when it is not required, it contains the message "Application output window unavailable". Once it has been displayed you can review any messages when the application has finished.
You can select items in this window and copy them to the Windows (system) clipboard by:
You can paste text from the clipboard into the Application Output window by right-clicking in the Application Output window and choosing Edit > Paste on the popup menu.
To specify whether or not a window such as the Output window is displayed, click Dockable Windows on the View menu. Then check or uncheck the name of the relevant window on the Dockable Windows menu and the display state of that window is toggled.
Alternatively, if you want to hide a window that is currently displayed, right-click in the window and click Hide on the popup menu displayed.
For information on other options available to help you configure the Mainframe Express interface, see the chapter Customizing Your Environment.
Copyright © 1999 MERANT International Limited. All rights reserved.
This document and the proprietary marks and names
used herein are protected by international law.
| Files and Data Sets | Using Projects | |