

| Baselines | Revolve and Mainframe Express Integration | |
This chapter covers TouchPoint's analysis and reporting features.
For each test, a set of output variables (or target variables) is defined. The contents of these variables are studied to ensure that the code has behaved correctly. The value of each target variable is stored when the test is executed. When the test is complete, the contents of the target variables can be viewed and analyzed manually.
For fragment tests, where validation criteria have been defined, the status of a test can be either pass (the validation criteria have been met) or fail (the validation criteria have not been met).
For application tests, and fragment tests where baseline comparison has been specified, the recorded values of the output variables (the baseline) are compared to the values produced when the test was run. The status of the test can be either pass (the values are the same) or fail (the values are different).
For a fragment test you can specify both baseline comparison and validation criteria.
Overall, therefore, the status of a test can be:
Validation criteria were met and all data matched.
The validation criteria were not met or all the data did not match (or both).
In addition to TouchPoint's analysis features, a number of reports can be generated from within the IDE using the information held in the TouchPoint database. This information can be output to an Access database or to an ordinary text file.
Text reports can be tailored to show varying levels of detail.
A number of Access reports are provided enabling you to extract the precise information that you are interested in from the database. If you have Microsoft Access installed, these reports can be extended, or customized.
You can analyze test results by selecting the test and then selecting Analyze from the Test Case menu.
For a fragment test, the results are displayed in the Analyze Fragment Test dialog box, illustrated in Figure 24-1.
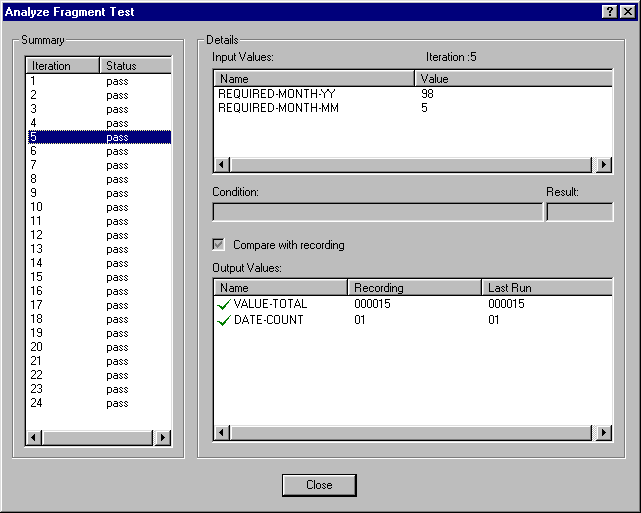
Figure 24-1: Analyzing Fragment Test Results
In the left-hand pane, a status is displayed for each iteration:
The iteration status is shown as pass if you have specified validation criteria and those criteria have been met or, you have specified baseline comparison and the output variable values recorded in the baseline for this iteration match those produced by the most recently run test. If you have specified validation criteria and baseline comparison, both must result in a status of pass for the overall iteration status to be pass.
If either the validation criteria are not met or the value recorded for an output variable during this run does not match the baseline value recorded for it, the status of the iteration is marked as fail.
Overall, a test is deemed to have failed if any single iteration returns a status of fail.
You can select an iteration by clicking on it in the left-hand pane. For the currently selected iteration the values of any input variables are displayed in the top right-hand pane and, in addition, the following information is displayed:
For an application test, selecting Analyze from the Test Case menu displays the Analyze Application Test dialog box illustrated in Figure 24-2.
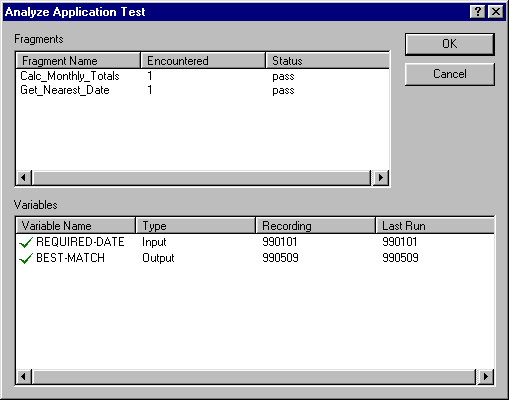
Figure 24-2: Analyzing Application Test Results
For each fragment, the number of times the fragment was encountered and the status of the test (either pass or fail) is displayed.
For each input and output variable, both the recorded baseline value and the value recorded when the test was last run are displayed.
Note: If you have WinRunner 2000 installed, the Analyze Script button enables you to inspect the WinRunner 2000 test results. As this option is only available with WinRunner 2000, it is not documented here. See your Getting Started for details.
You can create and print a report on a test by selecting the test and then selecting Report from the Test Case menu. The following options are offered:
Select Into Access from the Report option on the Test Case menu to create an Access database, TPoint_n.mdb, (where n is incremented for each database created) in the current project directory. The Generate Access Report Data dialog box illustrated in Figure 24-3 is displayed.
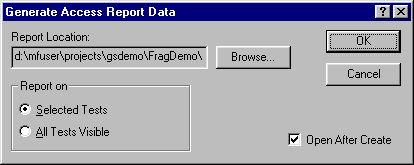
Figure 24-3: Access Report
Note: You should be aware that each Access database created is approximately 500 kilobytes in size.
You can change the name and location of the Access database by clicking on the Browse button.
You can select to generate information on all the tests that are visible in the Project View or only on those that are currently selected by clicking on the appropriate radio button.
Check Open After Create to view the database once it has been created.
A number of Access report macros are provided. These are displayed, as illustrated in Figure 24-4, when you open the Access database.
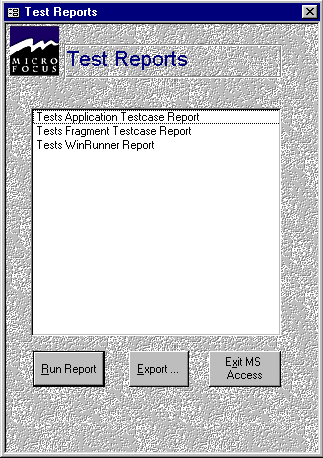
Figure 24-4: Access Reports
From here you can generate a report by selecting it and clicking Run Report, exit Access by clicking Exit MS Access or by clicking on Export, export the information held in the database to:
Select As Text Summary from the Report option on the Test Case menu to create a text file, TPoint_n.rep, (where n is incremented for each report created) in the current project directory. The Generate Text Summary Report Data dialog box is illustrated in Figure 24-5.
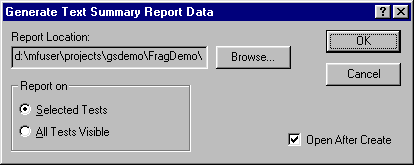
Figure 24-5: Text Summary
You can change the name and location of the report file by clicking on the Browse button.
You can select to generate the report on all the tests that are visible in the Project View or only on those that are currently selected by clicking on the appropriate radio button.
Check Open After Create to view the report once it has been created.
The information contained in the report is basically the same as that displayed in the Project View, that is, the name, type, status, last updated and last run details for the test(s).
Select As Text Detail from the Report option on the Test Case menu to create a text file, TPoint_n.rep, (where n is incremented for each report created) in the current project directory. The TouchPoint Report Details dialog box is illustrated in Figure 24-6.
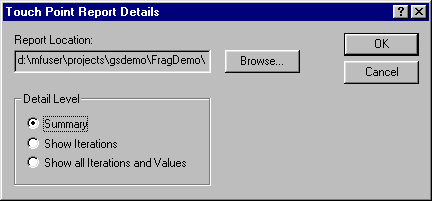
Figure 24-6: Text Detail
You can change the name and location of the report file by clicking on the Browse button.
You can select to generate a report containing:
A summary of the selected tests is written to the report file.
Summary information plus the status of each iteration for selected fragment tests is written to the report file.
The value of each input and output variable (for each iteration or each encounter) is written to the report file.
Copyright © 1999 MERANT International Limited. All rights reserved.
This document and the proprietary marks and names
used herein are protected by international law.
| Baselines | Revolve and Mainframe Express Integration | |