

| Initial Values | Baselines | |
This chapter describes the different types of test you can create using TouchPoint.
You can use TouchPoint to create two different types of test:
Once you have created your fragment(s) and recorded your initial values, you can create a fragment test.
A fragment test is created for a single, closed fragment and uses a single set of initial values. You specify values for the fragment's input variables and the number of values you supply for each input variable determines the number of times the fragment is executed (the number of iterations). At the start of each iteration the initial values are loaded and all data items other than those defined as input variables are reset to their original state using the initial values.
At the end of each iteration the value of each data item defined as an output variable is recorded.
An application test is created for one or more, open or closed fragments and is run by executing the entire application.
The value of each data item that you have defined as either an input or output variable is recorded when the test is run. A fragment may be executed more than once during application execution - a value is recorded each time the fragment is executed.
You cannot create a fragment test until you have defined your fragment(s) and generated some initial values.
To create a fragment test, select New from the Test Case menu. The dialog box shown in Figure 22-1 is displayed.
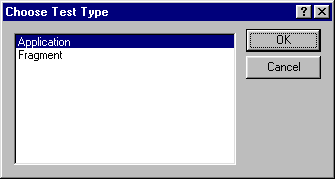
Figure 22-1: Selecting the Type of Test
Note: If you have installed WinRunner 2000, a third option WinRunner Script is available.
Select Fragment from the Choose Test Type dialog box and click OK. The dialog box shown in Figure 22-2 is displayed.
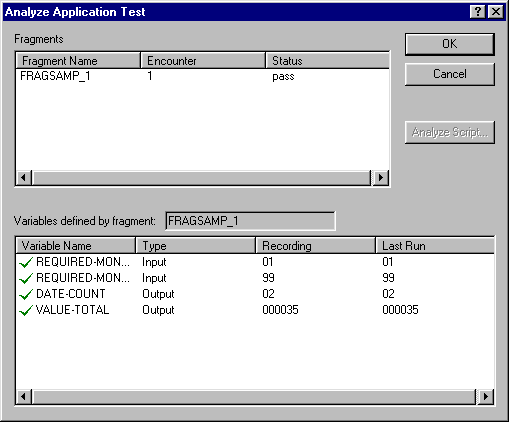
Figure 22-2: Creating a Fragment Test
Enter a name and a description for the test. Make these as meaningful as possible so that you can recognize the test from its name and description when it is displayed within a list of tests.
Each fragment test can cover only one fragment. You must select which fragment this test covers by selecting the fragment name from the drop-down list. Once you have selected the fragment, click Next.
Note: If the fragment you select ends on a statement that may
not be executed when the fragment test is recorded or run (for example,
the ELSE clause of an IF, ELSE, END-IF construct), a warning
message is displayed if the statement is not executed when the fragment
test is recorded. You can choose to ignore this warning and record the
test data or you can choose to ignore any test data. In this case, "not
encountered" is displayed in place of the test data at the analysis
stage.
You are prompted to select the initial values that you want to use, as illustrated in Figure 22-3.

Figure 22-3: Selecting the Initial Values
Only those initial values that are associated with the chosen fragment are listed. You can only use one set of initial values per test. Select the initial values that you want to use from the drop-down list or click Import Initial Values to import an initialisation file and then click on the Finish button to create the fragment test.
The fragment test worksheet is displayed, as illustrated in Figure 22-4, enabling you to enter values for the input variables that you defined for the fragment.
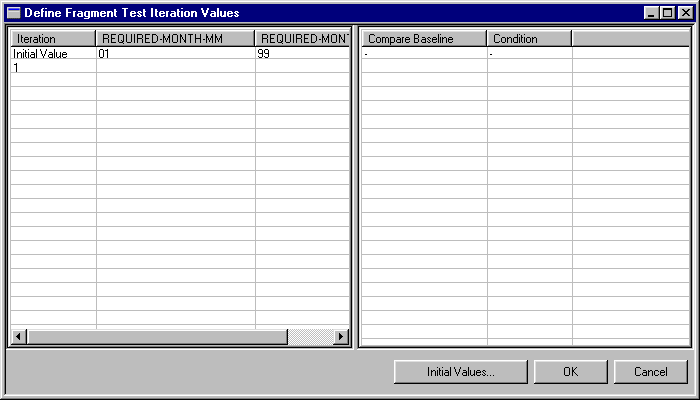
Figure 22-4: Fragment Test Worksheet
For each iteration of the test that you want to perform, enter a value for each of the input variables that you defined. This means that the first time the test is run, the data items that you have specified as input variables are given the values that you specify here for iteration 1. All other data items are given the initial values that you have selected for this test (the initial values of the input variables are displayed at the top of the worksheet). The second time the test is run, the values you define for iteration 2 are used for the input variables but all the other data items again use the initial values.
You can enter a single value for an input variable by double-clicking on the appropriate table cell:
![]()
Figure 22-5: Entering a Single Value
By right-clicking on the appropriate table cell you can specify input variable values using any of the following methods:
You can enter a range of values by specifying a start value and an end value. Right-click and select Range to display the dialog box shown in Figure 22-6.

Figure 22-6: Entering a Range of Values
Enter a start value, an end value and a step size (the value added to each number in the range to produce the next number).
You can specify an incremental value to be applied a set number of times to the initial value of an input variable by right-clicking and selecting Increment to display the dialog box shown in Figure 22-7.
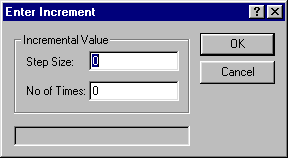
Figure 22-7: Entering Incremental Values
Enter the incremental value and the number of times it is to be applied to the initial value.
You can specify dates as input variable values by right-clicking and selecting Date to display the dialog box shown in Figure 22-8.

Figure 22-8: Entering Date Values
You can specify a single date, or a range of dates. In addition, you can select the date format from the drop-down list box. For a range of dates, you can specify an incremental value in years, months and days.
You can specify a variable value import (.vvi) file that is used to supply input variable values as the test is run, as illustrated in Figure 22-9.
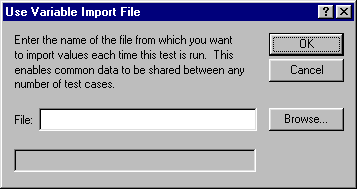
Figure 22-9: Specifying a Variable Import File
This enables multiple tests to use the same file (and therefore the same input variable values).
You can import input variable values from a variable value import (.vvi) file by right-clicking and selecting Import values. Select the appropriate file from the file selection dialog box.
From the worksheet you can also export input variable values to a .vvi file (all currently defined input variable values are exported) by right clicking on any cell within the worksheet.
Note: A number of .vvi files are supplied with TouchPoint in the \mfe\mfide\bin directory.
If you make a mistake when entering input variable values, you can delete a value by right-clicking on the appropriate table cell and selecting Delete from the context menu. You can also use the context menu to cut, copy or paste values.
When you run a fragment test you can choose to compare the value of any output variable with the value recorded in the baseline. If you choose to compare baseline values the test is deemed to have failed if any two output variable values do not match. Baseline comparison is switched on by default but you can toggle it off (or on again) by double-clicking in the appropriate cell.
You can also edit baseline values by right-clicking in the appropriate cell and selecting Edit baseline. This feature can be used to edit baseline values after they have been recorded, or to enter them directly in order to create a set of "expected results" for conformance testing.
For each iteration of the test that you want to perform, you can specify validation criteria to be applied to it. Any valid COBOL condition can be specified as a validation criterion. To enter a COBOL condition, right-click in the appropriate cell in the Condition column and select Edit. The dialog box shown in Figure 22-10 is displayed.
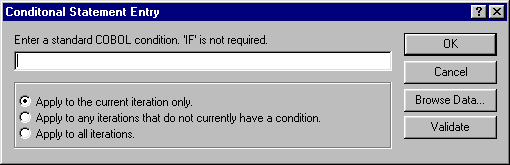
Figure 22-10: Define Validation Criteria
Click on the Validate button to check that the syntax of your COBOL condition is valid.
Click on the Browse Data button to display a list of all the data items in the Working-Storage Section.
You can delete a condition by right-clicking in the appropriate cell and selecting Delete.
If the fragment you have defined ends with an IF statement, you can click Record the result of the final IF statement in order to test whether the condition is TRUE or FALSE for each iteration. The information is displayed via the Analysis dialog box.
You can alter the set of initial values used by the fragment test by clicking on the Initial Values button.
You cannot create an application test until you have defined your fragment(s).
To create an application test, select New from the Test Case menu. The dialog box shown in Figure 22-11 is displayed.
Figure 22-11: Selecting the Type of Test
Select Application from the Choose Test Type dialog box. The Define Application Test wizard is invoked and the dialog box shown in Figure 22-12 is displayed.
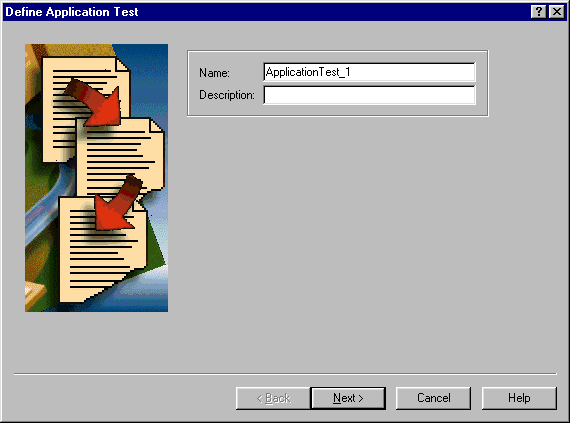
Figure 22-12: Define Application Test
Enter a name and a description of the application test and then click Next to display the Define Application Start Parameters dialog box.
The Define Application Start Parameters dialog box is illustrated in Figure 22-13.
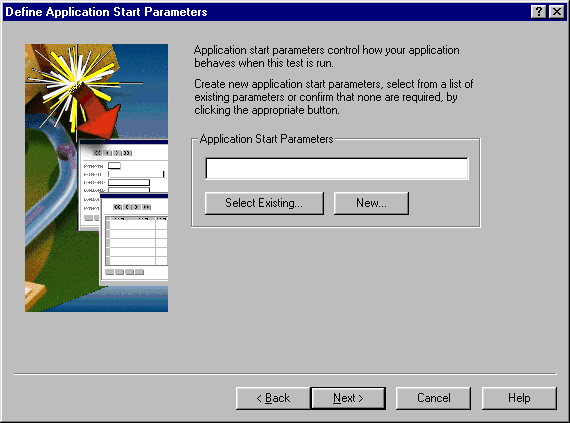
Figure 22-13: Define Application Start Parameters
From here you can specify the start parameters required to run the application. You can specify new start parameters or select from a list of existing parameters by clicking Select Existing.
Once you have defined, or selected, your application start parameters, click Next to display the Select Fragments dialog box.
The Select Fragments dialog box is illustrated in Figure 22-14.
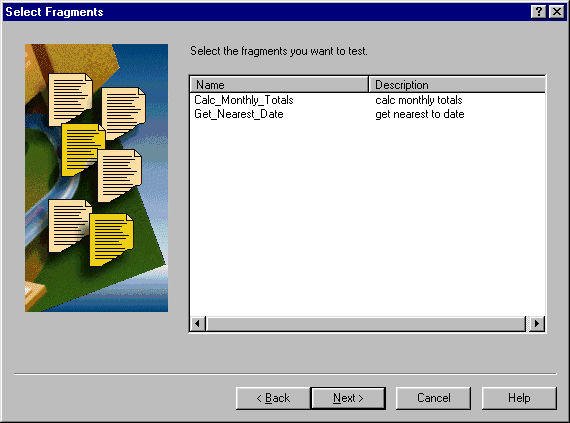
Figure 22-14: Select Fragments
Select one or more fragments and click Next.
If you have WinRunner 2000 installed you will be offered the opportunity to select a WinRunner 2000 script. As this feature is only available with WinRunner 2000, it is not documented here. See your Getting Started for details, or click on the Help button.
Finally, all the details you have entered are displayed. You can use the Back button to go back and change any of these. When you are happy with your selections, click Finish to create the application test.
Once you have created a test, you can record baseline values for each of its output variables. Then, later, when you have made changes to your code, you can run the same test again and compare the new results with the baseline. This is the essence of regression testing.
To record baseline values for a test, select the test and then select Record from the Test Case menu.
The test is run and values are recorded for the output variables.
As the test is run, information is displayed in the Build tab of the Mainframe Express Output window. The amount of information displayed is configurable via the Tests item on the Mainframe Express Options menu.
For a fragment test, output variable values are recorded for each iteration of the test. When all iterations have been run, a message is displayed indicating that the recording is complete.
For an application test, output variable values are recorded each time the fragment is encountered.
Note: Display of the message box indicating that recording is complete is configurable via the Tests item on the Mainframe Express Options menu.
If you click on the Tests tab on the Project View, you will see the date and time at which the baseline was recorded under Last Update.
After you have made fixes to your code, you can perform regression testing on your application by running the tests for which you have recorded baseline values. This enables you to compare the new output variable values with the baseline values and so spot any areas where your application is producing different output variable values.
For conformance testing, you can validate each iteration of a fragment test against the validation criterion that you have specified by running the test. Or you can validate each iteration against "expected" values that you have created by editing the default baseline.
To run a test, select Run from the Test Case menu.
As the test is run, information is displayed in the Build tab of the Mainframe Express Output window. The amount of information displayed is configurable via the Tests item on the Mainframe Express Options menu.
For a fragment test the value of the output variables is recorded for each iteration. In addition, any COBOL conditions that you have specified are validated. For an application test the value of both input and output variables is recorded each time the fragment is encountered.
You can run more than one test, simply hold down the Ctrl key, click on each test that you want to run and then select Run from the Test Case menu).
You can halt a test (or a series of tests) by selecting Stop from the Test Case menu.
If you click on the Tests tab, you will see the date and time at which the test was last run and the test status.
You can watch a fragment test as it runs by selecting the test and then selecting Debug from the Test Case menu.
This enables you to execute each iteration separately and to see the value of each input and output variable at the end of each iteration.
The source code is displayed in an edit window so that you can see the code fragment as the test is run.
When you select Debug from the Test Case menu, the TouchPoint toolbar, shown in Figure 22-15, is enabled.
![]()
Figure 22-15: TouchPoint Toolbar
The TouchPoint toolbar enables you to:
These functions are also available from the Fragment option on the Test Case menu.
Input and output variable values are displayed in the Run Iteration dialog box shown in Figure 22-16.
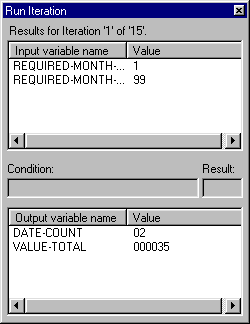
Figure 22-16: Run Iteration Dialog
If an exception is encountered whilst running the iteration, execution stops and the error is reported.
Copyright © 1999 MERANT International Limited. All rights reserved.
This document and the proprietary marks and names
used herein are protected by international law.
| Initial Values | Baselines | |