Use IMS Option to include an IMS application in a Mainframe
Express project. You can compile, edit and debug your IMS application in
an IMS environment on your PC.
You need to have read the chapter Start
Here for the Tutorials and worked through the first session,
Using
Mainframe Express, before you do this session.
You need to have installed IMS Option to do this session. We assume you
are familiar with IMS on a mainframe.
This session takes you through maintaining and running an IMS
application on your PC.
The demo application used in this session is a simple IMS application
that you might have downloaded from a mainframe. In this session, you get
it working on your PC. You create a transaction called MFDEMO, which
captures and maintains data for a table.
If you have closed Mainframe Express, open it as before. If any project
window or other windows are open, close them.
In this session you:
To create the project:
- Click New on the File menu, then select Project
on the New dialog box and click OK.
- Enter imsdemo as the name of the project and change the name
of the Project Folder to x:\mfuser\projects\gsdemo\imsdemo,
then click Next.
- Ensure that Using this wizard is selected and
click Next.
- Leave the default folder for the catalog unchanged and click Next.
You now get a page asking which of the installed options this
project uses.
- Ensure that only the IMS check box has a check mark, and click Next.
- Click Finish.
To add your files to the project:
- Click Add Files on the Project menu.
- In the Add Files to Project dialog box, open the folder \mfuser\projects\gsdemo\imsdemo\source.
Ensure the Files of Type field is set to Source Files.
- Click Add All, then click Yes on the confirmation
message.
The files are added to the project.
- Click Done.
To build the project:
- Click Build on the Build menu.
As you saw in the chapter Using Mainframe Express, the
correct compiler is automatically called for each source file - in
this case, for the COBOL, DBD, MFS, and PSB files.
The build finishes with "Build finished with no errors".
In the chapter Using Mainframe Express we saw how the tabs at
the bottom of the project window give you different views on the project.
For example, the Files View shows the types of the files in the project.
Because our present project is an IMS project, it has an extra view, the
IMS View.
- Click the IMS tab at the bottom of the project view.
The IMS view has, in the left-hand pane, a tree view which you can
use to select what the right-hand pane shows. Initially no entry is
selected, so the right-hand pane is empty.
- Click Transactions on the left-hand pane.
The right-hand pane now lists all the transactions in the
application. Initially, there are none.
You have to define a transaction for any program you want to run. To
define a transaction:
- Right-click on the right-hand pane and click Add New Entry on
the popup menu.
The Transaction Codes dialog box appears.
- Enter the following (leave the remaining fields unchanged), and click
OK.
| Program Type |
MPP |
A program run when its
transaction code is entered. |
| Trancode Name |
MFDEMO |
The transaction ID you
enter to run the program. |
| PSB Name |
DEMO001T |
The PSB Name associated
with the program DEMO001T. |
| Program Name |
DEMO001T |
The name of the program
you want to debug or run. |
| Process Limit Count |
99 |
Any value greater than
zero is allowed. |
An entry for transaction MFDEMO appears in the list in the
right-hand pane.
A database must be Zeroloaded before an application can issue calls
against it. To do this you can either Zeroload or Load the database using
the IMSDBU database utility. A Zeroload creates the physical files and
initializes them, creating an empty database. A Load consists of two parts
- first the database is Zeroloaded, and then data is Loaded into the
database. This is useful if you want to include data in your database or
if you want to reset your database after testing.
We will Zeroload a database:
- Click IMS on the Tools menu, then click Database
Utility on the popup menu.
The IMSDBU Database Utility window appears. It lists the database
functions available, and the keys to invoke them. Across the bottom of
the window are listed the keys you use to control the utility.
- Press F2.
This displays a list of the databases in the project. There are two
- DEMO03DD and TEST01DD.
- Make sure the cursor is just to the left of DEMO03DD, then
type S (for Select) and press Enter.
The list disappears. The Database field on the IMSDBU window is now
set to DEMO03DD.
- Type Z and press Enter.
- Press Enter again to confirm you want to zeroload DEMO03DD.
Messages appear, showing the Zeroload starting and successfully
completing.
- Press Enter to return to the main screen, then press Escape
to exit the Database Utility.
To run the program for which you defined the transaction MFDEMO:
- Click Run on the Debug menu.
- Select the IMS tab, and enter MFDEMO in the Command
or transaction code field.
Once you enter a trancode or command, it will be remembered so you
can select it from the drop-down list in the future.
- Click OK.
The Application Output window appears. The application displays its
first screen there.
You can also click the Debug menu. You will see that Stop
Debugging is enabled, while Start Debugging and Run
are not. This shows that an application is running. (To close the menu
again without executing a function, click on some neutral space.)
In the following, the Application Output window must be selected,
that is, in front of the others (also known as "having focus"),
so that keystrokes are directed to it and not to some other window. It
should be automatically selected when it appears, but if in doubt
click in it with your mouse.
We will use this transaction briefly, to add a table to the DEMO03DD
database.
- Type A (for Add) as the Function Code and TESTDEPT as
the Table-ID, and press Enter.
- On the screen now displayed, enter the data shown in the following
table. The left-hand column gives the name of each field, as displayed
on the screen, and the right-hand column shows what you should type. You
can use Tab to move the cursor to the next field, and Shift+Tab
to move to the previous field. After you have finished, the window
should look as in Figure 24-1. Then press Enter.
| Field: |
Data you should enter: |
| DESCRIPTION |
A TABLE OF SOFTWARE TESTERS |
| NUMBER OF CHARACTERS IN
ELEMENT KEY |
20 |
| NUMBER OF CHARACTERS IN
ELEMENT |
50 |
| PASSWORD PROTECT |
N |
| ELEMENT KEY |
FRED SMITH |
| ELEMENT VALUE/DESCRIPTION |
IMS DC TEST TECHNICIAN |
| ELEMENT KEY |
JANE JONES |
| ELEMENT VALUE DESCRIPTION |
IMS DB TEST TECHNICIAN |
| CONTINUE |
X |
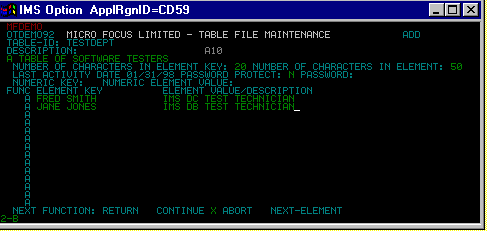
Figure 24-1: The "Add Table" Screen in Transaction
MFDEMO
The Add Table screen appears again ready for you to add another
table. We will not add another.
- Tab to the RETURN field at the bottom of the screen, and type X.
Then press Enter.
The transaction's main screen appears again.
- Type E (for End) as the Function Code and press Enter.
This exits from the transaction, and the Application Output window
shows a screen with a cursor and a message saying MFDEMO has ended. If
you wanted to run another transaction, you would enter its name here.
- Type /RCL and press Enter.
This exits from IMS. The Application Output window is cleared.
You can leave the Application Output window visible, as the next
section uses it as well.
To debug the program for which you defined the transaction code MFDEMO:
- Click Start Debugging on the Debug menu.
- Select the IMS tab, and ensure MFDEMO is still in the
Command or transaction code field.
- Click OK.
You see the same things happening on your screen as when running the
application, but in addition a source view window appears, showing the
source of DEMO001T, the main program invoked by the MFDEMO
transaction. The application has not yet displayed its first screen in
the Application Output window, because execution is paused at the
first COBOL statement of the application.
- Click
 a few times.
This demonstrates that you single-step an IMS application in the
same way as any other. All the same debugging features are available
for an IMS application as for any other application. We will not debug
this application further, but will simply complete the run.
- Click
 .
.
The transaction runs without debugging, and the first screen is
displayed. We will not use this transaction further.
- Type E as the Function Code and press Enter.
This exits from the transaction, and the Application Output window
shows a screen with a cursor and a message saying MFDEMO has ended.
- Type /RCL and press Enter.
This exits from IMS. The Application Output window is cleared.
You can leave the Application Output and source view windows open
during the next section.
There are several configuration options you can set, including several
for trace options to help in debugging. We will set some trace options.
To configure IMS:
- Right-click IMS System in the left hand pane of the IMS View
and click Properties.
The IMS System Configuration dialog box appears. It displays the
configuration functions available as tabs across the top with the
General Options page in view.
- Click the DL/I Trace tab.
- Select the boxes DB PCBs, I/O PCBs, SSAs,
PCB Area, I/O Area, Call counts and Call
timing.
- Click OK to return to the IMS View.
When you run or debug a transaction with these options set, an
additional view, the DLI Trace View, appears in the Output window, to
display trace messages.
Close the source view window and hide the Application Output window.
Close the project. If you want to take a break before going on to the
next session, you can close Mainframe Express.
Return to the Tutorials
Map in the chapter Start Here for the Tutorials and
choose which session to go on to next, depending on your interests.
Comments on the books? Click Send Us Comments.
Copyright © 2001 Micro Focus International Limited. All rights reserved.
This document and the proprietary marks and names
used herein are protected by international law.