Figure 35-1: The Files View for an IMS Project
This chapter describes how to use the Mainframe Express IDE to access the functions available with the IMS Option component of Mainframe Express. The IDE enables you to create, compile and test your IMS applications using the IMS Option interface. From within the IDE you can:
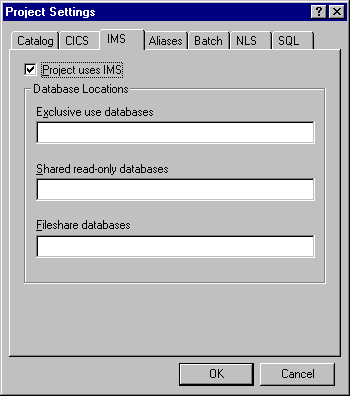
To be able to use the IMS Option interface to the IDE you must have created a project that uses IMS. Alternatively you can click Project uses IMS on the IMS page on the Project Settings dialog box, for a project that is open in the IDE.
The Files View of the IDE for an IMS project looks the same as the Files View for any other Mainframe Express project. You display it by clicking the Files tab in the Project View - see Figure 35-1.

Figure 35-1: The Files View for an IMS Project
The functions available from the Files View are the standard functions of the Mainframe Express IDE. From the tree view in the left-hand pane you can add files to the project and specify the build settings for the project. From the file list in the right-hand pane you can edit application program source files, specify build settings for individual files and compile source files.
The IMS View of a project lets you define IMS resources and manipulate these resources. You display the IMS View by clicking the IMS tab in the Project View - see Figure 35-2.

Figure 35-2: The IMS View
The IMS View comprises two panes: on the left is the IMS Tree View and on the right is the IMS Details View. The IMS Tree View shows the DBD Gens, MFS Gens, PSB Gens, Transactions, Printers and DB Catalog for which you can view, create and change entries. The Details View shows the entries that are in the item selected in the IMS Tree View, in this case the PSB Gens.
The IMS Details View is initially empty but, when you select an item in the IMS Tree View, it shows the entries that are contained in that item.
From the details view, you can create, copy, edit and delete entries by right-clicking the entry and selecting the appropriate item on the popup menu. For example, if you right-click a DBD Gen member the following popup menu is displayed.

Figure 35-3: The IMS Details View Popup Menu
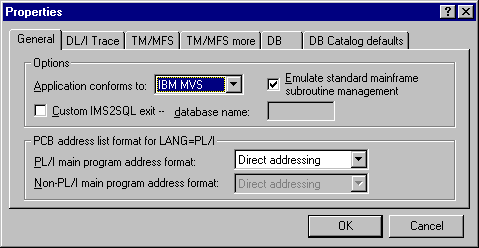
You can access the configurable properties by right-clicking on IMS System in the left hand pane of the IMS view (see Figure 35-2), then clicking Properties to see the dialog box shown in Figure 35-4. Further information is provided in the dialog box's context help.

Figure 35-4: The IMS System Configuration Interface
You can access the IMS Tools menu by clicking IMS on the Tools menu of the IDE. This menu enables you to access the Database Utility, test your database remotely or perform a trace print. (See Figure 35-5)

Figure 35-5: The IMS Tools Menu
Each of these facilities is described in the following sections.
The IMSDBU Database Utility is an interactive text interface shown in Figure 35-6.

Figure 35-6: The IMS Database Utility Menu
This menu uses the keyboard for input and produces text-based (character) output. Across the bottom of the screen there is a list of keys that you can use to control the utility.
The Remote IMS test is used to test the Remote IMS communications link to IMS/ESA without actually accessing an IMS/ESA database.
You see a progress report on the Remote Test page.
You can use the IMS Trace Print dialog box (shown in Figure 35-7) to specify a trace print input filename or accept the default name. The default is specified in Trace output options on the DL/I Trace page on the Configuration dialog box. You can also set the trace output file options or accept the default values. Click OK to run IMSPRINT.

Figure 35-7: The IMS Trace Print Dialog Box
When you debug an IMS application, the Start debugging dialog box (displayed by clicking Start Debugging on the Debug menu of the IDE) contains an IMS tab. You can specify a command or transaction code on this page. See the chapter Developing IMS Applications in this User's Guide for information about debugging IMS applications.
The section describes those parts of the Project menu that are specific to IMS. The general features of the Project menu are described in the chapter Using Projects.
Note: You only need to add the main source files to a project as the associated copybook files are automatically picked up when you build your project. These copybook files should be located in one of the project's dependency folders, (the default is <Project Folder>\COPYLIB). However, before you add files to a project, check that the correct copybook extension is specified on the Extension page of the General tab on the Project Settings dialog box. If the extension that you are using is not specified, you can add it to the list using the Add function.
You can access the project settings for the current project and specify the directory path to the Exclusive use databases, Shared read-only databases and the Fileshare databases.

Figure 35-8: The Project Settings Dialog Box
You can change the build settings for your project using the IMS specific tabs: MFS, PSB and DBD. Click these tabs and, where relevant, specify values on the General and Advanced pages.
Copyright © 2001 Micro Focus International Limited. All rights reserved.
This document and the proprietary marks and names
used herein are protected by international law.