

| Finding Points of Interest | Customizing Analysis Tools | |
In this session, you use the worksheet to list all the points of interest, together with analysis details.
Please see the Tutorials Map to check that you have run all necessary previous sessions.
The worksheet looks like a spreadsheet, but in fact is a database that contains all the POI's you've found, together with comments about them. You can populate the worksheet from sets created using the analysis tools, or from the result sets of other browsers and tools in Revolve Enterprise Edition. When fully populated, it serves as a list to guide you or other programmers in what needs to be changed and how and why. You can categorize entries to help break up and size the problem. You can also produce reports from it, so that you can track the work and produce estimates of the work involved in the planned update.
This session uses the project you created in the chapter Finding Points of Interest.
To check that the settings of the worksheet are as required for this session:
This creates and opens the worksheet for the Order project. It is empty at the moment.
All the chapters in this book assume that you have this setting.
In the chapter Finding Points of Interest, you created a set of POI's called "Potential monetary data items". To add this set to the worksheet:
This set contains 109 data items.
Check the Notes checkbox and type a new note in the lower entry field - for example, "Potential monetary data item".
The 109 data items in the set are added to the worksheet, as shown in Figure 5-1.
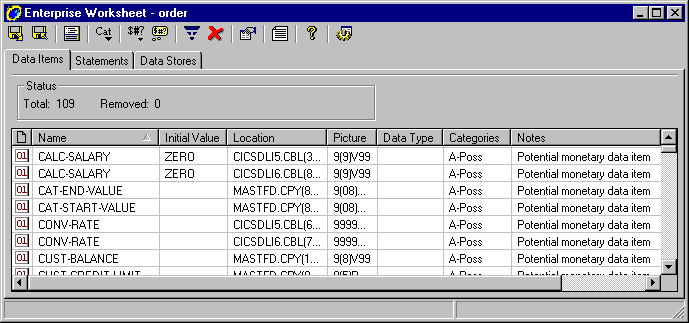
Figure 5-1: Worksheet
Before continuing, take a look at some of the features of the worksheet:
Notice that a count of 109 data items shows in the information bar towards the top of the worksheet.
This displays the source view in the bottom pane, as it did in the Set View, so that you can explore the source in the same way.
In the chapter Finding Points of Interest, you created a set of called "Monetary constants". To add this set to the worksheet:
This set contains 66 data items.
Some of the entries are gray. These are entries that are already in
the worksheet. All statements are in black, because they are not yet
in the worksheet, but only two data items are black. One of them looks
like it could be a monetary item: VAL-P-AND-P-LIMIT.
This item was not originally found as a potential monetary item,
because it is only two digits long and the minimum size searched for
was four digits (in the section Searching for Data Items by Format
in the chapter Finding Points of Interest).
The information bar towards the top of the worksheet shows there are
now 111 data items, two more than before. The new data item VAL-P-AND-P-LIMIT
is now in the worksheet, with a category of B-Constant.
Notice that some items in the Category column have more than one category. If you can't see them, widen the Category column by dragging the divider between the Category and Notes columns headings.
VAL-P-AND-P-COST, which was in both sets. You
should see its two categories, A-Poss and B-Constant.
The information bar towards the top shows there are 57 statements in the worksheet.
The worksheet now contains 111 data items and 57 statements.
Take a look at some more features of the worksheet:
ADD
        VAL-P-AND-P-COST
, and click Show contained data items to
display just the data items that are used in that statement and that are
in the worksheet.
Go to the Results(1) tab and click the + by ADD VAL-P-AND-P-COST.
Three data items in the worksheet are used in that statement.
VAL-P-AND-P-COST and click
Go to details.
Files that contain data representing monetary values might also need to be modified. Once you have identified monetary data items, you can examine them to see if they are within file records. Any file that contains a record containing a data item of interest is a file that might need attention; it is a file - or data store - POI.
In practice, it might be worth initially considering all files of interest and adding them to the worksheet. The worksheet reports can then list all the files and show the ones that contain data items of interest and the ones that don't.
To find the data files used by the application and the statements where those files or their data items are used:
This searches the application source and produces a set containing 39 entries - 7 data files and 32 statements.
The worksheet now contains 111 data items, 89 statements and 7 data files.
Finally, there is one other type of item that might need converting. These are items that are passed to and from screens.
To find the BMS screen fields in the application:
The resulting set contains 51 data items.
You can now see that these are the COBOL data items generated from the BMS screen map. The fields in the BMS screen map might need modifying and so you might need to regenerate the COBOL data item definitions. Alternatively, COBOL data items themselves might need modifying.
Notice that all the data items in the set are gray, which means they are already in the worksheet, by virtue of being used in the right way and having the right format and name. However, we need to update the categories of these items, so that you can distinguish them as BMS-related fields.
OE01.
The worksheet now contains 111 data items, which is the same as before since no items were added.
Take a look at some more features of the worksheet:
This function displays data items together with the statements that use them, provided those statements are in the worksheet. If a data item is not used in any worksheet statements, the data item does not appear here, even though the data item is itself in the worksheet and appears in the Data items tab.
The Results tabs show the relationships between data items and their corresponding statements and vice versa. Among other things, this view provides a reliable and quick way of removing data items and their corresponding statements at the same time.
CAT-END-VALUE to see the
statements that use it, by clicking its "+".
This shows that CAT-END-VALUE is used in four
statements, all of them MOVE statements.
The columns you selected are hidden, but their contents are still stored in the worksheet.
You can do this on this dialog box by selecting a column in the right-hand list and using the Move up and Move down pushbuttons, then clicking OK. Alternatively, you can change the column order directly on the worksheet by dragging the header bar of the column you want to move to its new position.
Either way, your selection of columns and their order stays set from one session to the next, until you change it again.
In this tutorial, you:
The worksheet is persistent and is continually saved, and so it is automatically up to date if you shut down.
However, it is good practice to save a backup of the worksheet, so that you can go back to a previous copy. For example, you might want to return to the current worksheet if you make a mistake in a later session.
If you already have a backup with this name, use a new name such as EndofPop-1.
If you want to take a break before going on to the next session, you can close the project; or you can close Revolve, with or without closing the project.
Return to the Tutorials Map and choose which session to go on to next.
Comments on the books?
Click Send Us Comments.
Copyright © 2000 MERANT International Limited. All rights reserved.
This document and the proprietary marks and names
used herein are protected by international law.
| Finding Points of Interest | Customizing Analysis Tools | |