

| Using Annotations | Scripts, Editing and the Shell | |
In this session, you look in more detail at the various Views, and at the Split Screen Editor and the Execution Simulator. You use them to find a JCL job and to make changes.
Please see the Tutorials Map to check that you have run all necessary previous sessions.
You can use Revolve to explore the structure of an existing system. Through the use of Views you can move step-by-step through an illustration of data movements in your source code.
Views provide graphical overviews of your system and different modules in your source code. They enable you to study your application to navigate the execution sequence. Views are good resources for system reference when you're not quite sure where to start or what information you need.
This session uses the project you created in the chapter Using Revolve.
To explore your application through graphical views:
The System View illustrates the calls that link programs in the project together. It displays icons that depict the project's different programs as well as other system items. Between the icons are the links that connect them. The icons and links represent source code entities.
This system contains a JCL job.
The Find dialog enables you to isolate information in the System View.
The JCL job card icon represents the JCL job. It is curently selected, as shown by an outline around it. (You may need to get rid of this outline temporarily, by selecting something else for a moment, to see this icon is shaped like a punched card.)
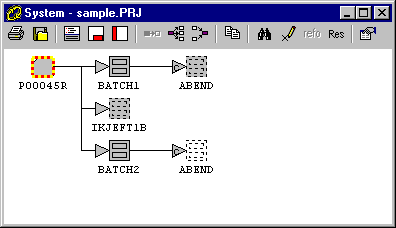
Figure 7-1: System View
This opens the Split Screen Editor where the source code for the JCL job is displayed.
The Inventory view graphically depicts the steps, DDs, executables, and databases in the JCL job.

Figure 7-2: Viewing Graphically in the Information Window and
Editor
BATCH1.CBL is the selected element. Notice it is selected in the System view in the top pane.
The Inventory view closes and is replaced by the Split Screen Editor displaying the source code for the program BATCH1.CBL.
You have isolated a program by using the graphical views. Do not close any windows or tools.
To explore the logical steps of BATCH1.CBL:
The Execution Simulator tool bar appears. This shows that the Execution Simulator is invoked and ready.
The code executes slowly, while displaying the logical procedural flow. The walk through is displayed, item by item, in the Execution Path display. Wait until execution pauses when an IF statement in the code is encountered, and the Execution Simulator Branch Choices dialog box opens.
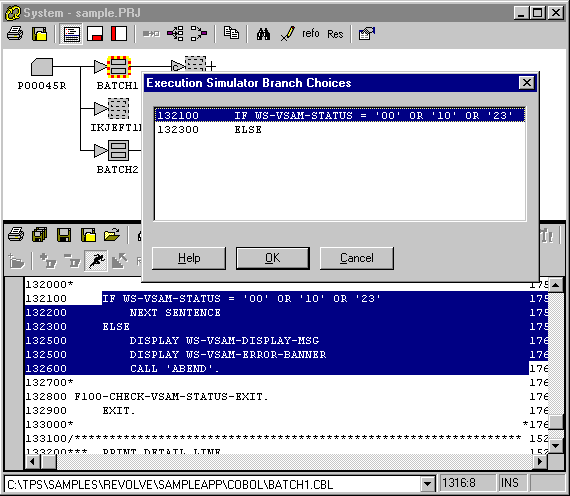
Figure 7-3: Execution Simulator Condition Prompt
In this session you:
If you want to take a break before going on to the next session, you can close the project; or you can close Revolve, with or without closing the project.
Return to the Tutorials Map and choose which session to go on to next.
Comments on the books?
Click Send Us Comments.
Copyright © 2000 MERANT International Limited. All rights reserved.
This document and the proprietary marks and names
used herein are protected by international law.
| Using Annotations | Scripts, Editing and the Shell | |