| Loading a Project into the Database | Populating the Worksheet |
This chapter contains the second in a set of five tutorials, which together give a tour of EuroSmart. This tutorial shows how to use the analysis tools to identify sets of monetary data items.
This tutorial starts the analysis by trying to find the monetary elements in the Order application, in several stages:
In this tutorial you use the Analysis Tools on the Euro menu to produce various sets of potential points of interest. The tutorial uses the following tools:
This tutorial takes about 30 minutes.
This section explains how to set up the analysis tools with the necessary options and defaults, so that the results you get match those of the tutorial.
Otherwise, restart EuroSmart if it is not running, and open the Order project by selecting it from the recent files list at the bottom of the Project menu.
If Defaults\United Kingdom is not shown, set it as follows:
If you break off from the tutorials, you might change these options and settings as you work and experiment. If you do change them and then want to continue with the tutorials, you need to reset the options and settings back to the ones needed for the tutorials.
The first search is for data items with PICTURE formats that could represent monetary values. We set the bounds fairly wide, from four digits, which includes digits both before and after the decimal point, right up to the largest number that COBOL allows, 18 digits. We disallow numbers less that four digits, since these are unlikely to be monetary values. We also allow from two decimal places down to none. In countries such as Italy or Belgium you might specify fewer decimal places, and for some applications that demand high accuracy, you might specify more.
This produces a set of data items, as described next.
The set you just produced is displayed in a Set View, as shown in Figure 6-1.
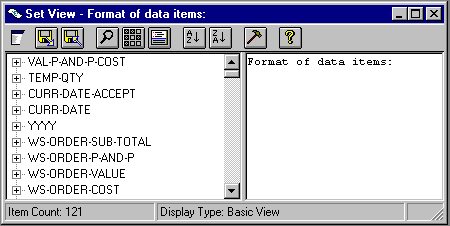
Figure 6-1: Set View
In the Set View:
If your set contains a different number of data items, check that you used exactly the settings listed in the previous section, by double clicking the tool in the right-hand pane. If you used different settings, go back and rerun the tool with the correct settings.
The set you have just created has a large number of data items, since the initial search was so broad, and inevitably some of the items aren't monetary.
In this section, you start getting to know the sample source code, scanning the data items and discovering that some data items aren't monetary and aren't of interest and so need to be removed from the set later. These items for removal are sometimes referred to as negative or false points of interest, whereas items that are definitely needed are known as positive or genuine points of interest.
VAL-P-AND-P-COST.
If this is not the first item, click any of the data items in the left
pane and press V to go to it quickly. From the name of the data
item, you can assume that the item holds a monetary value. However, you
might want to examine the data item in the context of the source code to
confirm that the data item is genuinely monetary.
VAL-P-AND-P-COST and then click
This splits the set view into two panes with the set at the top and the source file containing the data item's definition at the bottom. If necessary, drag the bottom edge of the source view, so that you can see more source code. You can also drag the horizontal divider between the set view and the source view at any time.
VAL-P-AND-P-COST. Notice that 92:12
shows in the status bar at the bottom of source view. This indicates
that the cursor is at line number 92 and column number 12.
Notice that the definition of VAL-P-AND-P-COST sets an
initial value of 17.50, which looks like a monetary value. It also
looks like a hard-coded constant in one currency that might need
converting to euros. Later we will capture a set of all such monetary
constants.
VAL-P-AND-P-COST is still highlighted
and then click TEMP-QTY in the Set View at the top and then
click From the name of this data item and the names of the data items it is used with, you can deduce that is actually a quantity and not a monetary item and so is not of interest. Later we will remove it along with other items whose names imply that they aren't monetary items.
CURR-DATE-ACCEPT in the same way.
Since this data item is used to hold the date, it is definitely not monetary and not of interest. Later, we will find a whole set of data items based on how they are used, and remove that set since their usage implies that they are not monetary.
WS-AREA-LENG in the same way. You can press
W and down arrow to go to the data item quickly.
This data item is used to hold the length of record and to pass the
length in an EXEC CICS statement, and so it is definitely not monetary
and not of interest. Later, this data item will be part of the same
set as CURR-DATE-ACCEPT, together with other data items
whose usage implies they are not monetary.
OE01 in the same
way.
These data items all correspond to BMS fields. Their data definitions are automatically generated from the BMS screen map and so have names ending in L, I, O corresponding to how the data items are used. Some of these data items might refer to monetary fields on a BMS screen, and might need modification. Once again, there is a tool to identify BMS-related data items.
In this section, you name the set, with its 121 items, so that you can refer back to it easily. You also save it in case you inadvertently delete it or the PC crashes or hangs.
Initial data items and
click OK.
Notice that the name you gave appears in the title bar of the set.
Note: The set is now saved to disk. Its filename is the name you specified and has the extension .set. The set is saved in the project directory Projects\Order.
The new set is now ready for you to use as a working set, so that you can refine it, gradually removing the unwanted non-monetary items
Notice that the "Initial data items" set remains in the Named Sets window, so that you can recall it at any time, but it isn't cluttering up the screen for now.
Many of the data items in the working set are irrelevant, because they aren't used to process money, but are used to help the flow of the program. There is a tool for identifying these data items and it finds, among others, data items controlling PERFORM VARYING statements, and data items to do with dates. Having identified the non-monetary data items, we can remove them from the set so that we start to refine the set more precisely.
This section searches the working set for these sort of data items and then removes them from the working set.
To do this, point to ![]() in the working set and drag it onto Use of data items in the
Analysis Tools window.
in the working set and drag it onto Use of data items in the
Analysis Tools window.
The resulting set contains 17 data items. Notice that these data items are genuinely unwanted, since they represent dates, a length and so on.
The working set contains 104 data items (121 minus 17).
Another set of data items that aren't of interest are those whose names imply they are unlikely to contain monetary amounts. There is a tool to find these items. However, since each program has its own naming conventions, you need to know the names to look for before running the tool. For example, the Order project has data items with "weight" and "quantity" in their names.
We have supplied a list of these names for the Order project, so that you can import this list and run the tool quickly. In the real world you would develop your own list or lists of names, while you work on a program and get to know it. You can keep your list in a separate file and this enables you to pass the list to colleagues working on similar or related source files. This not only saves them time but also ensures consistency when any of you rerun the tool.
To do this, point to ![]() and drag the set onto Names of data items.
and drag the set onto Names of data items.
This adds the following strings to the search criteria: *date*, *-dd*, *-id*, *key*, *-mm*, *-no*, *-qty*, *quantity*, *weight* and *yyyy*.
The resulting set contains 33 data items. Scan down the list of data items briefly and confirm that probably none of them is monetary.
The working set now contains 71 data items (104 minus 33).
This section searches for monetary constants and captures the statements and data items that are associated with them. These monetary constants might need converting for euro amounts, and any statements or data items associated with them might need modifying too.
It is key that you identify these monetary constants in the Data Division and the Procedure Division early. Although changing these amounts is technically fairly trivial, determining which values need to be in euros is typically done by the business analysts and not the IT department. Identifying these constants at an early stage will help the decision process, especially as this information might raise questions or issues that the business analysts had not previously contemplated.
The resulting set contains 60 entries, which are a combination of statements and data items.
Click the first entry in the set and click ![]() View Source Code. Then press down arrow to show the source for
each set entry in turn.
View Source Code. Then press down arrow to show the source for
each set entry in turn.
Notice that the entries are either data items defined with constant values, or statements that use those data items, or statements that contain constant values used with the data items in the "Potential monetary data items" set.
The resulting set contains 8 data items.
The sets created in this tutorial contain data items and statements that might be monetary and might need modifying. The process used in this tutorial is a good first step, and identifies the most likely points of interest.
However, this process does not produce 100% accurate results. It has identified some unwanted items, and has missed some items of interest. These discrepancies and how to rectify them are described later in the tutorials.
The next tutorial needs to use the Order project and the sets you have named, such as "Potential monetary data items". All of these are already saved and up to date.
You can break off from the tutorials now. If you want to work on your own code, you might need to change the options and settings back to the ones you use. See the Preparation section in this chapter, for how the tutorial changed them. When you can decide to follow the next tutorial, you will need to change back to the tutorials' settings again.
| Loading a Project into the Database | Populating the Worksheet |