

| Utilities | Shareable Projects | |
When Revolve loads a project it tries to resolve all system-wide relations. However, user intervention is occasionally required, especially in cases where direct name matching is not appropriate. These relations are needed to perform system-wide analysis tasks like tracing how a field impacts other fields throughout the project. With the functionality provided by the Complete Project window you can match up common files, executables, screens, etc. with appropriate files in your system or indicate that a resolution is unavailable. We recommend that you leverage the Complete Project features against your project to tie up the loose ends that may exist and to protect the integrity of your project analysis.
The Complete Project window is displayed by selecting the Complete... option under the Project menu. Possible problems are displayed as folder entries in the window. Expand the folders. Anything listed below the folder entry needs to be examined more closely. Specfically, a fix should be performed.
To fix problems in the project, select the problems or problem types you would like to fix and click the Fix... button. An appropriate Fix dialog will be displayed. When the parent (top line) of the Complete Project entry is selected and the Fix... button is clicked, a dialog will be displayed asking if all pertinent items should be included in the fix. If you choose No each problem will need to be repaired individually. If you choose Yes the Skip button is enabled and allows you to move down the list of entries, skipping those entries which should not be fixed.
An Unused Load Module signifies a program which is not invoked by any other component in the project. Typically the problem occurs in four ways:
A Load Module w/o Source Code signifies a load module which is not associated with any source code. This problem occurs in three ways:
Note: By default, a program's load module name is determined by the PROGRAM-ID in the Identification Division. However, Revolve also allows load module names to be determined directly from the source code's file name. To enable this function, select Admin... from the Utilities/Options menus, click the Component Parameters button, and select the "Use Component Name" checkbox in the Component Parameters dialog (refer to "Component Parameters" in chapter 7 "Utilities").
A Copybook/Proc not found signifies that a copybook or proclib include file could not be found in the project. This problem occurs for three possible reasons:
A Screen without Source Code signifies that a screen used in the project is missing source code. This problem arises in three ways:
A PROGRAM external file not associated with files signifies that a COBOL external file is not being properly associated with a physical data file. This problem occurs for three possible reasons:
An Unresolved System Variable signifies that a variable used to
resolve a system-wide access (calling a program, sending to a screen,
etc.) could not be populated with any values. To fix these problems
associate the variable with the proper value. You may type in the full
name directly or type a match query and use the match button to populate
the list of existing system-wide items. If multiple values need to be
entered for a particular variable use the Variable Data dialog,
invoked by pressing the Variable Data... button
 from the
button bar.
from the
button bar.
A CICS Dataset not associated with files signifies that a CICS dataset is not associated with a physical data file. This problem arises for three possible reasons:
A CICS program not associated with load module signifies that a CICS program can not be related to an existing load module in the system. This problem occurs for two possible reasons:
A CICS transaction not associated with load module signifies that a CICS transaction can not be related to an existing load module in the system. This problem occurs for three possible reasons:
A Component with Errors signifies that a component was not properly loaded. Typically this means a component was added with the wrong type (e.g. Assembler file added as COBOL), or that the parser options were set incorrectly. Use the Project/Delete to remove improperly added components.
Note: The Parsing Problems script, located in the Scripts tool, can be useful to identify and locate components with errors.
An IMS transaction not associated with load module signifies that an IMS transaction can not be related to an existing load module in the system. This problem occurs for three possible reasons:
An IMS program not associated with PSB signifies that an IMS program can not be associated with a PSB. This problem occurs for three possible reasons:
An IMS DBD not associated with files signifies that an IMS DBD can not be associated with a physical data file. This problem occurs for four possible reasons:
An IMS PSB Not Used signifies that there are IMS PSBs that are not associated with COBOL programs. To remedy this problem:
IMS PSBs without source code are caused when the project contains IMS PSBs that are not associated with any source code. This problem can occur in three ways:
IMS DBDs not used signals that the project contains IMS DBDs that are not referenced with IMS PSBs. To remedy this problem:
IMS DBDs without source code alerts the user that the project contains IMS DBDs that are not currently associated with any source code. This problem can occur in three ways:
IMS DBDs not associated with files signifies that the project contains IMS databases which are not associated with physical files. This problem occurs for three possible reasons:
Unused Copybooks alerts the user that copybooks have been added to the project but are not referenced in any of the programs. To remedy this problem:
IMS MFS Message not invoking an IMS transaction signifies IMS MFS Message that could not call or find a transaction. This problem can be remedied by associating the message with an IMS transaction.
The Complete Project process can be performed on a defined
subproject. Click the Subprojects...  button and select the subproject that should be completed from the Subprojects
dialog.
button and select the subproject that should be completed from the Subprojects
dialog.
See also Subprojects in Using Revolve for more information.
The Review... dialog box, displayed by pressing the Review...button
 , provides
the user with a listing of all system-generated and user-generated
resolutions to system-wide problems.
, provides
the user with a listing of all system-generated and user-generated
resolutions to system-wide problems.
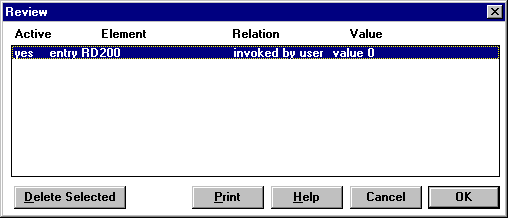
The columns are as follows:
If a mistake was made during a Complete Project fix, the user may delete the incorrect relation by selecting on the relation and clicking on theDelete Selected button. When finished viewing the Review List, clickOK to return to the Complete Project dialog box.
In COBOL and PL/I, statements can invoke a load module or screen, or
access a data file through a variable. To handle this case, Revolve
creates multiple invoke and access relations, one for each value of the
variable. Initially these values are computed by Revolve during the load.
The Variable Data...
button displays this list of values and allows the user to modify these
values so that the proper load modules are invoked and the proper data
files are accessed.
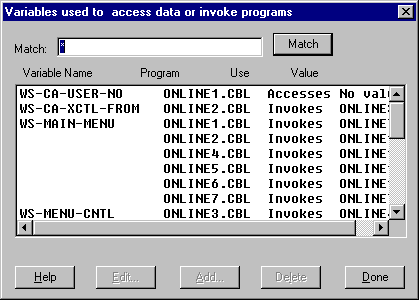
By adding values to a variable with the Add button the user can override the system-defined values (and any improper accesses and invokes). Once a new value has been added to the variable, any system-generated values are ignored and thus removed from the list. The user may further customize the list of user-defined values with the Edit and Delete buttons. To restore the list of system-generated values for a particular variable, all user-defined values for that variable need to be deleted.
The Process Schedules dialog box, displayed by selecting the
Process Schedules... button  ,
is used to create, modify, and delete scheduling information in Revolve.
Schedules are used to emulate JCL, replace missing JCL, or create high
level schedulers in Revolve. You define schedules by specifying the order
in which components in the project's source code are executed. This
information is then used in the System view to show the correct
execution relations for job/program/transaction execution.
,
is used to create, modify, and delete scheduling information in Revolve.
Schedules are used to emulate JCL, replace missing JCL, or create high
level schedulers in Revolve. You define schedules by specifying the order
in which components in the project's source code are executed. This
information is then used in the System view to show the correct
execution relations for job/program/transaction execution.

To create a new schedule,
 .
.The new schedule appears in the Process Schedules window.
To add elements to the new schedule:
 .
. 
The process that was added is contained in the folder for the new schedule. Processes are organized in descending order from last to first. So, the process that appears directly beneath the parent or top folder is the last step in the schedule. Likewise, the entry at the bottom of the list is the first step or process in the schedule.
If you want to add a new process to the list, select the line that you want the new process to precede and repeat steps 2-6 above. The new process will be inserted beneath the selected one in the Process Shedules window.
The System view will graphically depict this information by ordering the displayed components according to the process definition.
To delete a schedule select the undesired schedule in the information
window and click the Delete Schedule button
 . To delete
a process select the undesired item and press the Delete Process button
. To delete
a process select the undesired item and press the Delete Process button
 .
.
Note: Schedules are stored as .SCH files and can be manually entered into a project via the Add Components dialog following the process described in Adding Components. Remember, after the new schedule has been added to the project, a Make should be performed to bring the project up to date.
The Import Translations button  invokes the Import Translations dialog. If you have a copybook
that has invalid DOS characters, this dialog is helpful for translations
of copybook names. This option is also available in the Administrator
Options dialog.
invokes the Import Translations dialog. If you have a copybook
that has invalid DOS characters, this dialog is helpful for translations
of copybook names. This option is also available in the Administrator
Options dialog.
See also For details refer to Import Translations in Utilities.
Through the Execution Indirection window, invoked by the Execution
Indirection button  , a
user can setup Revolve to handle low-level routines which perform
invocation or data access based on passed parameters. For example, Wang
COBOL programs commonly use an assembly routine LINK to call other
programs based on the first parameter of the call statement.
, a
user can setup Revolve to handle low-level routines which perform
invocation or data access based on passed parameters. For example, Wang
COBOL programs commonly use an assembly routine LINK to call other
programs based on the first parameter of the call statement.
CALL LINK USING 'PROGNAME',...
In order for Revolve to recognize this statement as calling program PROGNAME, one must use the Execution Indirection window.
The following is a brief summary of functionality available on the Execution Indirection button bar:
The
Add Executable... button prompts for the name of the executable
and adds it to the project. The
Delete Parameter button deletes the selected parameter
indirection definition. The
Add Parameter... button allows the user to set up an indirection
through a parameter. To add an indirection, choose the desired load module (or create a new
one with the Add Executable button) and click on the Add Parameter...
button .The
Add Parameters dialog will appear and will prompt you for more
information on the indirection.
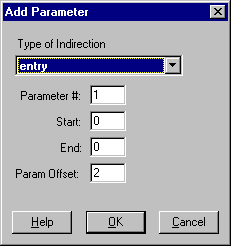
The Type of Indirection pull-down listbox specifies what type of object is being invoked or accessed and allows you to change it to one of the types described below. Parameter # specifies which parameter contains the name of the object being invoked or accessed. Finally, the Start and End fields specify the starting and ending character positions for the object's name. If both start and end contain 0, the whole parameter is used. The Param Offset field adjusts the offsets for IMS PSB's that are passed through entry point calling. The possible types are described below.
Copyright © 1998 Micro Focus Limited. All rights reserved.
This document and the proprietary marks and names
used herein are protected by international law.
| Utilities | Shareable Projects | |