

| Reporting on the Worksheet | Setting Up Projects | |
To effectively use Revolve for analysis, you should understand the following fundamental features and concepts:
Other Useful Features
The typical Revolve user is interested in a small number of files; however a large application can consist of hundreds, even thousands of source files. Because organization becomes so critical, Revolve structures source files as projects. A single Revolve project can contain up to 32,000 components. This figure represents the number of source members (COBOL, JCL, etc.), it does not include copybooks, includes, procs, or control-cards. Once created, projects exist until they are explicitly deleted by an administrator.
See also For more information about creating and maintaining projects see the chapter Setting Up Projects.
The following table provides a complete list and description of the options that are available from the Project menu:
Note: Icons in the following table are found on the Project Manager's button bar and access the described functionality.
| Menu Option:
|
Definition:
|
| New... | Prompts for the name and creates a new project. |
| Open... | Prompts for the name and opens an existing project. |
| Save | Saves the project. Save automatically happens when you close a project or exit Revolve, but periodically saving your project is a good practice. |
| Save As... | Prompts for the name and saves the project with a new name. It also updates the name of the active project. |
| Make User | Converts the database that is being accessed from Administrator the administrator's to the user's and vice versa. |
| Make Shareable... | Prompts for the path and name of a shadow project for making a shareable project (see Shareable Project for more information). |
| Close | Closes the active project. The changes to the project are automatically saved. |
| Delete Project... | Deletes the active project and any related files. |
| Import Project... | Loads the definition of a project from a file. |
| Export Project... | Saves the definition for the active project to user specified format. |
| Manager... | Opens the Project Manager to permit project administration. |
| Complete... | Opens the Complete Project dialog box, which guides the user through a process of identifying and classifying all the missing pieces and unknown information in a project. |
| Load Selected... | Parses (or re-parses) and loads all highlighted components in the
Project Manager. Also located on the Project Manager button bar
 . . |
| Make... | Parses (or re-parses) components which are "Out of Date", "Not
Loaded", or "Error", and loads successfully parsed
components. Also located on the Project Manager button bar
 . . |
| Status... | Compares database times against source-code time stamps and updates the
status in the Program Manager accordingly. Also located on the Project
Manager button bar  . . |
| Add Components... | Activates the Add Components dialog box, which is used to add new
components to the project. Also located on the Project Manager button bar
 . . |
| Delete Components... | Removes all highlighted components in the Project Manager. Also located
on the Project Manager button bar  . .
|
| Exit | Shuts down the Revolve system, saving all changes to the current project. |
See also For information about the administrator's options see Administrator Options in Utilities.
Revolve projects are controlled primarily from the Project Manager. The Project Manager window displays the list of component files which have been added to the project. It also provides the user with the ability to make modifications to the project's configuration--if the user has the appropriate rights. Certain buttons in the Project Manager may be disabled depending on the rights of the user. For example, if the project is shared, the Add Components and Delete Components buttons will be grayed and unusable to the user but will be focussed and accessible to the administrator.
The Project Manager is activated by creating a new project, by
selecting the Manager menu item from the Project menu, or by
clicking the Project Manager button  at the bottom of the Revolve desktop.
When existing projects are opened by choosing the Open option from the Project menu, the Project Manager will not appear.

See also For more information about administrative rights refer to Administrator Options in Utilities and Administrative Mode in Shareable Projects.
The Project Manager has six columns:
Each component of a project has an associated status.
It is sometimes necessary to modify the parameters of a component after it has been added to a project. Revolve provides the COBOL Parameters feature to facilitate component level parameter definition. This is different from the Component Parameters functionality available through the Administrator Options dialog (Utilities/Options/Admin...) in that these parameters are applied to existing, selected components (component level), as opposed to effecting all components, new and existing, across the project (project level).
To set component parameters on the component level:
 . The Parameters
dialog is displayed specific to the type of the component you selected. If
you selected many components, then the first type that appears in descending
order in the Project Manager is the first parameter dialog that is
displayed.
. The Parameters
dialog is displayed specific to the type of the component you selected. If
you selected many components, then the first type that appears in descending
order in the Project Manager is the first parameter dialog that is
displayed.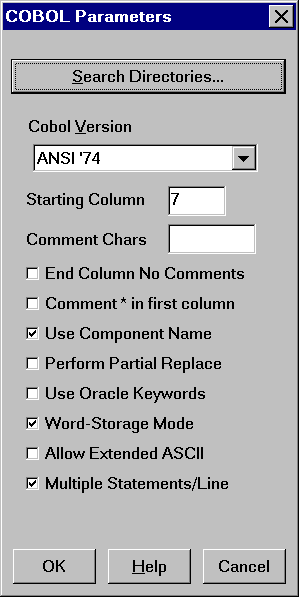
 to expand the list.
Note: Setting up search directories at the component level overrides the default directory settings for the selected components in the Project Manager. This can be useful for import files that have the status Not Found.
The parameters you select and check will be applied to the selected components when you click Ok. If the selected components are of different types, then a corresponding parameter dialog is displayed.
See also Component Parameters or Search Directories, in Utilities for more details on these dialogs.
Querying against an entire project can be inconvenient when you only need
to access an isolated or small amount of data. To remedy this problem Revolve
incorporates the use of subprojects in its tools and information browsers A
subproject is a collection of individually specified items that are
taken from a Revolve project to be analyzed and modified in specific ways.
The Add to Subproject button  allows the
Revolve administrator to compile selected components into a Revolve
subproject. To create a new subproject from the Project Manager:
allows the
Revolve administrator to compile selected components into a Revolve
subproject. To create a new subproject from the Project Manager:
from the Project
Manager button bar.The new subproject has been created. To view the subproject:
 The Subprojects dialog is invoked.
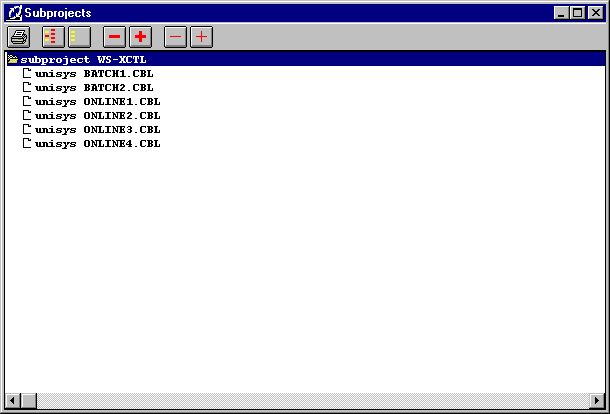
| Click this:
|
To do this:
|
 |
Invokes the Print dialog, allowing for the subproject to be printed. |
|
Deletes the selected subproject. |
| |
Invokes the New Subproject dialog where a new subproject is named and created. |
 |
Deletes selected subproject components. |
 |
Invokes the Find dialog where you can select project components and add them to the subproject. |
Subprojects are designed to limit the information pool that is to be analyzed. As an example, let's create a subproject with the sample code included with Revolve and use it in analysis.
at the bottom of the Revolve window.
button. Revolve projects can be configured so they are accessible by one user at a time (Single User Projects) or by many users simultaneously (Shared Projects).
The configuration of Shareable Projects is different from a network version of Revolve in which multiple users are able to use the same copy of Revolve simultaneously. Just because Revolve is accessed from a network does not necessarily mean that the projects are shareable. The ability to share Revolve projects depends primarily on the configuration chosen by the administrator.
Both single user and shared projects can be password protected to prevent unwanted changes to the project's configuration.
See also the chapter about Shareable Projects.
A project which is not shareable, known as a single user project, gives any user the ability to perform both analysis and administrative tasks. However, only one user at a time is permitted to open the project.
For these projects, a password can be specified which must be entered each time the project is opened. This is accessible through the Administrator Options dialog box located under the Utilities/Options menu.
Revolve projects can be configured to give certain users access to administrative functionality while others are limited to performing analysis tasks. Users are those individuals with access only to analysis tasks. The Administrator has access to options which affect the analysis done by Users.
See also the chapter about Shareable Projects.
Rights specific to an administrator include:
Revolve provides tools and information browsers for the analysis of source code. The interface of each tool is designed around a series of common features that make using Revolve both flexible and consistent. This section describes the common features that you will see across Revolve.

A button bar appears in virtually every window within Revolve. Each button is used to manipulate the window's data or perform a function. Buttons are provided for tasks such as:
While several buttons are common across all windows, many differ depending on the window's function. For definitions of specific buttons, refer to Appendix B.

The Match edit bar appears in most windows within Revolve which contain an information window. It's primary function is to enable you to quickly view pertinent information about a specific items. The information displayed depends on the browser or tool that is being used.
The Match edit box is a field where an item's name is entered. The pull-down list box specifies how the information in the information window will be organized. After these parameters have been established the Match button initiates the search and fills the information window with results.
The wildcard character (*) appears by default in the Match edit box in most Revolve interfaces. This character is used to find all items with similar names. For example, if "WS*" is entered into the Match edit box in the Variables browser, the information window will display all the variables with names that begin with "WS." In most cases, if the wildcard character is used alone as a match criteria, the information window will fill with all items in the project as they pertain to the specific browser or tool. The (?) character is used to construct a pattern where "?" stands for a single arbitrary character. For example, "WS?" would match all names consisting of "WS" and another character, like WS1 or WSA.
An Information Window is a special type of listbox which presents data in a clear hierarchical format and permits modification of the amount of information which is displayed at any one time.
A format is used in which all information starting in the same vertical
column on the screen is at the same hierarchy level. When a parent line is
expanded the child information for that line appears beneath and indented
from the current line's position. Folders are expanded by double-clicking.
Also use  ,
,  ,
,
 to expand and collapse folders.
 - a parent line which has not been expanded. The "+"
indicates that Revolve has retrieved database information for this item that
will appear as subsequent or children folders when double-clicked.
- a parent line which has not been expanded. The "+"
indicates that Revolve has retrieved database information for this item that
will appear as subsequent or children folders when double-clicked.
 - a parent line which has already
been expanded and contains children folders.
- a parent line which has already
been expanded and contains children folders.
 - a line which has been expanded and
whose children are currently displayed.
- a line which has been expanded and
whose children are currently displayed.
 - a line which is not expandable.
Commonly known as a leaf.
- a line which is not expandable.
Commonly known as a leaf.
Certain tools, views, and information browsers within Revolve are able to
limit the information displayed by both the criteria specified in the Match
edit bar as well as by a process called Information Screening. Options
dialogs, accessible with Options buttons ,
allow the user to specify additional parameters for the lookup of data in the
information window. Often these options do not even require the use of the
Match button.
When the View Source Code button  is pressed, the Split Screen Editor is displayed and can be used to
modify source code. The Split Screen Editor will display the source
code for any element selected in the information window. While the Split
Screen Editor is displayed, the thin, black, horizontal line dividing the
sections of the window can be dragged with the mouse to adjust the size of
the editing window.
is pressed, the Split Screen Editor is displayed and can be used to
modify source code. The Split Screen Editor will display the source
code for any element selected in the information window. While the Split
Screen Editor is displayed, the thin, black, horizontal line dividing the
sections of the window can be dragged with the mouse to adjust the size of
the editing window.
The Split Screen Editor is closed by clicking the View Source
Code button again.
See also For more information about the Split Screen Editor, see the section on the Integrated Editor
Printing the contents of an open window is performed by pressing the Print
button .
The generated report will contain either a graphical or textual representation of the information displayed in the open window. Any information which has not been expanded (as with collapsed hierarchy levels in information windows) will not be printed. The following options are available in the Printdialog:
in the editor and use that Print
dialog to print the legend. Highlighting marks source code elements in selected colors. The Color
menu, located at the bottom of the Revolve desktop, allows you to specify
a highlighting color. When you click the Highlight button
 in a browser,
the source code for all leaves () will
be highlighted in the specified color. The Source View is invoked to
display the line of code that was highlighted.
in a browser,
the source code for all leaves () will
be highlighted in the specified color. The Source View is invoked to
display the line of code that was highlighted.
You can also highlight by right-clicking on an item and selecting the Highlight
option. To view the highlighted code, right-click again on the item and
select Go To, or click to
view the source code in the Split Screen Editor.
See also Color Menu.
Annotations provide a mechanism for creating and manipulating persistent
documents or notes containing user-defined information about specific
elements of source code. The Add to Annotation button
, displays an Add to Annotation
dialog. To create a new annotation:
.After an annotation has been defined, items can be added by selecting the annotation title in the Add to Annotation dialog and clicking Add.
See also For more details on annotations, see Annotations.
Revolve 16-bit does not accept filenames longer than 8 characters. The 32-bit version of Revolve allows long filenames as operating systems permit. For example, Revolve 32-bit running under Windows '95/NT allows components to have long filenames.
Long filenames within source code files will cause parsing problems in the 16-bit version. In these instances the filenames must be translated to an accommodating length of 8 or less characters. It is also important to remember that projects should contain 8 character filenames if they are shared between 16-bit and 32-bit versions of Revolve.
See also the section describing the Import Translations dialog.
To support the transition from source code analysis to the implementation of modifications Revolve provides the Modification Driver. The Modification Driver allows the user to automatically insert user-defined text, comments, and/or code into the source code of selected items. This feature facilitates the implementation of source code changes in Revolve and allows for Revolve analysis results to marked for follow-up modifications in other development environments. Identified changes can be tagged or commented in the source code with the Modification Driver and easily located in Micro Focus Workbench® or other editing environments.
To insert user-defined text:
 .
The Modification Driver dialog will be displayed.
.
The Modification Driver dialog will be displayed.To insert text into the source code of multiple items in one step, set the parameters discussed above and click Execute all . The Execute button inserts text into the code of the current item. To skip a selected item's source code and continue insertions in the next item's code, click Skip. All insertions can be viewed in the Split Screen Editor.
Upon closing the browser or tool in which changes have been made, you will be prompted by a Save File dialog to save modifications. Yes to All saves all modifications that have been made. No to All cancels all changes. Yes saves the modification of the displayed item and No cancels it.
When the Early Release Option is selected in the User Options
dialog (Utilities/Options/User), the Capture Results dialog can be
invoked by clicking . Capturing Results allows
selected items to be included in annotations, subprojects, POP files, and TAG
files.

Copyright © 1998 Micro Focus Limited. All rights reserved.
This document and the proprietary marks and names
used herein are protected by international law.
| Reporting on the Worksheet | Setting Up Projects | |