

 | Information Browsers | Complete Project |  |
Revolve Utilities, accessible from the Utilities menu, provide both users and administrators with customization options for the Revolve workspace.
The Color menu, accessible from the Utilities menu or from the Revolve desktop status bar, provides a variety of colors for use with highlighting. The displayed color on the Revolve desktop is the color that is currently used to highlight objects in the database. Highlighting is a helpful feature because once an item is marked with a specified color it will appear in all tools or views in that color, making it easily identifiable.
See also Highlighting in Using Revolve, for more information.
The function keys F1 - F12 are assigned useful functions in Revolve.
With a single keystroke you can perform frequently used commands. A menu
of these commands is displayed by selecting the Power Keys option
on the Utilities menu or by clicking the Power Key icon
 on the Status Bar.
The settings for the power keys are as follows:
| Power Key:
|
Function:
|
|---|---|
| F1 | Help |
| F2 | Highlight currently selected element in the source code |
| F3 | Highlight all usages of the selected item in the source code |
| F4 | Clear all highlights |
| F5 | Select the definition |
| F6 | Scope to component with selected item |
| F7 | Previous selection |
| F8 | unassigned |
| F9 | Go to or show Source |
| F10 | unassigned |
| F11 | Add Annotation |
| F12 | unassigned |
The speed menu is a pop-up menu that allows quick access to functionality that corresponds with the selected element. A menu of these commands can be displayed by selecting the speed menu option on the Utilities menu or by clicking the right mouse button on an element in any view, tool, or information browser.
The speed menu is designed to display features that are appropriate to selected data. Features that are not pertinent to selected items will not be available from the speed menu.
Tools can be integrated into Revolve with the Update Tools dialog box. Once a tool has been added into Revolve, it can be invoked from the Tools menu or the speed menu.
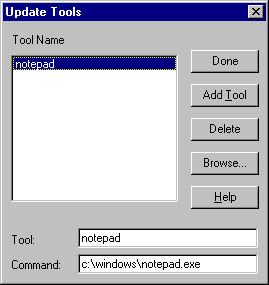
To add a new tool, first type the name of the tool in the Tool edit box. Then enter the command line call to the tool by entering it in the Command edit box, or by clicking the Browse button and selecting an executable program.
Once the tool name and command-line options have been completed, click on the Add Tool button to add the tool to Revolve. Note that if a new tool is being added with the same name as a tool already incorporated in Revolve, the newest tool replaces the older tool.
The command line can include the parameters for the file name, directory, line, and column of the selected element. These parameters are substituted into the following wildcards:
| Wildcard:
|
Function:
|
|---|---|
| %D | Specifies the directory of the source code file that contains the selected element. |
| %E | Specifies the extension of the source code file that contains the selected element. |
| %F | Specifies the path and name of the source code file that contains the selected element. |
| %N | Specifies the name of the source code file (with extension) that contains the selected element. |
| %S | Specifies the name of the source code file (no extension) that contains the selected element. |
| %X | Specifies the column in the source code where the selected element is located. |
| %Y | Specifies the line number in the source code where the selected element is located. |
To use these parameters, place {}'s around the portion of the command-line that you want to be executed when an item is selected For example:
notepad.exe {%F}
If no item is selected when the tool is executed, then the command-line within the brackets is not executed. To modify any tools listed in the Update Tools dialog, double-click on the name of the tool. This allows modification of the name or command line for the tool. When finished with the changes to the tool, click on the Add Tool button to add it back to Revolve. If you modified the name of the tool, a new tool will be created. If the tool name remains the same, the older tool will be replaced with your modifications.
To delete a tool from Revolve select the tool's name from the list and left-click the Delete button.
Important system parameters can be viewed and changed with the Options menu items. The Options dialogs can be invoked by choosing Options from the Utilities menu.
In addition to various tools and information browsers, Options are available to both users and administrators for customization of Revolve functionality.
To view or modify user options, select Utilities/Options/User...
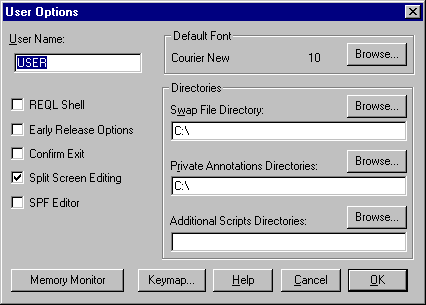
The following options can be modified:
 .
. is selected from button bars.
The Memory Monitor displays information about Revolve's memory and usage. It can be invoked by pressing the Memory Monitor button from the User Options dialog box.
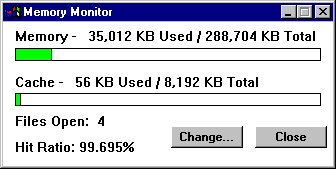
Revolve's usage of free memory is displayed on the Memory bar. The Cache bar displays how much memory is currently being used for the Revolve database. The Hit Ratio indicator shows the cache hit ratio of database accesses that are being written to disk rather than cached to memory. Files Open is how many files are currently loaded into Revolve. The Close button closes the Memory Monitor. The Change button invokes the Cache Memory dialog.
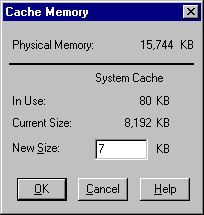
Cache Memory displays your machine's physical memory and lets you adjust the memory available for the Revolve project's database cache. The cache size should be set between 4 and 12 KB. Memory allocations for other analyses are not controlled by Revolve. If memory problems occur, contact Micro Focus technical support for help.
Key Mapping allows you to map actions performed in the Split Screen Editor with your keyboard. For example you can delete an entire line of code in the editor by selecting the line and using the Control and Y keys. There are several common operations which are mapped by default. These are displayed in the Current Mappings window.
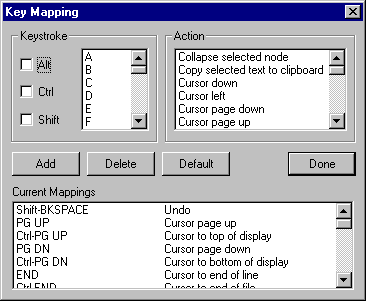
To map a key stroke:
The new setting will appear under Current Mappings. To remove existing mappings, select the undesired mapping and click Delete.
Administrator Options allows project administrators to set and modify parameters useful to project efficiency. To access the Administrator Options choose Options/Admin... from the Utilities menu.

This parameter specifies location of public annotations associated with either a single-user or shareable project. The default location is the directory where the project was created. By pressing the Browse button you invoke a Get directory for public annotations dialog. From this dialog you can set the directory path to a local or network location. The Network button opens the Map Network Drive dialog to give access to the entire system. Multiple directories can be listed by separating each with a semicolon.
The Common Database Directory parameter specifies the paths where Revolve will search for local databases. By adding paths to this parameter, projects can share local databases without duplication. By employing this functionality you can share components between two or more projects. To do this:
See also For guidelines on creating projects see Setting up Projects.
 )
on the project.
 Following this procedure, the main project (C) will access the databases of the previous projects (A and B) for identical files and will not create new ones.
The Automatic File Extensions dialog box, invoked by selecting the Extensions button from the Administrators Options dialog, allows the administrator to customize the Automatic Typing used by Revolve when adding components to the project. It presents a list of mappings from file extensions to component type (e.g. COBOL, BMS, JCL, etc.) and allows the administrator to add/delete these mappings.
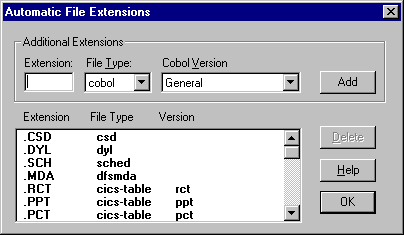
To add a new extension:
To delete an extension:
The Component Parameters dialog, invoked by clicking the Component Parameters button in the Administrator Options dialog, is where you specify the default component parameters for new components that are added to the project.
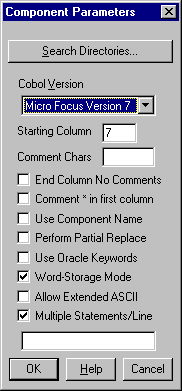
Component Parameters Options
Note: Sometimes it is useful to redefine parameters for
components that have already been added to the project. Revolve
facilitates this in the Project Manager, invoked with
 on the desktop or by
selecting Manager from the Project menu. For more
information see Modifying
At Component Level.
The Search Directories dialog, invoked by clicking Search Directories in the Administrator Options dialog, displays a list of directory paths which are used to search for copybooks, proclibs, control cards, and other included files.

Note: The following table describes adding and deleting search directories. Though adding search directories with this interface is a satisfactory method, it is preferred that you use the Add Components dialog and the Automatic Component Locator when adding search directories. Refer to Automatic Component Locator for a detailed description of this process.
| Option:
|
Function:
|
| Add | Invokes the Search Directory dialog, where paths can be entered and defined. |
| Edit | Invokes a specific Search Directory dialog for the selected directory. You can change type and path here. |
| Delete | Removes undesired paths from the directory. |
| To Top | Places the selected path first in the search order. |
| Help | Displays Help dialog. |
| Cancel | Closes the Search Directories dialog without saving changes. |
| Ok | Closes and saves changes in the Search Directories dialog. |
| Type | Column indicates the type of the directory. |
| Scan | Column indicates that file was scanned for a string (this option is initiated in the Search Directory dialog, described below). If "yes" appears under the Scan heading it indicates that the text of the file was scanned. If "no" appears, the scan only looked for the component name. |
| Project: | Displays the name of the project. If you are accessing the Search
Directories dialog for component level directories (accessed through
 on the Project
Manager), this field will display the type of component (if more
than one was selected) or the name of the component (if one was
selected), and the name of the project. on the Project
Manager), this field will display the type of component (if more
than one was selected) or the name of the component (if one was
selected), and the name of the project. |
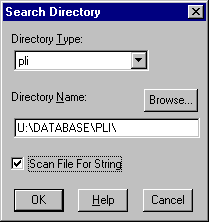
The Search Directory dialog will display information about the selected item. Select the directory type with the pull-down listbox. By checking the Scan File For String checkbox you initiate a search of the source file for proper module name. If this option is checked, "yes" will appear under the Scan column in the Search Directories dialog. Likewise if it's not checked, "no" will appear beneath the Scan column. The Browse button invokes the Get Search Directory dialog with which you can access all paths in all directories on your current system and set paths with the Set Path button.
Note: Sometimes it is useful to set a search directories for individual component's. Revolve facilitates this in the Project Manager. See Modifying At Component Level
The Import Translations dialog, invoked by selecting the Import Translations button from the Administrator Options dialog, lists the translations performed on copybooks, proclibs, control cards, libraries, and other included files. This dialog is especially useful for translating a copybook name with more than 8 characters or invalid DOS characters to a valid DOS filename, since Revolve 16-bit does not accept filenames longer than 8 characters nor invalid DOS characters. The 32-bit version of Revolve allows long filenames as operating systems permit. For example, Revolve 32-bit running under Windows '95/NT allows components to have long filenames.
Note: Long filenames within source code files will cause parsing problems in the 16-bit version. In these instances the filenames must be translated to an accommodating length of 8 or less characters. It is also important to remember that projects should contain 8 character filenames if they are shared between 16-bit and 32-bit versions of Revolve.
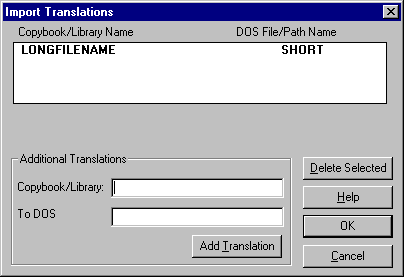
To add the translation of an included file (copybook, proclib, etc.) to a valid DOS name:
To add a translation from a library to a valid DOS path:
To delete translations from the table, select the undesired translation in the table and click on the Delete Selected button.
The Lookup Indices options allow the user to specify which indices will be created and maintained for the current project. Each of these indices allows fast queries of data for different item types. It is highly recommended that all of the indices be maintained to improve Revolve's speed performance on queries. However, if one or more of these lookups is not common at your site, we recommend turning off the related indices to improve parsing performance and reduce the disk space required for databases. These indices can be reestablished at a later date if desired.
The Change Password facility allows the user to enter a new password which is required for administrator access to the project. Once a password has been added, the user will be prompted for it any time he/she tries to access the project as an administrator. The password does not prevent authorized users from gaining read-access to the project. Please be sure to write down or remember the password.
By optimizing for Size, new databases created during parsing/reparsing will be smaller (typically 50% of those optimized for speed), but a slight performance decrease will be seen during loading. When optimizing for Speed, Revolve load times will be faster but database project size will typically be twice as large.
The Advanced Options dialog can be invoked by pressing the Advanced Options button.
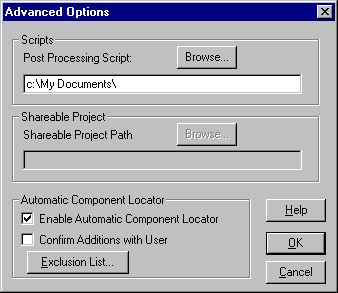
During the initial setup of a project, you can spend a lot of time identifying relevant source code components in a system and downloading the correct files. Revolve provides the Automatic Component Locator (ACL) to make this process easier and faster. The first step is to define a subset of modules (i.e. JCL job members, CICS tables, etc.). Revolve then accesses other modules within the current components as they are referenced (i.e. COBOL, copybooks, procs, BMS, etc.). Instead of having to individually add all source components yourself, you can specify a subset of modules and let the Automatic Component Locator search for, and load all of the required components.
Step 1: Enabling The Automatic Component Locator
Before you can setup the ACL it must be enabled. To enable the Automatic Component Locator, create a new Revolve project or open an existing Revolve project. If the project is shared then you must be the administrator.
Step 2: Adding Search Directories
The next step in using the Automatic Component Locator is to add search directories so Revolve knows where to locate source modules.
 on the Revolve desktop status bar.
  .
.
The Automatic Component Locator has now been employed to find the directories. It will bring the necessary modules into the project.
Not only is the functionality of the Automatic Component Locator useful when setting up a project but also in maintaining the project. When new components are added into a project during development the Automatic Component Locator can add the new components and parse the new code. To start the loading process select Make from the Project menu or select the Make button from the Project Manager. Once the make is complete, press OK in the message box. Newly referenced source files will now be included in your project. The Automatic Component Locator only adds components referenced within the current project. Thus, on-line components not called by existing components in the project, such as MFS screens, may need to be added manually.
The Display option invokes a Display Options dialog. From this dialog the Revolve user can change the way information is displayed in information windows. The Simulated Text option shows the type of each usage, plus some abbreviated information about the usage.

The Quick Text option, the fastest, only displays the type of the usage.

The Real Text option displays the actual text of the usage, so it takes longer to access the files than the other options.

Line numbers are displayed by default in Revolve. To remove line numbers from the information windows, uncheck the Display Line Numbers checkbox.
The Tools options, invoked from the Utilities/Options/Tools allow the user to have access to the option dialogs of various Revolve tools and views in order to set or change default settings.
The Browsers options, accessed from Utilities/Options/Browsers, allows the user to have access to various option dialogs of various Revolve browsers in order to set and change default settings.
The File Access dialog, invoked by selecting File Access from the Utilities menu, allows you to set the location of Revolve's temporary file cache and to open additional setup dialogs.
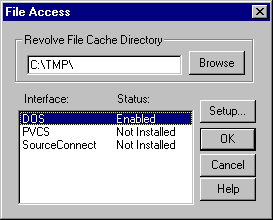
When you are using source files from external sources, Revolve keeps temporary copies of those files in a subdirectory called RVIOCASH. Revolve creates this subdirectory in the location specified within the Revolve File Cache Directory field on the File Access dialog. You can establish the cache location by entering a fully qualified path in the Revolve File Cache Directory field or by clicking Browse to navigate to the desired location.
The cached files are deleted when a new project is opened within Revolve and when you exit from the Revolve project.
Revolve accesses source files in external file systems through one or more Revolve features called interfaces. The DOS interface is enabled with every Revolve installation. It can reach all files that are accessible in your workstation's file structure and files in redirected network paths. These files are accessed directly without being cached.
Separate interfaces are used to access files in a PVCS source file management system or files stored on a mainframe. To enable these interfaces you must have the appropriate components installed on your workstation and they must be visible to Revolve. In other words, the external product's dynamic link libraries must be in Revolve's "BIN" directory or reside in a directory listed in your workstation's PATH environment variable. Copies of files opened through these interfaces are temporarily stored in the Revolve File Cache (RVIOCASH).
Each enabled interface has a setup dialog that you can use to make adjustments to the file access configuration. To invoke a Setup dialog, select an enabled interface in the File Access dialog and click Setup,.
Revolve supports Intersolv's PVCS Version Manager® 5.2, or compatible, matching Revolve 16/32-bit capability.
When DOS is selected and Setup is clicked, a DOS Options dialog will be displayed.
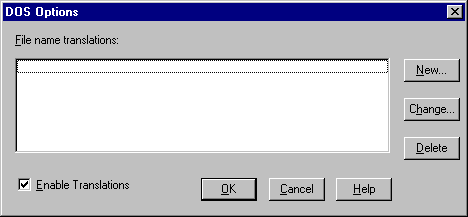
This dialog allows you to map one DOS drive, directory, or file name to another. DOS mapping is useful when a Revolve project has been built on a drive that appears to have different logical paths to different users. For example, if a Revolve project has been built on one user's workstation where the source files are located on a logical path beginning with S:\SOURCE and those same source files are stored on a second user's workstation on the logical path J:\CODE, then a file name translation can be used to re-map the original files to both users files.
To create a mapping:

To change an existing mapping, select the mapping in the DOS Options list box, click Change..., and make appropriate changes. To remove a mapping, select the undesired mapping and click Delete.
To setup PVCS and add Revolve components based on PVCS archives, you should:
Note: Be sure your PVCS system is operational before you try to access it through Revolve. You should be able to read, and possibly lock and write, archived revisions using only PVCS commands or the PVCS Graphical User Interface. If you have trouble locating the PVCS configuration file, or if you have trouble with PVCS licensing or privileges, you should consult your PVCS system administrator.

Note: When you click OK in the PVCS Options dialog, the PVCS User and Check-in information is saved immediately in a file named RVIO.INI, located in your "Windows" directory. The PVCS configuration file name is saved with your Revolve Project information.
Thereafter, Revolve will get workfiles, as needed, from the PVCS archives. Normally, no locks are established in an archive. Revolve temporarily locks revisions only if you do a Save from a Revolve Editor Window.
Revolve requires the following PVCS privileges:
| Functions:
|
Operation:
|
|---|---|
| GetNonTip, GetTip, ViewArchiveHeader, ViewArchiveRev | For basic operation. |
| AddVersion, DeleteVersion, LockNonTip, LockTip, ModifyVersion, PutBranch, PutTrunk, StartBranch, Unlock | For source file update. |
| AddGroup, DeleteGroup, ModifyGroup | For updating source files in Promotion Groups. |
PVCS administrators may provide a PVCS configuration file that contains directives for the operation of PVCS. The default name for this file is VCS.CFG. To specify the configuration file to be used by Revolve, use the Browse... button, select the appropriate file and press OK.
The PVCS User field is used to identify the person saving a PVCS workfile. It is registered in the archive when the workfile is checked in by Revolve. The PVCS Version Manager does not use it for control of licensing or privileges.
When you save a PVCS file in a Revolve session, you can configure Revolve to either prompt you for an optional PVCS version label and/or change description. Or you can have Revolve supply default values which can be null. To specify the default, click Default and fill in the field of the PVCS Put Options dialog box. To be prompted for this information instead, select the prompt check box.
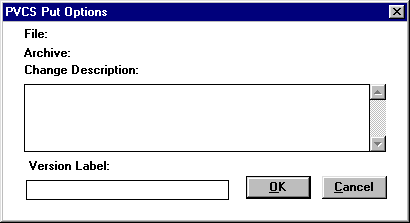
Revolve locks revisions in an archive only when you attempt to do a File/Save. More specifically, if you modify a source file and save it, Revolve creates a branch based on the original revision in the archive, and attempts to merge it with the current tip revision of the trunk. If there are conflicts that cannot be resolved automatically, you are notified that the Save failed. In that case, the workfile is saved as a branch revision. If the Multilock Revision PVCS Directive is in effect, Revolve will usually be successful in checking in your workfile, even if other PVCS users are actively making modifications to it. However, if the Multilock Revision PVCS Directive is not in effect, the Save will fail if another PVCS user holds a lock on a revision that Revolve attempts to lock. All locks used by Revolve are temporary, and are removed before the end of the Save operation.
If your PVCS configuration uses promotion groups, and the revision you are trying to modify is not in a development level promotion group, you will be prompted for the name of one in order for the PVCS check-in to go to completion. Revolve will check-in your workfile as a member of the development group you specify.
Copyright © 1998 Micro Focus Limited. All rights reserved.
This document and the proprietary marks and names
used herein are protected by international law.
 | Information Browsers | Complete Project |  |