
 | Analyzing Data Impacts | Exploring, Documenting, and Measuring |  |
Annotations are effective ways to document your project. You can use them to make notes to yourself about project components or you can use them in multiple user projects to alert other users of specific situations or to assign coding tasks.
You need to have read the chapter Start Here for the Tutorials! and worked through the first session, Creating and Loading Projects, before you do this session. In this session, we assume that you have created Sample.prj.
This session shows you how to take information from a Revolve analysis and add it to an annotation. Then you will use the Annotation tool to modify the annotation.
Annotations are useful in helping analysts track enhancements and to help programmers share code for research. The Annotation tool is dynamic and flexible , enabling you to use information contained in an annotation as a starting point for analysis.
You will apply the procedures in this session to the sample project created in Creating and Loading Projects. If Revolve and sample.prj are closed, open them like before.
In this session you:
To do this:
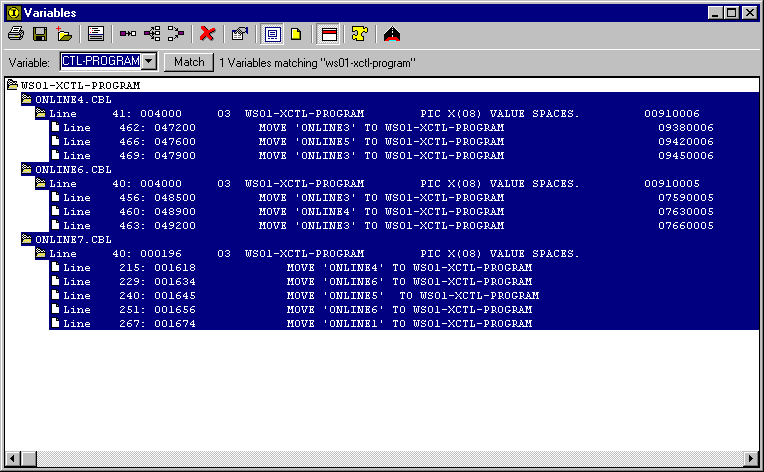
The Variables browser is displayed..
When the Variables dialog is opened for the first time, it will display, by default, the direct modifications, references, and redefines of the specified variable(s). The displayed information can be changed by adjusting the options in the Variable Information Options dialog.

Figure 9-1: Information Screening
A group of information has been isolated and can be used to create a coding task.

Figure 9-2: Selecting information for an annotation
The Capture Results interface is displayed. This enables you to add information to annotations, subprojects, Pop files, and Tag files.
The Required Field dialog is displayed, prompting you to, "Please Enter a Title for this Annotation:."
Locations modifying WS01-XCTL-PROGRAMin the open field.
A Revolve dialog informs you how many elements were added to the annotation.
The annotation is created and ready to be applied in coding tasks. Information can be added to the annotation and it can be edited. We'll elaborate on this in the next session.
To view the annotation:
LOCATIONS*in the Match edit field.
Be sure to include the wild card character (*) or the match will look for an annotation named LOCATIONS.
The Annotation tool searches an annotation that begins with LOCATIONS. The annotation we created in the previous procedure is displayed.
The information about the annotation as well as the information that we capture from variable WS01-XCTL-PROGRAM is displayed.
To edit the annotation LOCATIONS MODIFYING WS01-XCTL-PROGRAM:
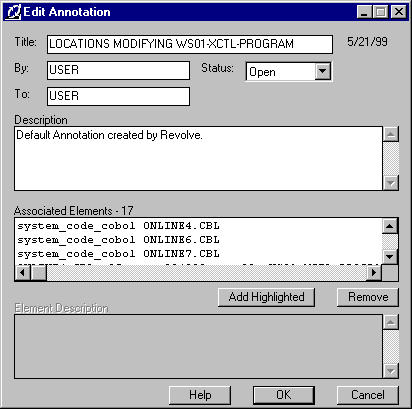
The Edit Annotation dialog is displayed. It contains current information about the annotation, including its title, creator, intended recipients, status, and a descriptions about the contents. In this interface you can modify any aspect of the annotation according to your analysis needs. See Figure 9-3.

Figure 9-3: Edit Annotations
Enhancement Request for all locations modifying WS01-XCTL-PROGRAM
Notice this is where programmers will check to see why this annotation was created.
Notice that the source code is available for the contents of the annotation. You can implement modifications in the Annotation tool and link to other tools and browsers to extend analysis. This concludes this exercise.
You can close Revolve, if you want to stop for now. The project that you have created and loaded is automatically saved.
You can continue with the next tutorial later, by simply reopening the project.
Copyright © 1999 MERANT International Limited. All rights reserved.
This document and the proprietary marks and names
used herein are protected by international law.
 | Analyzing Data Impacts | Exploring, Documenting, and Measuring |  |