
 | Creating and Loading Projects | Editing Source Code |  |
In Revolve, subprojects act as projects within projects to make source code analysis more customized and streamlined.
You need to have read the chapter Start Here for the Tutorials! and worked through the first session, Creating and Loading Projects, before you do this session. In this session, we assume that you have created Sample.prj.
A large Revolve project can consist of many source code files. At times it
is easier and more effective to take project components that you know are
related or of interest and isolate them in individual analysis. Revolve
facilitates this with the subproject feature. A subproject is a collection of
project components that are grouped for separate analysis. Elements can be
added to subprojects with the
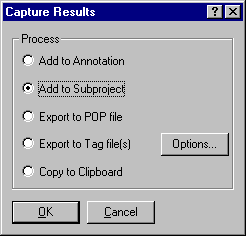
![]() Capture Results
dialog, available in most tools and browsers.
Capture Results
dialog, available in most tools and browsers.
If you closed Revolve, open it as you did before. To open sample.prj, click the Project menu and choose Open. Or select sample.prj at the bottom of the Project menu.
In this session you:
To create a subproject:
To select elements that are listed consecutively, click and drag with the mouse. To select elements that are not listed consecutively, use the control key and the left mouse button simultaneously.
The Capture Results dialog is used to add information from a Revolve window to annotations, subprojects, .pop files, and tag files.

Figure 6-1: Adding to Subprojects
BATCH1 and BATCH2.CBL have been added to the new subproject. A Revolve prompt confirms that elements were added to the subproject.
The subproject is created, loaded, and ready to be analyzed.
Leave the Project Manager open for the next exercise.
To view the contents of subprojects:
The Subprojects window serves the same purpose for subprojects that the Project Manager serves for projects.
The * wildcard character displays all the subprojects that exist in the loaded project.
Notice the two files you added in the previous exercise are displayed. In this window you can add and delete subprojects, view the source code, and add files to the subprojects.
The file BATCH2.CBL is deleted from the subproject but not from the project.
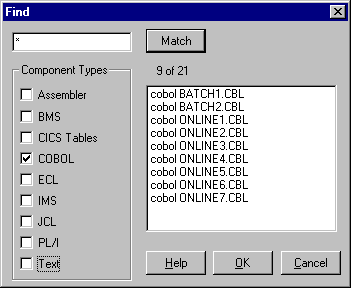
The Find dialog enables you to navigate through your project's files and locate elements to add to the subproject.
The Find dialog should correspond to Figure 6-4.

Figure 6-2: Find Dialog
ONLINE7.CBL has been added into the subproject.
This exercise demonstrated how easy it is to manipulate subprojects.
To apply Revolve's analysis features to subproject SP01:
When you want to apply Metrics to the entire project again you select None in the Subprojects dialog.
The Metrics tool displays a folder for ONLINE7.CBL and BATCH1.CBL.
The Metrics tool displays the measurements for the component BATCH1.CBL.
You can close Revolve, if you want to stop for now. The project that you have created and loaded into the database is automatically saved.
You can continue with the next tutorial later, by simply reopening the project.
Copyright © 1999 MERANT International Limited. All rights reserved.
This document and the proprietary marks and names
used herein are protected by international law.
 | Creating and Loading Projects | Editing Source Code |  |