

| The Interface | Managing Projects | |
This chapter describes creating and completing projects.
A large system application can consist of hundreds, even thousands of source files. However, during system analysis typical users are only interested in a small number of source files at any one time. To make this process easier, you need to identify the source files that are of interest in your system and use them to create projects. Projects are beneficial because:
Projects are the basis of all analysis and application maintenance in Revolve. Before analysis can begin, a new project must be created. To create a new project, you must determine its name, its location on your local system, and the source files that comprise it. Once this data has been collected it is parsed to create a database representation of the source files. Parsing is the process where each source file is processed and compiled into the project database. This database contains extensive information about your system. Specific details, from individual items like MOVE statements to the names of variables, are cataloged and are accessible with the various tools and browsers provided.
Before you create a project, it is good practice to create a directory that will contain only the new project's components. If two projects coexist in the same directory and files are shared, then conflicting versions of those files will occur. This happens because every time a file is parsed in one project it causes the other project to be inconsistent. By keeping projects separate you ensure your project's source code integrity.
After you have designated a directory for your project select New... from the Project menu. The New Project dialog box is displayed,. This where the name and location of the new project file are defined. The name that is entered here becomes the name of the .prj file. Once this is done the next step is to add components. Remember, a single project can contain up to 32,000 source members including COBOL, JCL jobs, and others depending on language extensions being used. Please note that this figure does not include imports (libraries, copybooks, includes, procs, control-cards, or macros). Use the Add Components dialog box to navigate to the location of the source files, select them, and add.
Project creation is complete when all the source files have been added and parsed. Parsing creates a database file for each source file. Each database file has the same name as the original source file and is given an extension of .rd#. Database files are stored in the directory that contains the .prj file along with system-wide database files. System-wide database files have the same name as the project and are given extensions like .ud#, .rt#, .rl#, .rv#, .rp#, .ra#, .pu#. If any changes are made to the source files, then the project must be parsed again to bring all the database files and source files up to date.
Notice in Figure 3-1 that source component ABC.CBL is added to Project.PRJ with Add Components and parsed. The database file ABC.RD1 is created during the parse. ABC.RD1 is the representation of ABC.CBL that is used in analysis. When you make changes to ABC.CBL, ABC.RD1 must be parsed to incorporate the most recent modifications.

Figure 3-1: The Project Creation Process
Projects created in Revolve 4.1 are incompatible with version 5.0. This means you cannot use Project > Open to open an older version's project in Revolve 5.0. If you try to do this, an error message will be displayed. To enable you to transfer projects between versions, the Import Project function is provided. You should create a new project in the 5.0 version of Revolve and then select Import Project from the Project menu. You are prompted to transfer User Relation information, which includes Complete Project specifications, Search Directories, File types, and Component Parameters. You are also prompted to confirm that Annotations should be transferred. Refer to the on line help for more information.
You can also import .pop files with the Import Project function. This is useful for integrating information from Mainframe Express.
When a project is loaded, Revolve attempts to resolve all system-wide relations. However, user intervention is occasionally required, especially in cases where direct name matching is not appropriate. These relations are needed to perform system-wide analysis tasks like tracing how a field impacts other fields throughout the project. With the functionality provided in Complete Project you can connect common files, executables, and screens with appropriate files in your system or indicate that a resolution is unavailable.
We recommend that you leverage Complete Project's features against your project before you begin analysis. This enables you to tie up any loose ends that may exist and ensure the integrity of your analysis.
The Complete Project window is displayed by selecting Complete... from the Project menu. Possible problems are displayed as folder entries in the window. Expand the folders. Anything listed below the folder entry needs to be examined more closely. Specifically, a Fix should be performed.
To fix problems in your project, select the problems or problem types
displayed in Complete Project and click
![]() Fix.... An
appropriate Fix dialog is displayed. When the parent (top line) of the Complete
Project entry is selected and the Fix button is clicked, a dialog will
be displayed asking if all pertinent items should be included in the fix. If
you choose No , then each problem will need to be repaired individually.
If you choose Yes the Skip button is enabled and allows you to
move down the list of entries, skipping those entries which should not be
fixed.
Fix.... An
appropriate Fix dialog is displayed. When the parent (top line) of the Complete
Project entry is selected and the Fix button is clicked, a dialog will
be displayed asking if all pertinent items should be included in the fix. If
you choose No , then each problem will need to be repaired individually.
If you choose Yes the Skip button is enabled and allows you to
move down the list of entries, skipping those entries which should not be
fixed.
An Unused Load Module signifies a program which is not invoked by any other component in the project. Typically the problem occurs in four ways:
A Load Module without Source Code signifies a load module which is not associated with any source code. This problem occurs in three ways:
Note: By default, a program's load module name is determined by the PROGRAM-ID in the Identification Division. However, Revolve also allows load module names to be determined directly from the source code's file name. To enable this function, select the Utilities menu and choose Options . Click the Component Parameters tab, and check Use Component Name.
A Copybook/Proc not found signifies that a copybook or proclib include file could not be found in the project. This problem occurs for two possible reasons:
A Screen without Source Code signifies that a screen used in the project is missing source code. This problem arises in three ways:
A PROGRAM external file not associated with files signifies that a COBOL external file is not being properly associated with a physical data file. This problem occurs for three possible reasons:
An Unresolved System Variable signifies that a variable used to
resolve a system-wide access (calling a program, sending to a screen, etc.)
could not be populated with any values. To fix these problems associate the
variable with the proper value. You can type in the full name directly or type
a match query and use the match button to populate the list of existing
system-wide items. If multiple values need to be entered for a particular
variable use the ![]() Variable Data dialog.
Variable Data dialog.
A CICS Dataset not associated with files signifies that a CICS dataset is not associated with a physical data file. This problem arises for three possible reasons:
A CICS program not associated with load module signifies that a CICS program can not be related to an existing load module in the system. This problem occurs for two possible reasons:
A CICS transaction not associated with load module signifies that a CICS transaction can not be related to an existing load module in the system. This problem occurs for three possible reasons:
A Component with Errors signifies that a component was not properly
loaded. Typically this means a component was added with the wrong type. For
example, an Assembler file added as COBOL. Or the parser options were set
incorrectly. Use the ![]() Delete function on the Project Manager to remove improperly
added components.
Delete function on the Project Manager to remove improperly
added components.
Note: The Parsing Problems scripts, accessible in the Scripts tool, are useful for identifying components with errors.
An IMS transaction not associated with load module signifies that an IMS transaction can not be related to an existing load module in the system. This problem occurs for three possible reasons:
An IMS program not associated with PSB signifies that an IMS program can not be associated with a PSB. This problem occurs for three possible reasons:
An IMS DBD not associated with files signifies that an IMS DBD can not be associated with a physical data file. This problem occurs for five possible reasons:
An IMS PSB Not Used signifies that there are IMS PSBs that are not associated with COBOL programs. To remedy this problem:
IMS PSBs without source code are caused when the project contains IMS PSBs that are not associated with any source code. This problem can occur in three ways:
IMS DBDs not used signals that the project contains IMS DBDs that are not referenced with IMS PSBs. To remedy this problem:
IMS DBDs without source code alerts you that the project contains IMS DBDs that are not currently associated with any source code. This problem can occur in three ways:
IMS DBDs not associated with files signifies that the project contains IMS databases which are not associated with physical files. This problem occurs for three possible reasons:
Unused Copybooks alerts you that copybooks have been added to the project but are not referenced in any of the programs. To remedy this problem:
IMS MFS Message not invoking an IMS transaction signifies IMS MFS Message that could not call or find a transaction. This problem can be remedied by associating the message with an IMS transaction.
The Review feature, displayed when you click
![]() Review,
provides a listing of all system-generated and user-generated resolutions to
system-wide problems.
Review,
provides a listing of all system-generated and user-generated resolutions to
system-wide problems.
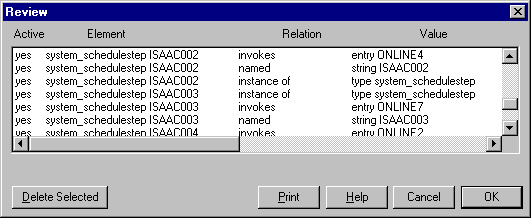
Figure 3-2: Review
The Review dialog box contains the following columns:
If a mistake was made during a Complete Project fix, then you can delete the incorrect relation by selecting the relation and clicking Delete Selected. When finished reviewing the Review List, click OK to return to Complete Project.
In COBOL and PL/I, statements can invoke a load module or screen, or access
a data file through a variable. To handle this case, Revolve creates multiple
invoke and access relations, one for each value of the variable. Initially
these values are computed by Revolve during the load. The
![]() Variable
Data button displays this list of values and enables you to modify them, so
that the proper load modules are invoked and the proper data files are
accessed.
Variable
Data button displays this list of values and enables you to modify them, so
that the proper load modules are invoked and the proper data files are
accessed.
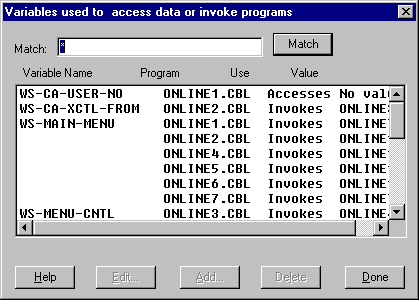
Figure 3-3: Variable Data
By adding values to a variable, you override the system-defined values (and any improper accesses and invokes). Once a new value has been added to the variable, any system-generated values are ignored and removed from the list. You can further customize the list of user-defined values with the Edit and Delete buttons. To restore the list of system-generated values for a particular variable, all user-defined values for that variable need to be deleted.
Process Schedules, displayed by clicking
![]() Process
Schedules , is used to create, modify, and delete scheduling information.
Schedules are used to emulate JCL, replace missing JCL, or create high level
schedulers for your project. You define schedules by specifying the order that
components in the project's source code are executed. This information is then
used in the System
view to show the correct execution relations for job/program/transaction
execution.
Process
Schedules , is used to create, modify, and delete scheduling information.
Schedules are used to emulate JCL, replace missing JCL, or create high level
schedulers for your project. You define schedules by specifying the order that
components in the project's source code are executed. This information is then
used in the System
view to show the correct execution relations for job/program/transaction
execution.
To create a new schedule,
The new schedule appears in the Process Schedules window.
To add elements to this new schedule:
The process that was added is contained in the folder for the new schedule. Processes are organized in descending order from last to first. The process that appears directly beneath the parent or top folder is the last step in the schedule. Likewise, the entry at the bottom of the list is the first step or process in the schedule.
If you want to add a new process to the list, select the line that you want
the new process to precede and repeat steps 2-6 above. The new process is
inserted beneath the selected one in Process Schedules. The System view
graphically depicts this information by ordering the displayed components
according to the process definition. To delete a schedule select the undesired
schedule in the information window and click
![]() Delete
Schedule. To delete a process select the undesired process and click
Delete
Schedule. To delete a process select the undesired process and click
![]() Delete
Process .
Delete
Process .
Note: Schedules are stored as .SCH files and can be manually entered
into a project with the Add Components dialog. Remember, after the new schedule
has been added to the project, a
![]() Make must
be performed to bring the project up to date.
Make must
be performed to bring the project up to date.
Execution Indirection, invoked with the Execution Indirection button
![]() , enables you to configure your
project to handle low-level routines that perform INVOKES or data accesses
based on passed parameters. For example, Wang COBOL programs commonly use an
assembly routine LINK to call other programs based on the first parameter of
the call statement.
, enables you to configure your
project to handle low-level routines that perform INVOKES or data accesses
based on passed parameters. For example, Wang COBOL programs commonly use an
assembly routine LINK to call other programs based on the first parameter of
the call statement.
CALL LINK USING 'PROGNAME',...
In order for your project to recognize that this statement is calling the program PROGNAME, you should use the Execution Indirection window to define the parameter.
The following is a brief summary of functionality available in Execution Indirection.
| Click this: |
To do this: |
|---|---|
Add Executable |
Prompts for the name of the executable and adds it to the project. |
Delete Parameter |
Deletes the selected parameter indirection definition. |
| Add Parameter |
Enables you to set up an indirection through a parameter in the Add Parameter dialog. See below. |
To add an indirection, choose the desired load module (or create a new one
with the Add Executable button) and click
![]() Add
Parameter. The Add Parameters dialog is displayed and prompts you for more
information on the indirection.
Add
Parameter. The Add Parameters dialog is displayed and prompts you for more
information on the indirection.
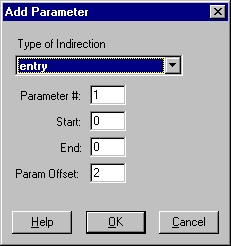
Figure 3-4: Adding Indirection
The Type of Indirection list box enabled you to specify what type of object is being invoked or accessed. The following types are possible:
Make the following modifications to the indirection type.
After you have created your project and completed it, there are some features that you need to be aware of before you begin your system analysis. The Managing Projects chapter provides some essential information that you should review before beginning your analysis. For example, it describes how to determine if your components are out of date, writing scripts to automate administrative tasks, and how to share projects among many users.
In addition to managing project information, you should check out the Configuring Utilities chapter. It describes settings that customize your analysis environment, like Display Options. Or find out about using the SourceConnect feature to access source code on mainframes.
Copyright © 1999 MERANT International Limited. All rights reserved.
This document and the proprietary marks and names
used herein are protected by international law.
| The Interface | Managing Projects | |