| Finding Dates and Reviewing the Worksheet | Analyzing Data Items and Their Year Types |
The tutorial in this chapter shows how to analyze a statement to determine whether it is genuinely a problem, and how to set the category accordingly.
The worksheet now contains all the potentially date-related problems. These are the points of interest. Each point of interest has one or more categories assigned to it, indicating the reason why it is of interest.
The next stage in the process is to systematically examine each statement in the worksheet, exploring the related source code and the data items involved. When you understand the statement fully, you make comments and add reminders in the Notes column, as necessary, and you categorize the statement according to whether you are verifying the application or intending to fix it:
You can categorize points of interest in any way that suits your organization or the application. For example, your organization might need to know whether statements are windowed or fixed using data expansion. SmartFind Plus comes with a set of categories, but your organization can set up its own. The facility to do this is reserved as an administration task, since we recommend that you provide one defined set of categories for your work group to ensure that everyone categorizes consistently.
During this analysis process, you can also examine the data items used in the statements, and possibly adjust the year types and categories assigned to them. To simplify the learning process, examining data items is left until the next tutorial. With a real application, however, you would probably examine and make decisions on the relevant data items at the same time as the statements.
The aim in this tutorial is to categorize every statement according to whether it is a problem or not. The A-Yes category is used to indicate that the statement is logically unsound and needs fixing. A-No is used to to indicate that the statement is OK and does not need fixing, perhaps because it has already been fixed correctly.
In this tutorial, you analyze each statement in the worksheet and assign it an A- category using:
This tutorial takes about 30 minutes.
This section explains how to run the tutorial for the first time and how to reset everything so that you can restart the tutorial.
If you are continuing immediately from the last tutorial, you can skip this Preparation section and go straight to next main section in this chapter, Reviewing the False Positives.
If you stopped following the tutorials, open the Tour project and the default worksheet, as before, and check that your options are set correctly for the tutorials. For details, see the sections Setting the Analysis Tools Options and Setting the Worksheet Options in the chapter Finding and Adding Dates to the Worksheet.
The worksheet should contain 53 data items and 119 statements.
If you have already started this tutorial and now want to restart it, you need to reopen the backup worksheet that you made at the end of the previous tutorial. To do this:
Depending on how you have Windows set up, the worksheet names are displayed with or without the .mdb extension.
The title bar of the worksheet now shows Worksheet - Tour, and you can work on this leaving the backup EndofChap6.mdb intact in case you need it again.
The worksheet should contain 53 data items and 119 statements.
In the previous tutorial, the Verify - all research analysis tool searched for all the potentially date-related problems. Despite the specialized analysis criteria used to identify potential date problems, some of the identified statements do not require remediation for the year 2000. These are known as false positives.
You now need to examine the false positives to see if you can disregard any of them, to help focus on the statements that are genuinely a problem. The tool started this process, by running the component tool Verify - false positives categorization, which identified any likely false positives in the worksheet and categorized them as follows:
In this section, you review the false positives in the context of the source code.
The worksheet is now filtered and shows 16 statements. Notice that the information bar towards the top of the worksheet shows Filtered (16) .
COMPUTE MONTHS-ELAPSED-SINCE-JAN-1900 = ...
Only MM has the category R-NonYearType. Since
some of the data items represent years, this means that the statement
is not a false positive, and so you must leave this statement intact
for now.
COMPUTE MMM-CONTRACT-TERM-TO-DATE = ...COMPUTE SUB2 = (YYMMDD-N + 9999) / 10000
Go back to the Statements tab. Review these other COMPUTE statements in the same way. They are not false positives and you can skip over them.
IF P-FIRST-DD = 0 OR > 31 OR
Since it refers to only days and months, it is not a problem. It is a false positive. Categorize the statement as not a problem as follows:
IF P-LAST-DD = 0 OR > 31 OR
This statement is not a problem in the same way. Categorize it as A-No in the same way.
PERFORM VARYING SUB2
SUB2 used?P-CONTRACT-LENGTH in the Source View.In the previous tutorial, the tool Verify - SmartFind research ran automatically, and found the majority of points of interest, adding them to the worksheet with the category R-SF Wizard.
The next stage is to systematically examine each of these statements to decide whether or not it is a problem before you finally assign the appropriate category. During this process, you can add notes to the statement and its data items and potentially adjust the year types of the data items, but for now, year types are left until the next tutorial.
In this section, you examine the statements with the category R-SF Wizard and assign them either A-Yes or A-No.
The worksheet now shows 83 filtered statements.
ADD 1900 P-START-YEAR GIVING TMP-YYYY
P-START-YEAR in the worksheet at the top.
TMP-YYYY in the worksheet.
TMP-YYYY.ADD 1900 TO YYYYADD 2000 TO YYYYIF YYYY > 50
IF MMMM-CONTRACT-TERM-TO-DATE <= 6
From the source code, this statement appears to be referring to a duration rather than a date and is not a problem. Set the statement's category to A-No.
IF P-FIRST-DD = 0 OR > 31 ORIF P-LAST-DD = 0 OR > 31 OR
You already categorized these statements as A-No, because they did not involve any year-related data items, and so you can skip these statements.
IF P-YEARS-TO-REPORT = 0 OR > 10 OR
This statement involves durations rather than dates and is not a problem. Set the statement's category to A-No.
IF RD-END-YY < P-START-YEAR ORIF YYMMDD <= RD-END-DATE
You can see from the source that these statements are comparing years and so are definitely a problem. Set the statements' categories to A-Yes.
MOVE "190427" TO AC-CONTRACT-END-DATE
This statement contains "19" but this is the year not the century and so is not a problem. Set the statement's category to A-No. You could also add a note saying "Literal is a year not a century".
| Statement that starts with | Category |
|---|---|
PERFORM READ-CONTRACT |
A-Yes |
PERFORM VARYING TMP-YY
|
A-Yes |
SUBTRACT 20000 |
A-Yes |
SUBTRACT 5 |
A-Yes |
SUBTRACT P-START-YEAR |
A-Yes |
SUBTRACT RD-END-DATE-N |
A-Yes |
SUBTRACT MMMM |
A-Yes |
PERFORM VARYING SUB*
(3 statements) |
A-No |
READ and START
(many statements) |
A-No |
SUBTRACT CN-CONTRACT-TERM
(many statements) |
A-No |
SUBTRACT SUB2 |
A-No |
WRITE (many
statements) |
A-No |
All the statements with the category R-SF Wizard are now categorized as either A-Yes or A-No.
There are 10 statements with the A-Yes category.
In the previous tutorial, the tool Verify - supplementary research ran automatically, and found the more obscure points of interest, adding them to the worksheet with a category indicating why it is of interest, such as R-AddNegLitl for adding a negative literal.
The next stage is to systematically examine each of these statements to decide whether or not it is a problem, in much the same way as before, adding notes and categorizing as appropriate.
In this section, you examine the statements that you have not yet examined and categorize them.
The worksheet now shows 33 filtered statements.
| Statements | Category |
|---|---|
ADD -*0000 TMP-YYYY
(3 statements) |
A-Yes |
ADD P-START-YEAR (1
statement) |
A-Yes |
COMPUTE (3
statements) |
A-Yes |
ACCEPT (2 statements) |
A-No |
ADD 1 (4 statements) |
A-No |
IF (2 statements) |
A-No |
MOVE (all statements) |
A-No |
The filtered worksheet should now be empty.
There are 17 filtered statements. These are the statements that need fixing.
All the statements in the worksheet are now categorized as A-Yes or A-No.
Many of the statements are relatively straight forward to understand and establish whether they are a problem or not. Sometimes, however, a statement has wider implications because of the data items it uses and the way those data items are used elsewhere. To help in these situations, the Analyze a statement analysis tool produces a set of all the data items and statements associated with the statement in question.
This section examines one PERFORM statement in depth, using Analyze a statement.
PERFORM READ-CONTRACT-REC.
Drag the statement and point to the name Analyze a statement in the Analysis Tools window.
This produces a set of 11 points of interest and displays them in a Set View, as shown in Figure 7-1.
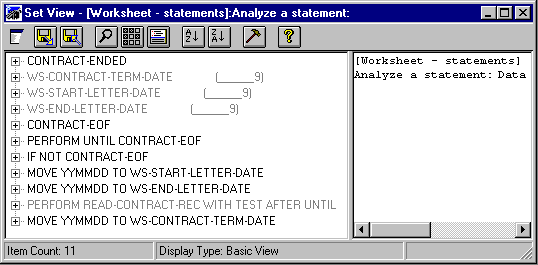
Figure 7-1: Set View
Some set entries are in gray and these are in the worksheet because they are potentially a problem. The entries in black are not in the worksheet, because they are not a problem in their own right. The black entries are useful here to help in analyzing the PERFORM statement in question.
The right pane contains a history of the set, and shows how the set was created. In this case, this shows that the set originated from a statement in the worksheet and used the Analyze a statement tool.
The status line at the bottom shows that there are 11 points of interest in the set.
WS*DATE data items hold dates in the format
year-month-day
CONTRACT-ENDED and CONTRACT-EOF
do not hold dates
Since the PERFORM statement already has the category A-Yes you do not need to do anything further.
The worksheet should now contain 53 data items and 119 statements. 17 of the statements have the category A-Yes.
The worksheet is persistent and is continually saved. However, it is good practice to save a backup of the worksheet from time to time.
If you already have a backup with this name, give a new name such as EndofChap7-1.
You can close SmartFind Plus, if you want to stop for now. You can then continue with the next tutorial some other time.
| Finding Dates and Reviewing the Worksheet | Analyzing Data Items and Their Year Types |