 |
Loading an Application into the Database |
|
Analyzing Statements and Categorizing Them |
 |
The tutorial in this chapter shows how to find the potentially
date-related issues in an application and goes on to describe the
worksheet.
Now that your application is loaded into the database, you need to find
all the potentially problematic data items and statements, and add these
to the worksheet. You can then use the worksheet as the central store for
year 2000 details, and use it to manage and track your work.
This tutorial applies equally whether you are verifying an application
or intending to fix it.
In this tutorial, you:
- Confirm that the sample Tour project has been metered by
pointing to the supplied metering control file
- Run the Verify - all research analysis tool to find the
potentially problematic data items, statements and data files, and add
these to the worksheet giving them the appropriate reason categories
- Review the data items and statements in the worksheet and explore the
relationships between them
This tutorial takes about 20 minutes.
This section explains how to run the tutorial for the first time and how
to reset everything so that you can restart the tutorial.
If you are continuing immediately from the previous tutorial, you can go
straight to the section Metering Code.
If you stopped following the tutorials, to experiment independently or
to close down SmartFind Plus, start this tutorial as follows:
- If SmartFind Plus is not running, restart it in the same way as
before.
- Open the Tour project by selecting it from the recent files
list at the bottom of the Project menu.
If you want to redo this tutorial and start this tutorial from the
beginning again, you will have an old worksheet with some information in
it. To start afresh, you need to open an empty worksheet. To do this:
- If you still have the Tour project open, close it using Close
on the Project menu.
- In Windows, delete the Tour project's worksheet. This has the
same name as the project and so is called Tour.mdb, and it is in
the project directory, which is Projects\Tour.
- If SmartFind Plus is not running, restart it in the same way as
before.
- Open the Tour project by selecting it from the recent files
list at the bottom of the Project menu.
- Check that your options are set correctly for the tutorials, as
described in the later sections Setting the
Analysis Tools Options and Setting the
Worksheet Options.
SmartFind Plus is metered on a line-of-code basis, which means that the
code has to have been metered before you can process it through SmartFind
Plus. However, only one person needs to meter the code and then everyone
can process the code without further cost.
The demonstration programs are already metered, so all you need to do is
to point to the file that confirms that the code has been metered. This
file is called the metering control file.
When you want to process code other than the demonstration programs,
someone authorized will meter the code and tell you where the metering
control file is. The metering administrator can authorize users to meter
code, by providing an enabled usage counter and setting up the metering
control file with write access for those users. Since metering is usually
a one-time task, and since it involves debiting your line-of-code credit,
effectively paying money, we advise the administrator to limit
authorization as much as is feasible for your organization.
- Click Analysis Tools on the Year 2000 menu.
- If the Analysis Tools are now available, you do not need to
do anything about metering. You are already pointing to the correct
metering control file that confirms that the demonstration programs are
metered. Go the next section, Setting the Worksheet
Options.
- However, if the Analysis Tools are not available, the
Metering wizard starts up. The Redeem application's source files
are already metered; you will not be charged for this project. However,
you need to point to the metering control file that confirms that the
application has been metered.
-
Follow the wizard's instructions. When asked for the metering
control file, point to the directory Sfplus\Revolve\Sample\Meter,
which contains the relevant metering control file, factory.bdb.
Continue with the wizard and click Finish at the end.
When you follow any of the tutorials, you need to set up the worksheet
and the Analysis Tools with the necessary options, so that your SmartFind
Plus behaves the same as that in the tutorial.
The tutorials require you to set Find and Verify mode, so that
your SmartFind Plus matches that described in the tutorials. This mode
disables some fix options and defaults to verification reports. The later
tutorial, Fixing the Date Issues uses Find and Fix mode,
so that you can explore the fixing options there.
- Click Open Worksheet on the Year 2000 menu. If
necessary, click OK to open an empty default worksheet called
Tour.mdb for the Tour project.
- Click
 Options on the worksheet.
- On the Worksheet tab, make sure that the options are set as
follows:
-
Click Find and Verify mode.
-
Check Show information bar.
- Choose whichever date format you prefer, such as DD/MM/YYYY.
- Uncheck all the other boxes.
- Go to the Fix Options tab and make sure that the options are
set as follows:
- Set By default, mark these as to Auto.
- Set Current macro library to Micro Focus ANSI85
library.
- Set Default fix type to In-line code.
- Click OK.
When you follow any of the tutorials, you need to set up the Analysis
Tools with the necessary options, so that your SmartFind Plus behaves the
same way as that in the tutorial.
- Click Analysis Tools on the Year 2000 menu, and
click
Options on Analysis Tools.
- On the Set Viewer Options tab, make sure that the options
are set as follows:
- Check
Colorize items that exist in the worksheet
- Check
Display prompt before changing set contents
- On the Analysis Tool Options tab, check
Edit settings before running tool. If you do not check
this, when you subsequently run the Analysis Tools, they run immediately
without allowing you to see and change the settings.
-
On the Scope tab, make sure that Universal Scope
is clicked, so that all the programs in the application are searched by
the Analysis Tools.
- Click OK.
-
Check that the status line at the bottom of the Analysis
Tools window shows Settings: Defaults. This means that the
Analysis Tools will use the default settings. If Defaults is not
shown, set it as follows:
- Click Settings on the Year 2000 menu.
- Select Defaults as the settings group.
- Click OK.
The first step in investigating the extent of the year 2000 problem in
your application, is to find all the potentially problematic data items,
statements and data files. To do this, you use the Verify - all
research analysis tool, which contains the following main tools:
-
Verify - SmartFind research. This tool first finds the
elements of code that represent dates, based on the size and type of
data items, some specific literals, and some other criteria. It then
focuses on the lines of code where these elements might cause a logic
problem. For example, comparing two date data items across the century
boundary causes a logic error, but moving one date data item to another
does not.
These potentially problematic data items and statements are then
added to the worksheet with the category R-SF Wizard
indicating that the tool derived from the SmartFind wizard found them.
-
Verify - supplementary research. This tool includes a
whole range of tools, each one looking for a specific type of date
issue, such as truncation of data items containing dates, or negative
additions that are in effect subtractions.
Each included tool finds and adds the points of interest to the
worksheet, assigning the tool's category to each one. The category
indicates the reason why each point of interest is considered an
issue. If a point of interest is found by more than one tool it is
added only once, but additional categories are added, so that a point
of interest can have several categories if it is found by several
tools.
-
Verify - false positives categorization. This tool
includes several tools that examine the points of interest already added
to the worksheet, to identify any that have some indication that they
are not year related or are not a problem for any other reason. These
points of interest are sometimes referred to as false positives.
Each included tool examines the worksheet for false positives of one
sort and assigns the tool's category to any that it finds.
In this section, you find all the potentially date-related elements,
using the Verify - all research tool.
- Double click Verify - all research in Analysis Tools.
This shows the three included tools, as described earlier.
- Display the tools included in the Verify - supplementary research
tool to see the range of issues this tool searches for, as follows:
- Right click Verify - supplementary research.
- Click Properties.
- When you are ready, click Cancel.
- Display the tools included in the Verify - false positives
categorization tool in the same way.
- Click OK to run the tool Verify - all research.
If necessary, click Yes to create the worksheet.
This runs all the included tools, one after the other, and takes one
or two minutes, depending on the power of your machine.
The worksheet now contains all the potentially date-related problems.
These are the points of interest.
From now on, you use the worksheet to manage and track your work,
recording in it your decisions and information concerning individual
points of interest, such as why it was added to the worksheet or why it is
not a problem after all. This provides an audit trail and enables you to
revisit earlier decisions if necessary.
The worksheet is now displayed, as shown in Figure 6-1.
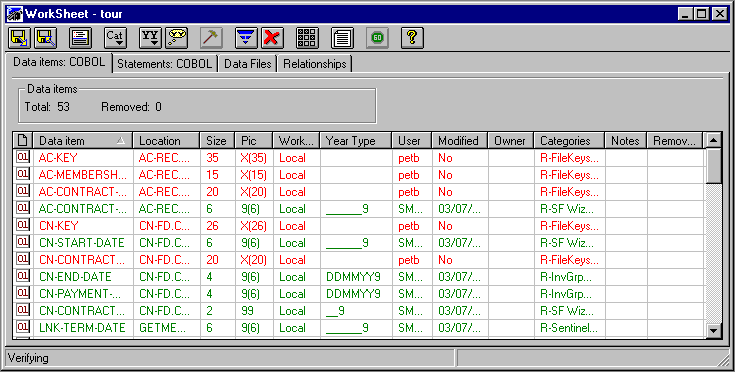
Figure 6-1: Worksheet
- Click the Data items tab if it is not already displayed.
This tab lists the data items that you have added to the worksheet.
These are the data items of interest in the project. Among other
things, the worksheet shows the location of each data item's
definition, and who added the item to the worksheet and when.
- Notice that a count of 53 data items shows in the information bar
towards the top of the worksheet.
- Some of the data items are in red, indicating that they do not have
year types assigned to them in the Year Type column. The green
data items do have year types.
- The Year Type column describes the type of date that the data
item represents. It indicates, among other things, the data item's
logical date format (such as yymmdd or ccyy) and its physical format
such as numeric or alphanumeric as defined by its PICTURE. Usually, a
data item holds data of only one logical format and only one physical
format. The tutorial describes this more fully later.
- The Category column shows the categories that a data item
falls into. Currently, the categories all start with R, which means that
they indicate the reason why the data item is considered an issue. These
categories were assigned by the various analysis tools, each tool
assigning its own category. You can change the categories of a data item
manually, if you discover that different or additional categories are
appropriate.
- The Notes and Removal Reason columns, on the right,
are for various types of information that you can record for each point
of interest in the worksheet. The tutorials show how to use these later.
-
Click
RD-END-DATE and then click
 View Source Code.
This splits the worksheet into two panes with the worksheet at the
top and the source file containing the data item's definition at the
bottom. If necessary, drag the bottom edge of the source view, so that
you can see more source code. You can also drag the horizontal divider
between the worksheet and the source view at any time.
- In the source view at the bottom, notice that the highlighted line is
the definition of
RD-END-DATE. Click RD-END-DATE
in the source view and notice that 78:nn shows in the status bar
at the bottom right of source view, where 78 indicates that the cursor
is at line number 78 within the source file named at the bottom left and
nn is the column number of the cursor.
Notice that RD-END-DATE is defined as a group item
with subordinate items RD-END-YY, RD-END-MM and RD-END-DD,
indicating that it almost certainly holds a date.
- Explore how the data items and its subordinate items are used, as
follows:
- Click
RD-END-DATE in the source view, if it is not
selected any more.
- Click
 Next Usage several times to see how the data item is used
and that it does indeed hold a date.
Next Usage several times to see how the data item is used
and that it does indeed hold a date.
- Click
 Definition
of Usage to return the data definition of
Definition
of Usage to return the data definition of RD-END-DATE.
- Click
RD-END-YY and explore its usages in the same
way.
- Close the source view, by clicking
View Source Code again at the top of the worksheet.
The worksheet contains 53 data items.
This section introduces the Statements tab of the worksheet. It
describes the information available and shows how you can navigate the
statements in the worksheet. Analyzing the statements thoroughly is
covered in a later tutorial.
- Click the Statements tab of the worksheet.
This tab lists the statements of interest in the project. Notice
that a count of 119 statements shows in the information bar towards
the top of the worksheet.
- Some of the statements are in blue and some in red. These colors are
applicable if you are fixing, as is the Status column. These are
described in more detail later in the tutorial Generating and
Editing Fixes.
- Sort the statements into statement order with the ACCEPT statements
at the top, by clicking in the Statements column heading.
-
Right click the first ADD statement and click Properties.
This shows a two pane window showing the statement's audit trail, in the
form of:
-
The statement's change history in the top pane. This shows who
assigned the category R-AddNegLitl to the statement and
when. The history keeps track of any changes to the notes and
categories you set, so that you can revisit earlier decisions.
-
The statement's analysis information in the lower pane. This
shows the search criteria used to find the statement. In this case,
this information describes the format of the data items in the
statement and then shows that the statement involves a negative
addition.
Close the Properties window.
-
Display the data items involved in the first ADD statement, by
right clicking that statement and clicking Show contained data items.
This swaps to the Data items tab and shows just the two data
items used in this statement.
-
Right click the contained data item,
YR-START-DATE,
and click Show statements containing. This swaps back to the
Statements tab and shows the four statements using this data
item, one of which is the original ADD statement.
There are more than just these four statements that use this data
item but they are not of interest and are not in the worksheet. If you
wanted to see those unwanted statements, you would use
View Source Code
as before.
- Redisplay all the statements in the worksheet again, by unchecking
Filtered at the top of the worksheet.
The worksheet contains 119 statements.
The Relationships tab of the worksheet shows the data items and
their corresponding statements in a hierarchical view. Among other things,
this view provides a reliable and quick way of removing data items and
their corresponding statements at the same time.
In this section, you explore the relationships of the data items and
statements in the worksheet.
- Go to the Relationships tab of the worksheet.
- In the Relations box at the top, choose Data item, then
usage. This displays data items together with the statements that
use them, providing those statements are in the worksheet. If a data
item is not used in any worksheet statements, the data item does not
appear here, even though the data item is itself in the worksheet, and
appears in the Data items tab in its own right.
- Expand the data item
P-START-YEAR to see the statements
that use it, by clicking  .
.
This shows that P-START-YEAR is used in five
statements: two ADDs, one IF, one PERFORM and one SUBTRACT.
- Make sure that the Format column is on view, by shrinking the
Item and Location columns as necessary.
The Format column shows that there are two usages for
the first ADD statement involving P-START-YEAR and three
usages for the other statements. This means that there are two data
items in the worksheet that are used in the first ADD statement and
three data items used in each of the other statements.
- To confirm the number of usages, click the PERFORM statement and
click View Source
Code. You can now see this statement fully and in context with the
rest of the code.
- To display all the data items in the PERFORM statement, right click
the statement in the worksheet and click Go to details to show
the Statements tab. Then right-click the statement and click
Show contained data items to view the relevant data items.
- Close the source view, by clicking
View Source Code again at the top of the worksheet.
There are a number of techniques for displaying the worksheet.
- Go to the Data items tab.
- Uncheck Filtered at the top, if not all the data items are
displayed.
-
Sort the data items into alphabetical order, by clicking the
column heading Data item. You can sort the worksheet by any
column, similarly.
-
Widen the Data item column by dragging the divider
between its column heading and the next column's heading. You can also
press Ctrl + F2 to size all the columns to fit the information in them.
-
Hide some of the columns that are not of interest in the
tutorials, by right clicking in one of the column headings and clicking
Customize columns. Select the columns Size, Worksheet, User, and
Modified and click Remove and then OK.
This hides these columns, but still maintains the information.
-
Reorder the columns, so that the Location column is first,
using Customize columns and Move up.
Your selection of columns and their order stays set from one session
to the next, until you change it again.
- Go to the Statements tab and hide the Modified, Owner,
Program, Status, Type, User and Worksheet columns.
- Hide the information bar at the top of the worksheet, by clicking
Options and
unchecking Show information bar. For now, make sure the
information bar is displayed, since you need it for the later tutorials.
The worksheet should now contain 53 data items and 119 statements.
The worksheet is persistent and is continually saved, and so it is
automatically up to date if you shut down.
However, it is good practice to save a backup of the worksheet, so that
you can go back to a previous copy. For example, you might want to return
to the current worksheet, if you make a mistake in a later tutorial.
- At the worksheet, click
 Save to File.
- Specify the filename, EndofChap6, for the backup worksheet
for this chapter.
If you already have a backup with this name, give a new name such as
EndofChap6-1.
- When asked whether to make the saved worksheet your current
worksheet, reply No, because the saved worksheet is a backup and
you do not want to update it.
You can close SmartFind Plus, if you want to stop for now. You can then
continue with the next tutorial some other time.
Copyright © 1999 MERANT
International Limited. All rights reserved.
This document and the proprietary marks and
names used herein are protected by international law.
|
Loading an Application into the Database |
|
Analyzing Statements and Categorizing Them |
|