

| Start Here for the Tutorials | Finding Dates and Reviewing the Worksheet | |
The tutorial in this chapter shows how to create a project and load the source files into the project database.
Before starting the year 2000 analysis, you need to carry out an inventory of all the COBOL source, copyfiles, BMS files, JCL files and so on that comprise the application.
In this first tutorial, you create a project for the demonstration application and load its source files into a project database. You then review the completeness of the project to make sure that there are not any missing files. Finally, you check the warnings that might have occurred when parsing the application.
This tutorial takes about 20 minutes.
This section explains how to restart the tutorials if you have already followed some of them. If you have not followed any of them at all, you can go straight to the next section.
To restart the tutorials:
This deletes the project and the worksheet if you have created one.
The central component of SmartFind Plus is a project database containing a complete representation of an application's source code. The database represents not only the content of your application but also its structure. The first step is to create a project for your application and load its source files into the database.
This section shows how to create a project tour.prj containing the demonstration source files, and how to load these files into the database.
 Create New
Folder to create a directory, such as projects\tour, for the
project you are about to create. Never create more than one project in
the same directory.
Create New
Folder to create a directory, such as projects\tour, for the
project you are about to create. Never create more than one project in
the same directory.
If you are running SmartFind Plus on a network, create a local directory for your own copy of the project, to prevent sharing conflicts with other users, for example, c:\projects\tour.
 .
. to go back up one level in the directory hierarchy.
.
. to go back up one level in the directory hierarchy.
Select all source files for the Redeem application, by clicking the subdirectory source.
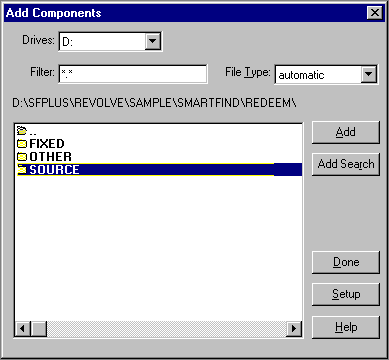
Figure 5-1: Add Components
The new project is now created and loaded into the project database.
When you create a project and load the source files, the files are parsed, and checked for inconsistencies, missing files, misnamed components and so on. For example, parsing might uncover references to other program source files and copy books, or file definitions, screen layouts, job control and so on. You need to check for missing files and add them if appropriate, so that the project database is complete and up to date.
This section shows how to check any potential problems that were discovered when loading the demonstration programs into the database.
There is one control card file that is listed as not found. This does not matter for the purpose of these tutorials, but you can clear it as follows:
 Fix.
Fix. at the top
right of the window.
at the top
right of the window. When you create a project and load the source files, the files are parsed, checking for inconsistencies, COBOL syntax errors and so on. You need to fix these problems as appropriate, so that the database is accurate, complete and up to date before you start the year 2000 analysis itself.
In this section you check whether any parsing problems were discovered when loading the demonstration programs into the database.
 Run/Stop.
There are not any parsing problems.
at the top
right of those windows.
The new project is now loaded correctly into the project database, and ready for you to analyze.
You can close SmartFind Plus, if you want to stop for now. The project that you have created and loaded into the database is automatically saved.
You can continue with the next tutorial later, by simply reopening the project.
Copyright © 1999 MERANT International Limited. All rights reserved.
This document and the proprietary marks and names
used herein are protected by international law.
| Start Here for the Tutorials | Finding Dates and Reviewing the Worksheet | |