Configuring a SP Broker
This section describes how to configure the origin identity provider to act as a SP Broker or a federation hub and also control authentications provided by the Origin identity providers to their Allowed service providers.
Prerequisites for Configuring a SP Broker
-
Identify the Origin identity providers and their Allowed service providers. For example, Company 1 establishes a business partnership with Partner 1, at which Company 1 users can access the application of Partner 1. In this case, identity provider at Company 1, is now the Origin identity provider and Allowed service provider is the service provider at Partner 1, and controls access to its applications.
-
Identify the federation protocols supported by the Origin identity providers and their Allowed service providers. Access Manager Identity Provider supports SP brokering for SAML 2.0, Liberty, or SAML 1.1 federations.
-
Identify whether Persistent or Transient federations needs to be established between Company 1 and Partner 1. For Persistent federation, the user that is authenticated at the Origin identity provider must be mapped to a valid user at their Allowed service provider. For Transient federation, the user is provided with a temporary identity at the Allowed service provider.
Configuration Flow
The following diagram depicts the various configuration steps involved in enabling the SP Brokering feature assuming SP Brokering is enabled between Company 1 and Partner 1:
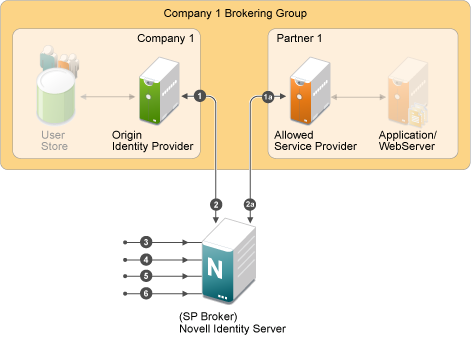
Step 1: Establish Federation at Origin Identity Providers to SP Broker
-
The SP Broker must be configured as a service provider at origin identity provider of Company 1.
For more information, see Creating a SAML 1.1 Service Provider.
If Access Manager identity provider is the Origin identity provider, refer.
For more information, see Creating a Trusted Service Provider.
Step 1a: Establish Federation at Allowed Service Providers to SP Broker
The SP Broker must be configured as an identity provider at allowed service provider of Partner 1.
For more information, see Creating a Trusted Identity Provider.
If Access Manager identity provider is the allowed service provider, refer.
For more information, see Creating a Trusted Service Provider.
NOTE:Step 1 must be repeated for each of the origin identity provider in the federation circle and step 1a must be repeated for each of the allowed service provider in the federation circle.
Step 2: Establish Federations at SP Broker for Origin Identity Providers and their Allowed Service Providers
At the SP Broker, configure origin identity provider of Company 1 as the identity provider. The federation protocol (SAML 1.1/ SAML 2.0/ Liberty) and the federation type (Persistent or Transient) must match the federation protocol and federation type that is used for the respective origin identity provider in the step 1 above.
For more information, see Creating a SAML 1.1 Service Provider, Creating a Liberty Service Provider, and Creating a Trusted Service Provider.
Step 2a:
At the SP Broker, configure the allowed service provider of Partner 1 as the service provider. The federation protocol (SAML 1.1/ SAML2.0/ Liberty) and the federation type (Persistent or Transient) must match the federation protocol and the federation type that is used for the respective allowed service provider in the Step1a above.
For more information, see Creating a Trusted Identity Provider.
For more information, see Creating a Trusted Service Provider.
NOTE:Step 2 must be repeated for each of the origin identity provider in the federation circle and Step 2a must be repeated for each of the allowed service provider in the federation circle.
Step 3: Configure the Attribute to be Cached at the SP Broker (Optional)
If the target applications require user information, then this information must be passed along with the authentication by the origin identity provider. At the SP Broker, these attributes that are received at the authentication must be cached and sent to the allowed service provider during authentication.
For more information, see Configuring the Attributes Obtained at Authentication.
For more information, see Configuring the Attributes Set with Authentication.
Step 4: Create Brokering Group for the Federation Circle with the Origin Identity Providers and their Allowed Service Providers
Create a new brokering group in the SP Broker. Company 1 identity provider and Partner 1 service provider must be selected as the origin identity provider and their allowed service provider.
For more information, see Creating a Brokering Group.
The SP Brokering is enabled when at least one brokering group is enabled. Origin identity providers and their allowed service providers can either be added while creating the brokering group or added/deleted by editing the brokering group.
Step 5: Create Brokering Rules for the Brokering Group
Create brokering rules that provide granular control on the brokering requests. For example, a brokering rule can be configured which can deny a brokering request from an origin identity provider to an Allowed service provider, if the user satisfies a certain role at the SP Broker.
For more information, see Configuring Brokering Rules.
To use roles in the brokering rules, identity role policies must be configured on Access Manager identity provider acting as an SP Broker. Roles can be associated for the user at the SP Broker according to the various parameters that include roles sent by the origin identity provider, attribute values sent from the identity provider.
For more information, see Section 6.2.2, Enabling Role-Based Access Control.
Several rules can be configured for a brokering group. To help administrators understand how the rules are applied, a Rule Validation user interface is provided under each brokering group.
For more information, see Validating Brokering Rules.
Step 6: Create and Configure Brokering URLs
The users at Company 1 are provided with a portal page containing URLs to access the applications at the service provider of Partner 1. These URLs are called Brokering URLs and are designed to pass through the SP Broker. The URLs consists of information that are embedded and a tool is provided to construct these URLs. The administrator can create URLs from a given origin identity provider to their allowed service provider to access a given target application specified by a target URL. The URLs constructed are placed in the users’ portal page.
For more information, see Constructing Brokering URLs.