12.3 Configuring Public Access to Digital Airlines
This section describes the procedures for configuring Access Gateway so that a client can access the Digital Airlines site. Before continuing, make sure you have completed the prerequisite tasks described in Prerequisite Tasks and Section 12.2, Setting Up the Web Server.
-
On the client machine, open a browser and log in to Administration Console.
-
Click > .
The IP address or name of Access Gateway you installed must be listed in the display window.
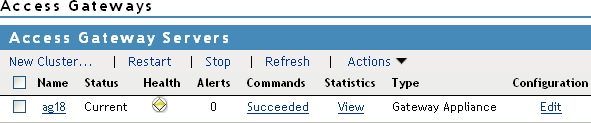
An Access Gateway that has not been configured displays a yellow health status.
-
Click > .
-
In the option, select the configuration you have assigned to Identity Server.
This sets up the trust relationship between Access Gateway and Identity Server that is used for authentication.
-
In the , click , specify DAL as the new , then click .
-
Enable a listening address.
If the server has only one IP address, only one is displayed and it is automatically selected as the . If the server has multiple addresses, you can select one or more IP addresses to enable. You must enable at least one address by selecting its check box.
-
Configure a listening port.
Non-Secure Port: Select 80, which is the default port for HTTP.
Secure Port: This is the HTTPS listening port. This port is unused and cannot be configured until you enable SSL. This configuration scenario does not contain SSL configuration instructions.
-
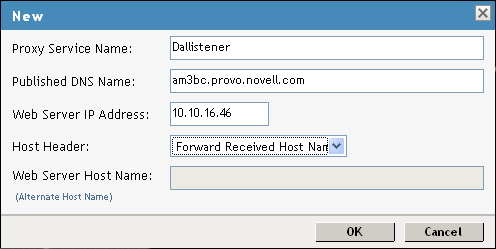
In the , click and specify the following information:
Proxy Service Name: Specify any name that intuitively identifies this service on your Access Gateway server. For this example, specify Dallistener.
Public DNS Name: The DNS name you want the public to use to access your Digital Airlines site. This DNS name must resolve to the IP address you set up as the listening address. This example uses am3bc.provo.novell.com.
Web Server IP Address: The IP address of the web server where your Digital Airlines files are installed.
Host Header: Select from the drop-down menu. The web server and the Digital Airlines pages have not been set up to require the DNS name of the web server in the Host Header, so it does not matter what name is placed in the Host Header.
Your form must look similar to the following:
-
Click .
-
In the , click .
-
Click , then in the , click .
-
Type everything in , then click .
-
In the field, select from the drop-down menu.
Under , you must see /*, which includes everything on that server.
Later on, you will be instructed to change the field to a , but for now, we want you to learn how the example works without any authentication.
-
Click .
-
In , verify that the protected resource you created is enabled, then click .
-
Click the > .
-
To apply the changes, click > .
Until this step, nothing has been saved. The status pushes the configuration to the server. When the configuration update has completed successfully, the server returns the status of .
-
To update Identity Server for the trusted relationship, click > , then click > .
-
To test the results, complete the following.
-
Open a browser on the client machine.
-
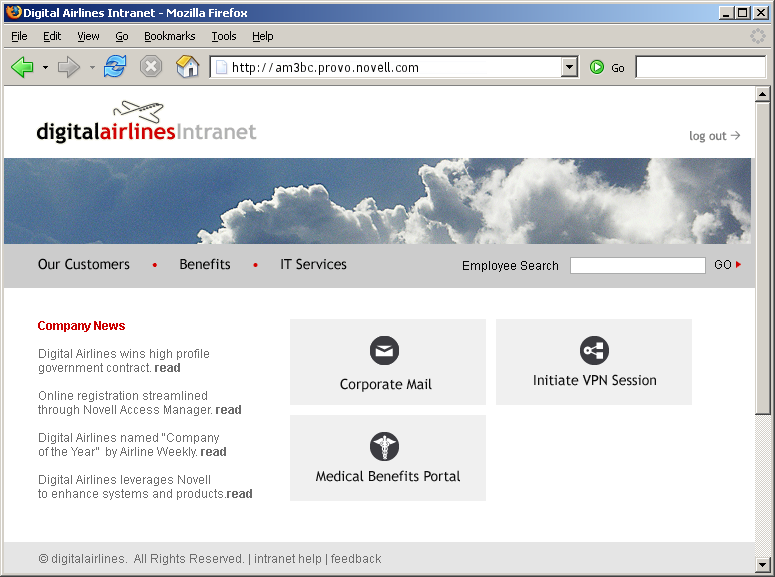
Enter the URL for the proxy service. For this example, it is
am3bc.provo.novell.com
Your network needs to be configured so that this published DNS name of the proxy service resolves to the IP address of Access Gateway. The reverse proxy hides the internal address of the web server.
You must see the page.
If you get an error, check the time on Access Gateway and Identity Server. Their time must be synchronized and must be within 5 minutes of each other.
-
-
Close the browser.
-
To require authentication for access to the site and to configure access to the protected pages (the VPN application and the hidden Sales System site), continue with Section 12.4, Implementing Access Restrictions.
Currently, and do not link to available pages. They exist to illustrate what you could do when you require your users to authenticate before accessing the site.
For example, could be configured so that the redirected request initiates a mail session to the user’s default e-mail application and injects the login credentials to provide access to the user’s protected, web-based e-mail account.
You can configure to set up a federated account with the company that provides medical benefits for your company.