Creating a Role by Using an LDAP Attribute
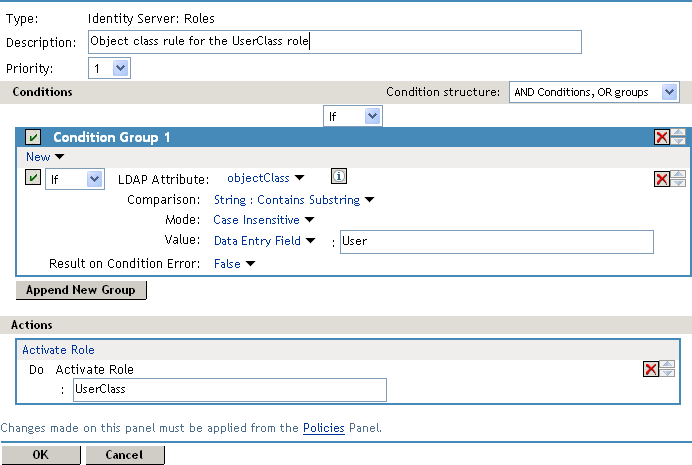
You can assign a user to a role by using a value found in any LDAP attribute in your directory. The following example uses the objectClass attribute because every object in an LDAP directory has an objectClass attribute that contains the object classes to which the object belongs. This attribute contains the name of the object class that was used to create the object and the names of the superior object classes of this class. For example, perform the following steps to create a Role policy for users who were created with the User object class:
-
Click > .
-
Select the policy container, then click .
-
Specify a name for the Role policy, select for the type, then click .
-
In , click , then select .
-
In , select the conditions the user must meet:
LDAP Attribute: Select the objectClass attribute. If you have not added this attribute, it does not appear in the list. Scroll to the bottom of the list, click , specify objectClass for the name, then click .
If you are using eDirectory™ for your LDAP directory, specify standard LDAP names for the attributes. Access Manager does not support spaces or colons in attribute names.
Comparison: Select how you want the attribute values to be compared. For the objectClass attribute, select > .
The objectClass attribute is a multi-valued attribute and, for most objects, contains multiple values. For example, in eDirectory, users created with the User object class have User, organizationalPerson, person, ndsLoginProperties, and top as values in the objectClass attribute.
Mode: Select .
Value: Select and specify User as the value.
Result on Condition Error: This sets up the results that are returned if an error occurs while evaluating the condition. For example, the LDAP server goes down. This rule grants the user the role of UserClass if the condition evaluates to . If an error occurs, you do not want random users assigned the role of UserClass. Therefore, for this rule, you need to select .
-
In the section, click .
-
In the box, type UserClass, then click
This role is assigned to users who match the condition.
-
Click > > .
-
Click > > .
-
Select the check box next to the name of the role, then click .
-
Click and update Identity Server.
You can now use this role when creating Authorization and Identity Injection policies. For more information, see the following: