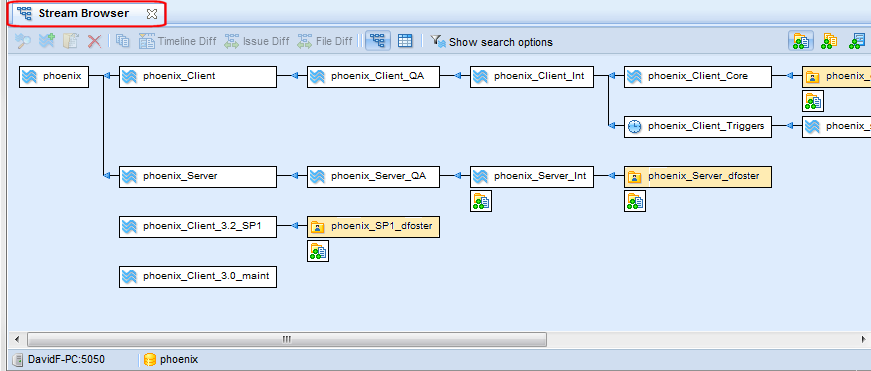
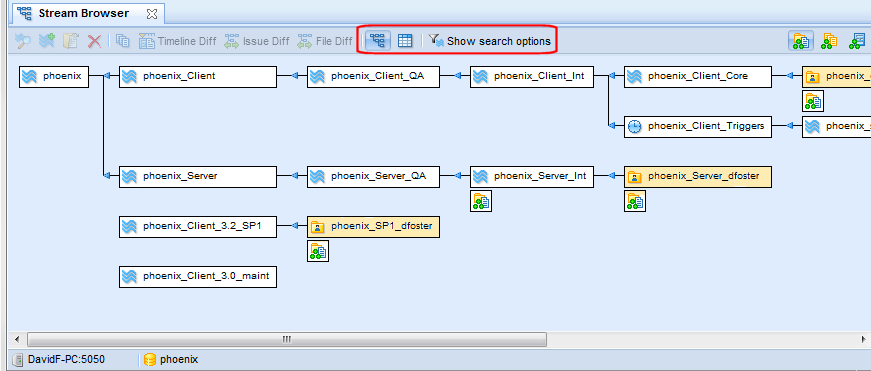
The StreamBrowser™ displays graphical and tabular views of a depot's stream hierarchy. You can use the StreamBrowser to compare streams, promote versions between streams, and perform other stream-based operations. An example of the StreamBrowser graphical display is shown here:
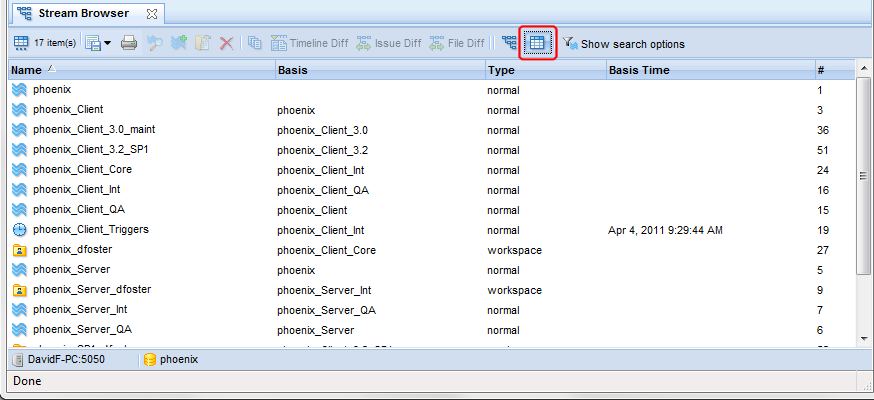
See Working with the Tabular Display on page 13 for an example of the StreamBrowser tabular display.
To open the StreamBrowser, click the StreamBrowser button on the AccuRev Web Interface toolbar:

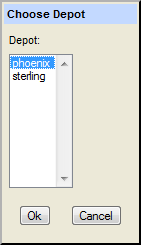
Select the depot whose streams you want to view and click Ok to display the StreamBrowser.
Initial StreamBrowser™ Content and Appearance
Streams are displayed using the graphical format by default, but you can quickly change to the tabular format using the Tabular Display button ( ) on the Web UI toolbar. To change back to the graphical format, click the Graphical Display button (
 ).
).
Note: Changing the display does not cause AccuRev to execute a new search; it simply changes how the currently displayed data is rendered.
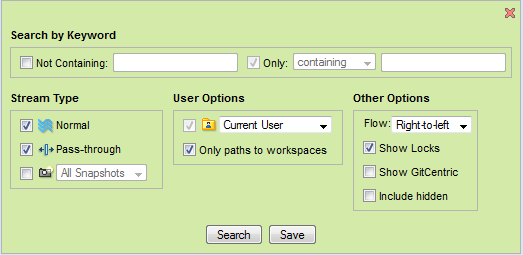
You make changes to the default search filter using the search options panel, shown here:
|
1.
|
|
2.
|
|
3.
|
Make changes to the search filter options as needed. See Search Filter Options on page 8 for a description of these options.
|
|
4.
|
Click the Search button to refresh the StreamBrowser display and review the changes.
|
Otherwise, click the Hide search options button ( ) to close the search options panel. If you do not save changes, AccuRev uses the default search filter options each time you open the StreamBrowser.
Note: Each depot is associated with its own search filter; any changes you make to search filter options apply to the current depot only.
|
When selected, allows you to specify a string that AccuRev uses to search the depot. Any streams that include the specified string are excluded from the display. Searches are case-sensitive; DevStreams and devStreams would yield different results, for example.
|
|
|
When selected, allows you to specify a pattern (a string and a condition) that AccuRev uses to search the depot. For example, you might want to search the depot for any stream that ends with the string _dev. Conditions include containing (the default), starting with, matching, and ending with.
To specify a patternless search, clear the Only Containing checkbox. Note that patternless searches can take a long time to execute. In this case, AccuRev prompts you to confirm whether or not you want to continue the search.
|
|
When selected, AccuRev includes normal dynamic streams and time-based streams. By default, normal streams are included in the display.
|
|
|
When selected, AccuRev includes pass-through streams. By default, pass-through streams are included in the display.
|
|
|
When selected, allows you to specify a time period for which you want AccuRev to include a depot's snapshots (all snapshots within the past two week or past month, for example). By default, snapshots are not displayed. (Check the Include hidden checkbox if you want to see snapshots that have been removed.)
|
Tip: Gated and staging streams are considered "Normal" streams for the purposes of the search filter. If you want to display these types of streams, make sure the Normal field is selected.
|
The workspaces drop-down list lets you filter the display of the depot's workspaces by user. The default is the current AccuRev user, but you can restrict the search to any registered AccuRev user or group, or choose to display streams for all workspaces. (Check the Include hidden checkbox if you want to see workspaces that have been removed.)
Note: If the number of streams retrieved by the search exceeds 1,000 for graphical format or 2,000 for tabular format, AccuRev prompts you to cancel the operation so that you can modify the search filter. Search results that exceed these limits can take an extended time to display. This threshold varies by Web browser.
|
|
|
When selected, AccuRev displays only the streams that directly connect the root stream to the visible workspaces. While this filter is enabled, the Only containing filter is disabled. Stream paths to workspaces you have hidden are not displayed. See Remove for more information on hiding streams.
Note: This setting is available only when the workspaces setting is set to a single user (Current User, for example), so if the workspaces filter is set to All Workspaces, selecting Only paths to workspaces sets the workspaces filter to Current User. You can change Current User to another AccuRev user if you choose.
|
|
When checked, displays a GitCentric™ icon (
 |
|
|
When selected, AccuRev includes any streams that have been removed. Hidden streams are displayed with a gray background in the tabular display.
Note: By default, streams underneath a hidden stream are not displayed, regardless of their own hidden status.
|
These options are displayed on the search options panel only during the Look up Stream operation. See Look up Stream on page 11 for more information.
You can change the StreamBrowser flow display to read from left-to-right using the Flow option on the search options panel. See Filtering the StreamBrowser Display on page 7 for more information.
Tip: Display mode buttons (on the right side of the toolbar) allow you to switch between Show Active Files, Show Active Transactions, and Show Active Files modes.
|
|
|
|
|
|
|
|
Note: Pass-through streams are transparent in the AccuRev desktop client GUI.
|
|
|
|
|
|
|
|
|
Note: Gated streams are transparent in the AccuRev desktop client GUI.
|
|
|
Note: Staging streams are created automatically as children of gated streams.
|
By default, dynamic streams have a white background and workspaces have a light yellow background. If you want, you can change a dynamic stream’s background color using the CLI setproperty command. You might want to manually highlight streams of interest, or use a script to set a stream color based on events -- to set a build stream to red if the build fails, and to green when the build passes, for example.
Opens another instance of the StreamBrowser whose top-level stream (the root stream) is the stream you select, allowing you to easily search streams in the stream hierarchy below the root stream. Use the Immediate Children Only field on the search options panel to restrict the search. See Search From options on page 10 for more information.
Creates a new stream as a child of the selected stream. A Adding a Stream to a Depot dialog box appears to specify settings for the new stream. This command is not available from a workspace.
Hides the selected stream from searches. This command is available from the toolbar and also via right-click on a stream. See Removing a Stream for more information on hiding streams and workspaces.
Allows the selected stream to be shown in searches. Before using this command, make hidden streams visible with the Show including hidden checkbox. (Context menu only.) See Reactivating a Stream for more information on displaying hidden streams and workspaces.
Shows development activity for the selected stream in a new File Browser tab. This command is the equivalent of displaying the default group in the File Browser.
Shows development activity by transaction for the selected stream in a History Browser tab. A transaction is active in the stream if one or more active elements are part of the transaction.
Shows development activity for the selected stream in an Issues tab. An issue is active in the stream if one or more active elements have been associated with it (during promote, for example). An element is said to be active in a workspace or stream if a new version of the element has been created there, and that version has not been either (1) promoted to the parent stream or (2) purged from the workspace or stream. The set of elements associated with an issue is referred to as a change package. This command is not available from a workspace.
Note: AccuRev determines that an element is 'active’ (changed) if its basis version (the version that appears in the backing stream) and head version (the most recent version in the stream) differ. That is, a new version of the element has been created and is still part of that stream's default group.
Allows you to view all changes that occurred in a stream or workspace over the period of time you specify. See Finding Changes in Streams and Workspaces.
Shows in a Diff Against the change packages that differ between two selected streams. Click the first stream, then click the Issue Diff icon (or the Issue Diff context menu item), then click the stream you want to compare. (To cancel the Diff, just right-click the mouse.) See Diff Against.
Shows in a File Diff tab the files that differ between two selected streams. Click the first stream, then click the File Diff icon (or the File Diff context menu item), then click the stream you want to compare. (To cancel the Diff, just right-click the mouse.)
Tip: Click on a column heading to sort the table based on that column’s data.
Searches sometimes return many items (streams, for example), which can make reviewing them difficult. If your search returns many items, consider using the Table Filter to specify the number of items to show per page, rather than displaying all search results in one long list. When AccuRev returns more items than the limit you specify, page navigation links appear above the table header. You can use the First, Prev, Next, and Last buttons to navigate the pages in the result set, as shown in the following illustration:
Allows you to export the contents of the current table as either XML or a comma-separated values (CSV) file. In most browsers, you are prompted to view the report or save it to a file. By default, the file name is Report.ext, where ext is either xml or csv.
|
1.
|
|
2.
|
Sends the contents of the current table to a printer. When you click the Print button, AccuRev displays a standard print dialog box that allows you to specify printer name, page ranges, number of copies, and so on. AccuRev provides identifying header information and formatting for the output. (You cannot customize the report header or formatting.)
Note: Print functionality for tables that display issues allows you to print the table, or detailed reports for one or more issues. See Reports About Issues on page 92 for more information.
|
•
|
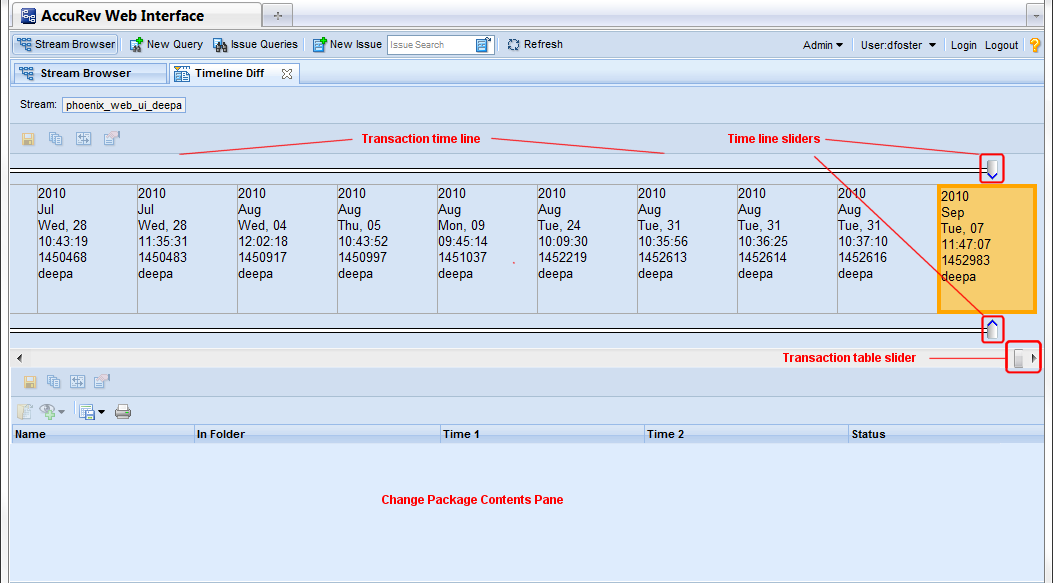
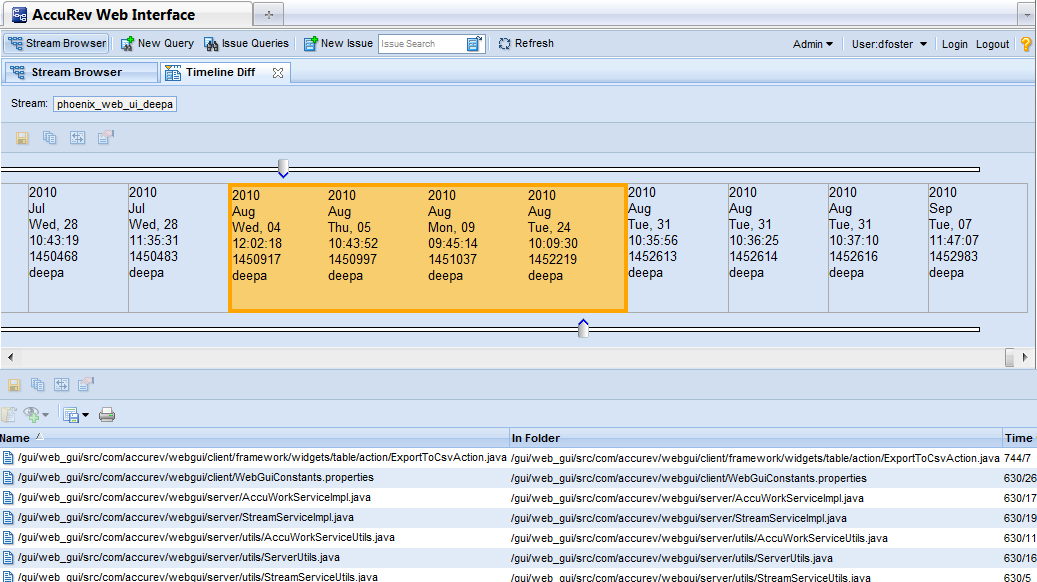
Click the transaction. This implicitly starts (or ends) the time period with the time associated with the transaction. Note that all the transactions between it and the currently selected transaction are selected automatically. AccuRev searches all selected transactions for changed files.
|
|
•
|
Click a time line slider rail. AccuRev selects the transaction above (or below) the place on the time line slider rail you clicked.
|
|
•
|
Drag and drop the time line sliders. Again, AccuRev selects the transaction above (or below) the time line slider when you release the mouse button.
|
Note: The time required to perform the search varies based on the number and scale of the transactions you select.
|
2.
|
Alternative: Right-click the stream or workspace and choose Timeline Diff from the context menu.