As described previously in this chapter, a workflow stage defines a phase in your development or release process. In AccuRev, a workflow stage is represented as a green rectangle, like the New stage shown in the following illustration:
|
•
|
Name. Every stage in your workflow should have a name that clearly identifies its role in the workflow—use names like New and WIP and not Stage 1 and Stage 2, for example. AccuRev enforces uniqueness for stage names. Consider using the names of your development process phases as the names for your workflow stages.
|
Tip: The AccuRev Stage Generator automatically creates stages based on values from the AccuWork schema. See Creating Stages Automatically on page 141 for more information for more information on the Stage Generator.
|
•
|
Conditions. Each stage must be defined with one or more conditions; conditions act as a filter that determines whether or not an issue can be in that stage. For example, the condition for a Scheduled stage might be as simple as Status = Scheduled. Only issues that satisfy that condition—in other words, only issue records whose Status field is set to Scheduled—can be in the stage.
|
Conditions are expressed as field name, condition value, and field value and can be grouped using any combination of AND and OR groups. See Using the Conditions Editor on page 144 for more information.
Tip: The AccuRev Stage Generator automatically creates a default stage condition. See Creating Stages Automatically on page 141 for more information on using the Stage Generator.
|
•
|
Actions. A stage can be defined with two optional types of actions, entry and validation.
|
|
•
|
Entry actions – Entry actions are performed only when an issue enters a stage by transition. For example, an entry action for the WIP stage might set the value of the Status field to WIP.
|
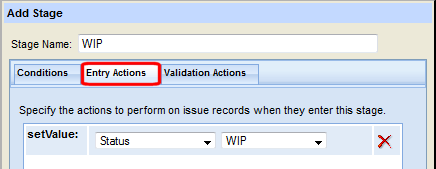
Tip: The setValue entry action is created automatically when you use the Stage Generator; the value is set to the value of the Status field (or whatever field in your schema you are using to represent your workflow stages) that represents the stage. See Creating Stages Automatically on page 141 for more information on using the Stage Generator.
|
•
|
Validation actions – Unlike entry actions, which are performed only when an issue enters a stage by transition, validation actions are performed when an issue record is opened. Validation actions are typically used to identify required fields or fields that you want to make read-only. For example, the setFieldPermission validation action sets the corresponding field to auto, which is a special type of read-only that allows only AccuRev to modify the field.
|
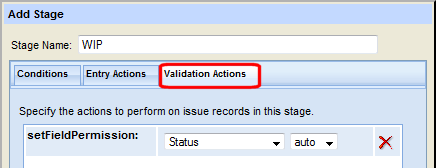
Tip: The setFieldPermission validation action is created automatically when you use the Stage Generator; the value of the Status field (or whatever field in your schema you are using to represent your workflow stages) is set to auto. See Creating Stages Automatically on page 141 for more information.
Defining stage actions is optional—you might prefer to define actions for a transition instead. See Specifying Actions for Stages and Transitions on page 157 for more information.
Note: A stage’s logic—that is, its conditions and any actions you choose to define for it—should be unique. No two stages should have the same set of conditions and actions defined for them. Further, you must ensure that a stage’s logic does not conflict with the logic of any transitions that are linked to that stage.
|
•
|
Automatically. The AccuRev Stage Generator automatically creates stages and transitions based on the fields in your schema that you choose to represent the stages in your workflow process. You might want to create stages in your workflow based on the values of your issue record’s Status field: New, Scheduled, WIP, Done, and Closed, for example.
|
|
•
|
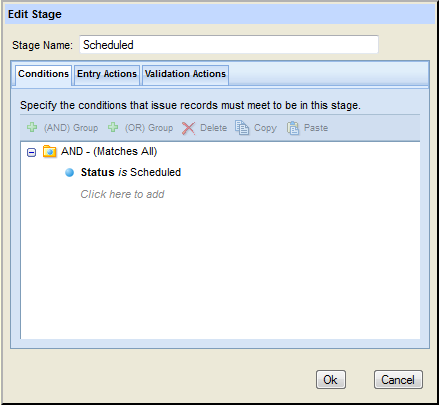
Stage condition (Status is Scheduled)
|
|
•
|
Entry action (setValue Status to Scheduled)
|
|
•
|
Validation action (setFieldPermission Status to auto)
|
If you want to specify additional conditions, entry actions, or validation actions for a stage, you can edit the stage. See Editing Workflow Stages on page 143 for more information.
The transition is given a default name that indicates the destination stage (in this example, the transition is named to Scheduled). You can rename the transition and create validation actions and conditions as needed. See Editing Workflow Transitions on page 148 for more information.
Tip: Consider using the Stage Generator to automate workflow stage creation. The Stage Generator is the quickest way to create a workflow and it eliminates the need to manually specify the stage name, conditions and actions, as well as the related transition. See Creating Stages Automatically on page 141 to learn how to use the Stage Generator.
|
•
|
Manually. If you prefer, you can create stages manually. When you use this approach, you must specify all of the stage components—its name, conditions, and any entry or validation actions you require. When you create a workflow stage manually, it does not create the corresponding transition, as shown in the following illustration:
|
Use the Stage Generator to have AccuRev automatically create one or more fully defined workflow stages and their associated transitions based on values in your AccuWork schema. Only schema fields with the type Choose are used by the Stage Generator. Examples of schema fields of type Choose you might consider using to create workflow stages include Status and State.
|
1.
|
|
3.
|
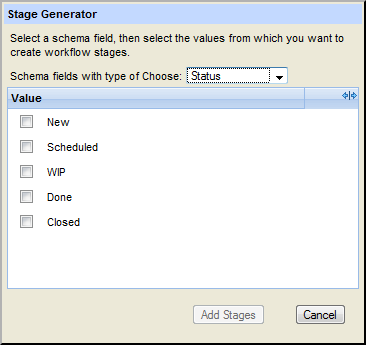
Tip: Only schema fields whose values are not already represented as workflow stages are displayed in the Value table.
|
6.
|
Click the Add Stages button.
|
AccuRev adds a stage and an associated transition to the workflow diagram for each value you select. The transitions are given default names based on the stage. See Editing Workflow Transitions on page 148 to learn how to rename a transition. See Linking Workflow Stages on page 150 to learn how to link one stage to another.
Tip: The first stage in a workflow is typically not used as the destination for a transition: a workflow transition seldom results in placing an issue record in the New stage, for example. You can leave the default transition associated with the first stage in your workflow if you want (AccuRev ignores it), but you might prefer to delete the transition from the workflow diagram for clarity. See Deleting a Workflow Transition on page 149 for more information.
|
7.
|
Once you have fully defined two or more stages, you can link them as described in Linking Workflow Stages on page 150.
|
1.
|
|
3.
|

|
4.
|
Enter a stage name in the Stage Name field.
|
|
5.
|
Click the Conditions tab to specify a condition for the stage. See Using the Conditions Editor on page 144 for more information.
|
|
6.
|
|
8.
|
Once you have fully defined two or more stages you can link them. See Linking Workflow Stages on page 150.
|
1.
|
|
4.
|
Alternative: Right-click the stage and choose Edit from the context menu.

To add or modify stage conditions or actions, click the Edit Logic button.
The Edit Stage dialog box expands to display the Condition, Entry Actions, and Validation Actions panels.
See Using the Conditions Editor on page 144 to learn how to specify conditions for a stage. See Specifying Actions for Stages and Transitions on page 157 to learn about the actions you can specify for a stage’s entry and validation actions.
|
7.
|
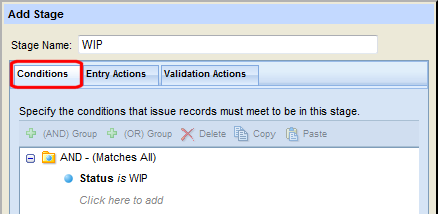
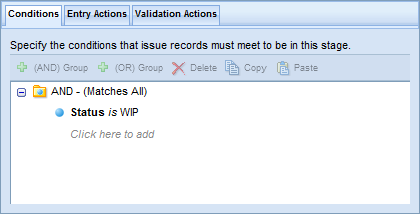
As shown in the following illustration of the Conditions Editor on the Edit Stage dialog box, this condition ensures that only issue records whose Status field is set to WIP can be in this stage:
Tip: If you created a stage using the Stage Generator, AccuRev displays the condition that it created for that stage.
The Conditions editor has the same features and uses the same mechanics as the AccuRev Web UI Query Builder. See Working with the Query Builder on page 64 for more information.
When you delete a stage from a workflow, you also delete any transitions that refer to it. For example, in the following illustration, deleting the Scheduled stage also deletes the to Scheduled transition from the workflow:
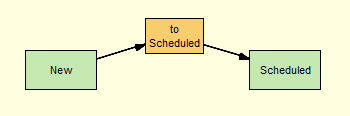
Deleting the New stage, however, affects neither the to Scheduled transition nor the Scheduled stage.
Tip: AccuRev always displays a confirmation message when you delete a stage.
To learn more about the relationship between transitions and stages, see Linking Workflow Stages on page 150.
|
2.
|
Alternatives: Press the Delete key on your keyboard, or right-click the stage and choose Delete from the context menu.
|
3.
|
|
4.
|