|
•
|
As a result of a Show Active Issues (see Show Active Issues) or Diff Against Basis (by Issues) (see Diff Against) command
|
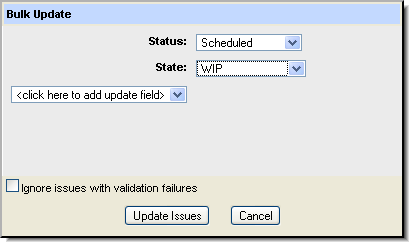
Click the Update Issues button to update these fields in the selected issues with the values you specified.
AccuRev applies validation rules during the bulk update operation, and displays an error if a rule is violated by the bulk update. The Ignore issues with validation failures checkbox skips issues with validation errors. See Understanding Issue Form Validation for more information.
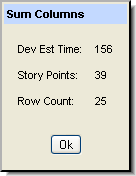
The Sum Columns command allows you to easily sum certain fields for issues displayed in the Web UI. For example, you might want to sum the Dev Est Time field for the issues displayed in the Query Results pane in the Queries tab.
Alternative: Choose Sum Columns from the context menu (right-click to display) in any issue list shown in the Web UI.
|
4.
|
Click Ok to close the Sum Columns dialog box.
|
The Calculate Columns command allows you to perform basic mathematical operations (add and subtract, for example) on any two columns for issues displayed in the Web UI. For example, you might want to subtract the Dev Actual field from the Dev Estimate field for the issues displayed in the Query Results pane in the Queries tab.
When you execute the Calculate Columns command, AccuRev adds a new column to the table to display the result of the calculation. You can name this column at the time you specify the calculation.
|
2.
|

|
4.
|
Click Ok.
|
|
1.
|
If necessary, set the query to Public: in the Web UI Query Browser, right-click the query and choose Set as Public from the context menu.
|
|
2.
|
Right-click the query and choose Query Link from the context menu.
|
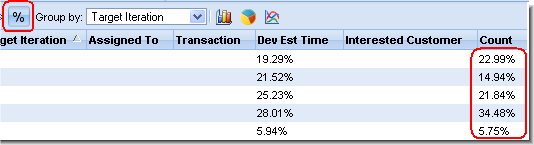
Show Percentages ( ) toggles the display of percentage information for columns that contain numeric data. If you have specified the display of Groups (see the next section), the Count column also toggles to percentages. This is useful for columns such as “estimated time” to see which issues in the current table are expected to take up the most development time. See Group Issues by Field below for more details.
This command can be invoked via the Group by drop-down list on the issue list toolbar. The drop-down shows the issue fields that these issues can be grouped by. Choose a field to group the issues by that field.
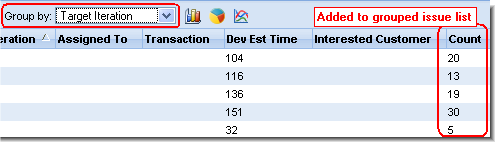
The resulting issue list shows one line for each value of the chosen field. A Count column is added to the grouped issue list, which contains the number of issues for each value of the chosen field.
To toggle the display in this column to show percentages, click the  Show Percentages button.
When the Group By option is in effect, three graphical chart options—bar, pie, and line—become available on the toolbar and the context menu, allowing you to display query results in a graphical format.
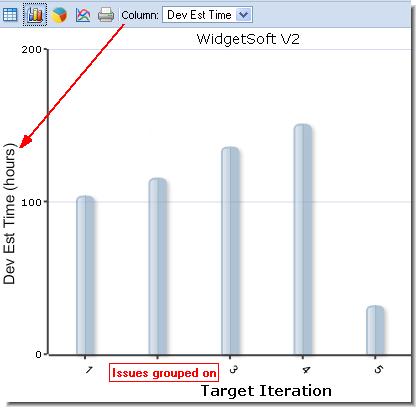
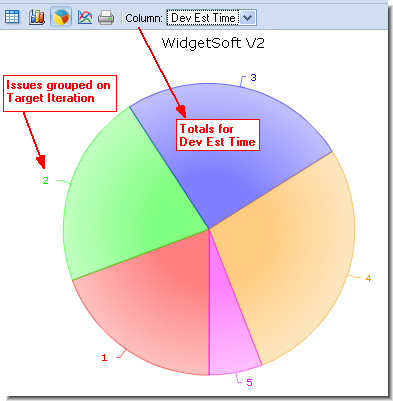
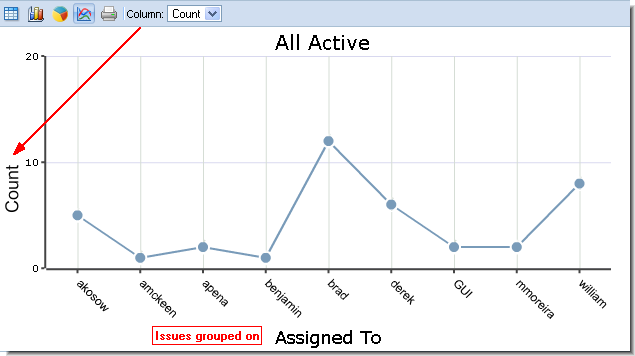
The field that the issues are grouped by creates the horizontal axis of the bar chart or the labeled sections of the pie chart. The leftmost column with summed data creates the vertical axis of the bar and line charts or the sizing for the wedges of the pie chart. This value can be changed using the Column drop-down list on the chart's toolbar.
To return to the list of grouped issues, click the Show Issue Table  button on the issue list toolbar. Following are examples of bar, pie, and line charts.
Tip: You can distribute URLs of query results displayed as groups and charts. See Linking to Charts and Grouped Issues.
|
1.
|
|
2.
|
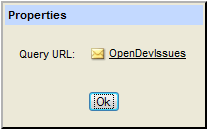
To create the URL, right-click the query and choose Properties from the context menu. This allows you to save or email the link for the query result. See Using URLs to Access AccuRev® Data for more information.
Note: If the field used to create the group changes—if you remove it from the columns displayed for the query results or change the Group By value, for example—the URL will no longer work.
This command allows you to specify a default query—the query that is run automatically when you open the Query Browser. The name of a query that has been specified as the default query is bold and italicized in the Query List Pane. You can invoke the Set as Default command from the context menu in the Query List pane.
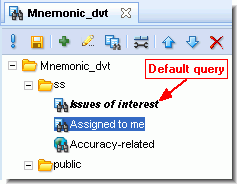
By default, queries you create are private—they are accessible only by you. This command allows you to make a private query a public query. Public queries are accessible by all AccuRev users.
This command allows you to make a public query you have created a private query. Private queries are accessible only by you.
The Set up Columns dialog box lets you specify the columns to include in query results and, optionally, save the columns you select as a default to be used to display query results for any new queries you create. You use the Set up Columns button ( ) on the Query List Pane or Query Pane toolbar to display this dialog box.
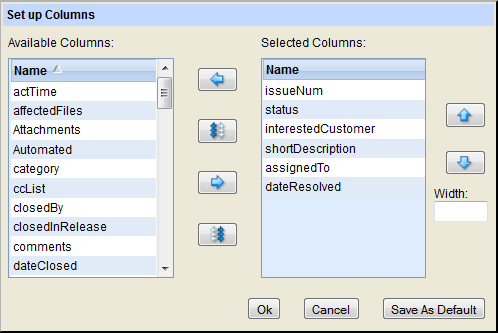
When you click Ok to close the dialog box, the changes you have made are reflected immediately in the Query Results pane. Changes to the query's column setup are not saved in the repository until you invoke the Save command in the Query List pane.
|
•
|
The names displayed in the Set Up Columns dialog box are the AccuWork field names as specified in the AccuWork Schema Editor in the Java GUI. The names displayed in query results are the corresponding AccuWork field labels.
|
|
•
|
|
1.
|
Click the Save as Default button.
|
|
2.
|
Click Ok.
|
This command runs the selected query and displays the resulting issues in the Query Browser or New Query Tab tab. It is invoked from the toolbar button or the context menu in the Query List pane.
This command saves any changes to queries that you have made in the Query Browser, such as Set as Private/Set As Public commands to change the status of your queries (see Set as Public and Set as Private).
Each user's private queries are stored separately. The <username> directory in the query storage path name causes the private queries for each user to be stored separately.
This command shows the entries currently in the change package for the selected issue. You can run this command from context menus and toolbars in the Query Browser and Show Active Issues.
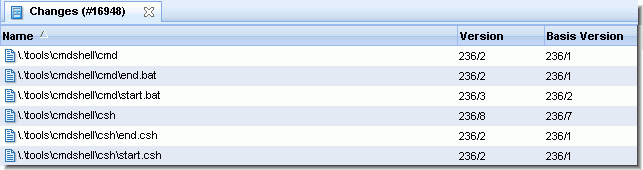
Entries are included for elements in the change package only if they were promoted to the stream, but have not yet been promoted from the stream to its parent. This helps you to concentrate on current programming efforts, rather than those that were completed long ago.
Note: For the purposes of the display on this tab, a Revert to Backed operation has the same effect as a Promote operation. For a workspace, substitute the phrase "created in" for "promoted to".
The Show Active Issues command displays in the Issues tab the active issues for the current stream. An issue in a stream is considered to be active if the change package associated with the issue has had one or more of its versions promoted to the stream, but has not yet been promoted from the stream to its parent.
Tip: You can display active issues for an individual stream by choosing Show Active Issues from the context menu for that stream. You can also change the display mode for all streams in the StreamBrowser by clicking the Active Issue Mode button ( ) on the StreamBrowser.
Note: The Issues tab will not display any issues if you invoke Show Active Issues on a snapshot, since nothing can be promoted to a snapshot.
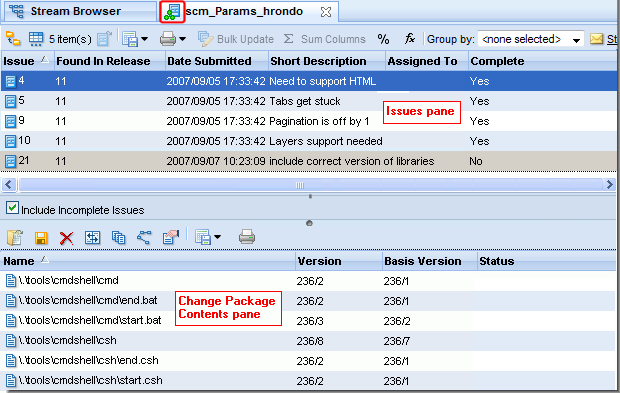
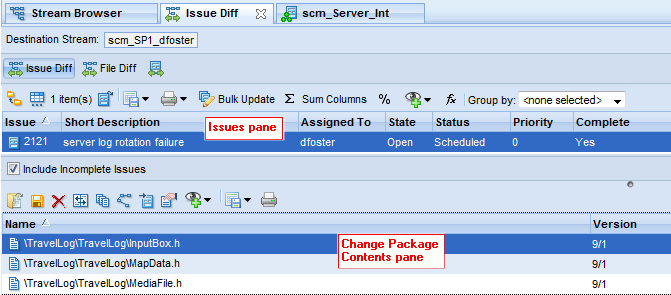
Click an issue in the Issues pane to display the items currently in its change package in the Change Package Contents pane. This pane lists the file name, version, and basis version for each element in the change package.
Entries are included for elements in the change package only if they were promoted to the stream, but have not yet been promoted from the stream to its parent. This helps you to concentrate on current programming efforts, rather than those that were completed long ago.
Note: For the purposes of the display on this tab, a Revert to Backed operation has the same effect as a Promote operation. For a workspace, substitute the phrase "created in" for "promoted to".
Incomplete issues are shown by default and can be excluded by clearing the Include Incomplete Issues checkbox. (An issue is incomplete when some, but not all, of its change package entries are in the stream.) When the checkbox is selected, the Complete column appears and shows the incomplete issues with a grey background in the Issues pane. When an incomplete issue is selected, the missing versions will be shown with a grey background on the Change Package Contents pane. In addition, the Status column on that pane will read (Missing) for each missing version.
|
1.
|
In the StreamBrowser, change to the Active Issue display mode by clicking the Active Issue Mode button (
|
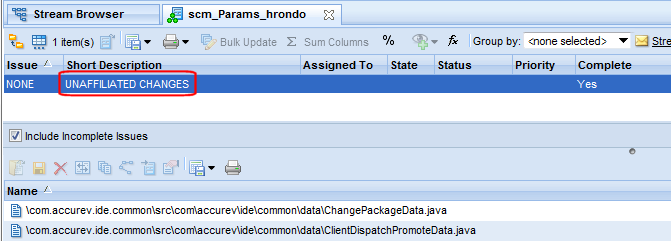
If any unaffiliated changes exist in the stream, the issue table gains an extra row labeled "NONE". (This is true regardless of how you display the issues table.) If your table layout includes a second column (in this example, the column Complete), AccuRev displays "UNAFFILIATED CHANGES" in the row. Clicking anywhere in the row displays the unaffiliated elements. For each unaffiliated element, examine its history to determine how best to manage it—you might decide that you need to promote a file to an issue to correct the problem, for example.
For more information on working with unaffiliated changes, see the topic Patches and Change Packages topic in the Java GUI online help.
A link to the Web UI URL (labeled "Stream Active Issues Link") used to access this view is shown at the top of the tab. See URLs for AccuWork™ Queries and Issues.
This command promotes the selected issue so that it is active in the parent stream. This command is available from the context menu only.
Displays a dialog box to enable paging in the issue list (see Query Results Pane). Enter the number of items to display per page. This command is available from the toolbar only.
Allows you to print issue table or issue details reports. See Reports About Issues for more information. This command is available from the toolbar only.
Changes field values for the selected issues. See Bulk Update for more information.
Returns the number of issues selected, as well as the sums of all Text fields with numeric-only data and the sums of all Timespan fields. See Sum Columns for more information.
Displays percentage information for columns that contain numeric data. See Show Percentages for more information. This command is available from the toolbar only.
If enabled by your AccuRev administrator, allows you to create a code review for the selected file, or add files to an existing code review. See Creating a Crucible Review for AccuRev Elements on page 53 for more information.
Allows you to perform basic mathematical operations (add and subtract, for example) on any two columns with numeric values. A new column is created to display the results. See Calculate Columns for more information. This command is available from the toolbar only.
See Group Issues by Field. This command is available from the toolbar only.
Using the Open Commands the file.
Tip: The Delete key on your keyboard also performs the remove action.
Compares the selected version or versions with the corresponding basis version, revealing what changes were made to the file (see Diff Against Basis). If you select multiple files, navigation icons ( )appear in the toolbar that allow you to step through the selected files. NOTE: If you receive the error message “Diff action is not available for selected elements”, check to see if any of your selections are either binary files, or have a basis version of “0/0”. These elements cannot be diff’d.
Opens a History Browser tab, containing the transactions involving the selected file or directory.
Opens the Version Browser, showing the version from the change package in the context of its ancestors (and children, if any).
See Using AccuWork™ for more information about issues and change packages.
Displays a message box with information about the selected element. See Displaying Element Properties.
See Common Table Commands. This command is available from the toolbar only.
The Issue Diff tab appears whenever you choose one of the many Diff Against Basis (by Issues) or Issue Diff commands available throughout the Web UI. This tab shows the source and destination streams for the comparison, and a list of issues which differ between the two streams.
This command promotes the selected issue so that it is active in the parent stream. This command is available from the context menu only.
Displays a dialog box to enable paging in the issue list (see Query Results Pane). Enter the number of items to display per page. This command is available from the toolbar only.
Allows you to print issue table or issue details reports. See Reports About Issues for more information. This command is available from the toolbar only.
Changes field values for the selected issues. See Bulk Update for more information.
Returns the number of issues selected, as well as the sums of all Text fields with numeric-only data and the sums of all Timespan fields. See Sum Columns for more information.
Displays percentage information for columns that contain numeric data. See Show Percentages for more information. This command is available from the toolbar only.
If enabled by your AccuRev administrator, allows you to create a code review for the selected file, or add files to an existing code review. See Creating a Crucible Review for AccuRev Elements on page 53 for more information.
Allows you to perform basic mathematical operations (add and subtract, for example) on any two columns with numeric values. A new column is created to display the results. See Calculate Columns for more information. This command is available from the toolbar only.
See Group Issues by Field. This command is available from the toolbar only.
Using the Open Commands the file.
Tip: The Delete key on your keyboard also performs the remove action.
Compares the selected version or versions with the corresponding basis version, revealing what changes were made to the file (see Diff Against Basis). If you select multiple files, navigation icons ()appear in the toolbar that allow you to step through the selected files.
Note: If you receive the error message “Diff action is not available for selected elements”, check to see if any of your selections are either binary files, or have a basis version of “0/0”. These elements cannot be diff’d.
Opens a History Browser tab, containing the transactions involving the selected file or directory.
Opens the Version Browser, showing the version from the change package in the context of its ancestors (and children, if any).
See Using AccuWork™ for more information about issues and change packages.
Displays a message box with information about the selected element. See Displaying Element Properties.
If enabled by your AccuRev administrator, allows you to create a code review for the selected file, or add files to an existing code review. See Creating a Crucible Review for AccuRev Elements on page 53 for more information.
See Common Table Commands. This command is available from the toolbar only.
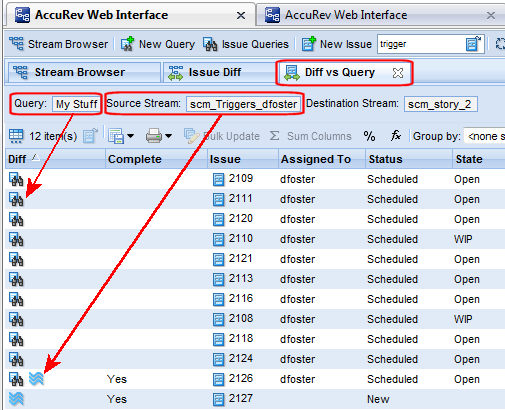
This feature is available from the Issue Diff tab, and allows you to compare the results of the current Issue Diff operation against the results of an issue query. Diff vs Query is useful as an auditing tool, allowing you to verify that the issues that you think are being worked on are those actually being worked on. Make sure that you have a valid issue query defined that can be used with this feature. (See New Query Tab.)
See Query Diff to learn how to compare the results of two queries.
|
3.
|