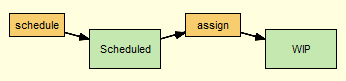
In AccuRev, you use a transition to link one workflow stage to another. The stage from which you are linking is referred to as the source stage; the stage to which you are linking is referred to as the destination stage. In the following illustration, Scheduled is the source stage; it is linked to WIP, the destination stage, by the assign transition:
Here, only the WIP stage is currently being used as a destination stage. The Scheduled stage currently has no source stages linked to it via the schedule transition.
The destination stage in a pair of linked workflow stages must have a transition associated with it—without it, there is no way for an issue to enter that stage using workflow transitions. In the following example, the Closed stage cannot currently be used as a destination stage because it does not have a transition associated with it:
Once the Closed stage is associated with a transition, called cancel, for example, issues can move to it through the workflow from either the New or Scheduled stages, as shown here:
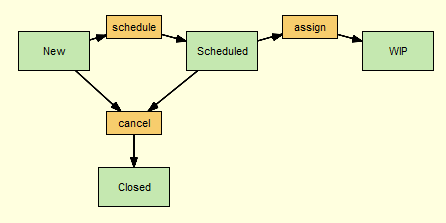
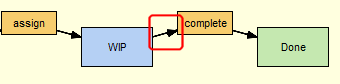
Note that a destination stage can be referenced by more than one source stage. In addition, a destination stage may have more than one transition associated with it. You might want to set up your workflow such that an issue can move from WIP to Closed via a complete transition, for example.
|
Tip: You can also use the Link Stages dialog box to create a new transition for the destination stage. See Linking Workflow Stages Using a New Transition on page 153 for more information.
|
||
You can also create a transition at the same time you create the link. See Linking Workflow Stages Using a New Transition on page 153.
|
1.
|
Tip: If you select a stage in the workflow diagram, AccuRev uses that stage as the default source stage in the following step.
|
3.
|
|
4.
|
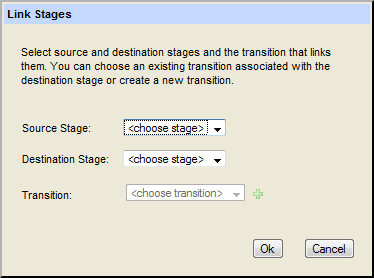
Select the source stage and destination stage you want to link from the Source Stage and Destination Stage fields.
|
When you select a destination stage, the Transition field displays transitions associated with that stage.
|
5.
|
|
6.
|
|
1.
|
|
3.
|
In the workflow diagram, right-click the workflow stage you want to specify as the source stage and choose Add Link from the context menu.
|
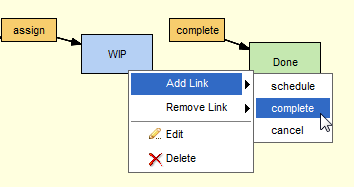
AccuRev links the source stage you specified in Step 3 with the destination stage associated with the transition you specified in this step. For example:
|
5.
|
|
1.
|
|
3.
|
Tip: If you select a stage in the workflow diagram, AccuRev uses that stage as the default source stage in the following step.
|
4.
|
Select the source stage and destination stage you want to link from the Source Stage and Destination Stage fields.
|
When you select a destination stage, the Transition field displays the transitions associated with that stage.
|
5.
|
|
6.
|
In the Transition Name field, enter a name for the transition.
|
|
7.
|
|
8.
|
|
10.
|
Click Ok to link the source and destination stages using the new transition.
|
|
11.
|
When you unlink two workflow stages, you are simply de-coupling the source and destination stages; it has no effect on the transition associated with the destination stage. If you want to delete a transition, see Deleting a Workflow Transition on page 149.
|
1.
|
|
3.
|
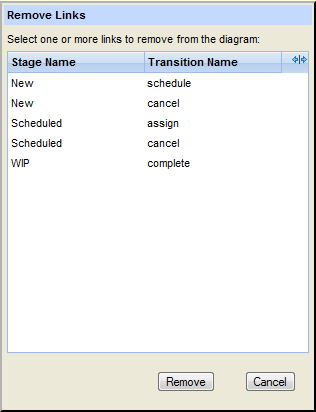
|
5.
|
Click the Remove button.
|
|
6.
|
|
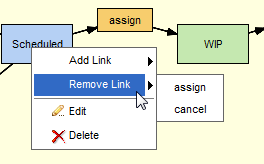
1.
|
|
3.
|
In the workflow diagram, right-click the source stage you want to unlink and select Remove Link from the context menu.
|
|
5.
|