The pass/fail QA processes can be modeled using workflow transitions—the AccuRev Stage Generator will automatically create these transitions, as you will see in Step 3: Create Workflow Stages and Transitions. The process that allows the engineer to request more information, however, requires changes to the AccuWork schema. How the AccuRev administrator addresses this requirement is described in the following section, Step 2: Modify the AccuWork Schema.
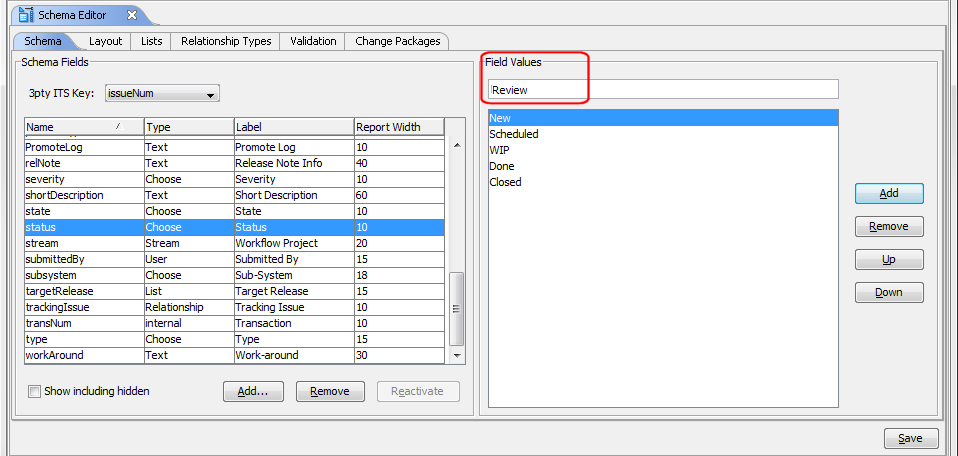
After further discussion, the product owner, development and release managers, and the AccuRev administrator agree that a Review stage is needed for the workflow. The first step in creating such a workflow stage is to add a Review value to the status field in the AccuWork schema, as described here:
|
2.
|
Tip: The order of values in the Field Values list is the order in which these values will appear in the Status field in the AccuRev Issue Edit form.
|
3.
|
|
4.
|
Use the Down button to move the Review value to a more appropriate place in the Field Values list (after WIP, for example).
|
|
5.
|
Next, add a new field of type Stream. Consider giving the stream field a label such as Project or Workflow Project to help convey the conceptual connection between a depot stream and a workflow project.
|
|
6.
|
Click the Save button to save your changes to the AccuWork schema.
|
Now that the status field has values for all of the stages that the Rapid Velo engineering staff wants to represent in its workflow, they are ready to create workflow stages and transitions.
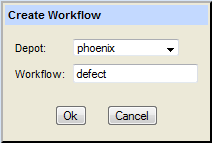
After the AccuRev administrator has modified the AccuWork schema as described in Step 2: Modify the AccuWork Schema, she starts the AccuRev Web UI. From there, she opens the phoenix depot, clicks the Admin menu, and chooses Create Workflow:
|
1.
|
In the Create Workflow dialog box, she selects the phoenix depot and enters the name defect for the workflow:
|
|
2.
|
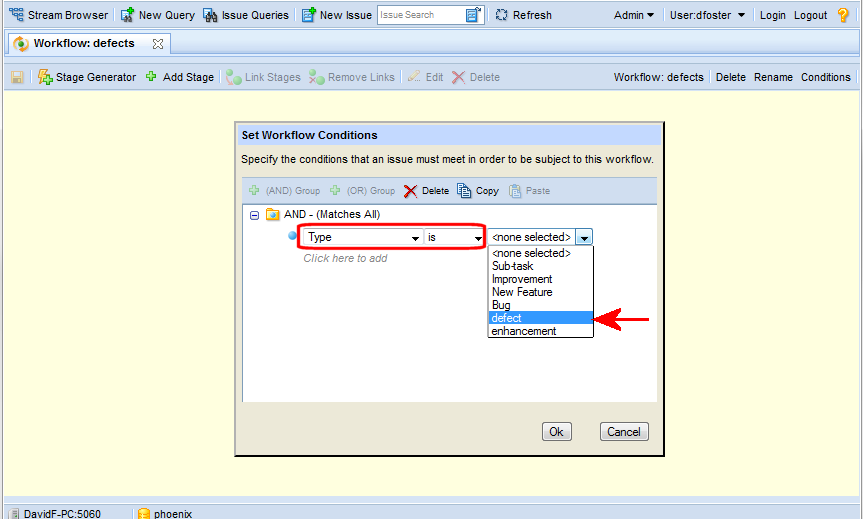
When she clicks Ok, the Workflow Editor appears, along with the Set Workflow Conditions dialog box. She uses this dialog box to specify that issues must have a type of defect in order to be subject to this workflow:
|
|
3.
|
When she clicks Ok to save the condition settings, the workflow is activated, but the workflow stages and transitions still need to be defined.
|
|
4.
|
She clicks the Stage Generator button (
|
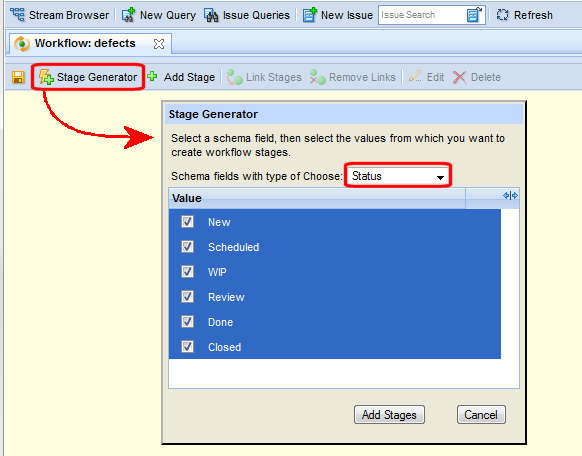
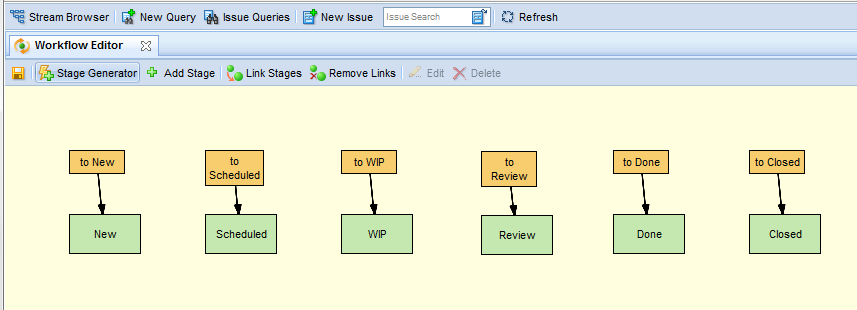
After choosing Status from the Schema fields with type of Choose field, she selects all of the values and then clicks the Add Stages button. AccuRev automatically creates workflow stages and default transitions for every value in the AccuWork schema’s status field:
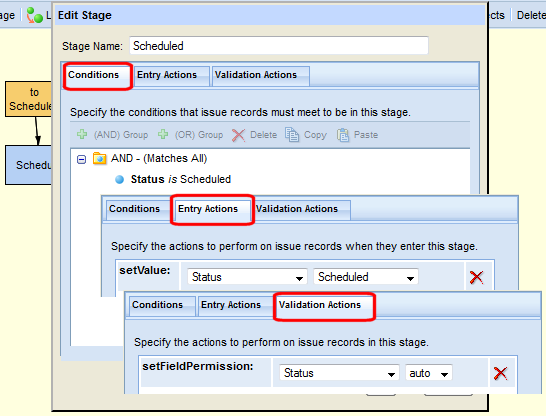
When the AccuRev administrator examines the Scheduled workflow stage (she selects the stage in the workflow diagram and clicks the Edit button ( ) in the Workflow Editor toolbar), she finds that its logic—its conditions and entry actions—is fully defined, with a condition that describes when an issue can be in that stage, an entry action that describes the changes AccuRev makes to the issue record when it enters that stage by transition, and a validation action that sets the Status field to read-only, so that AccuRev users cannot manually remove an issue from the workflow:
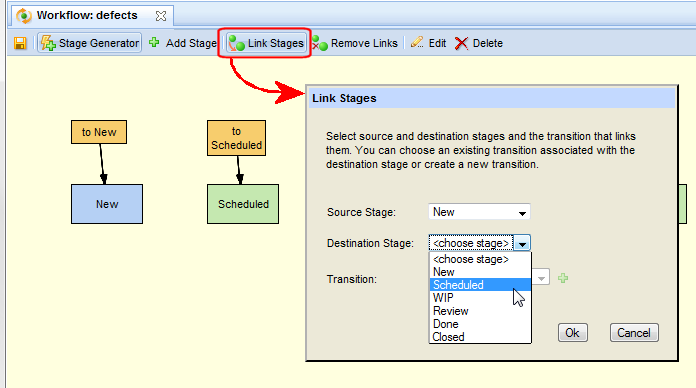
To link workflow stages, the AccuRev Administrator selects a source stage, clicks the Link Stages button ( ), and then chooses the destination stage. In this example, she has chosen the New stage as the source and the Scheduled stage as the destination:
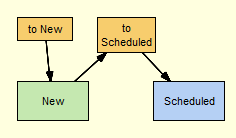
AccuRev updates the workflow diagram with the newly created link between the New and Scheduled stages.
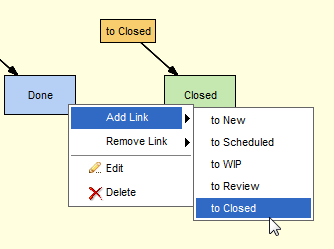
The AccuRev administrator links the remaining workflow stages, this time using the stage context menu Add Link, which displays a list of the transitions to other workflow stages.
Now that all the workflow stages have been linked, some finishing touches can be applied to the defects workflow.
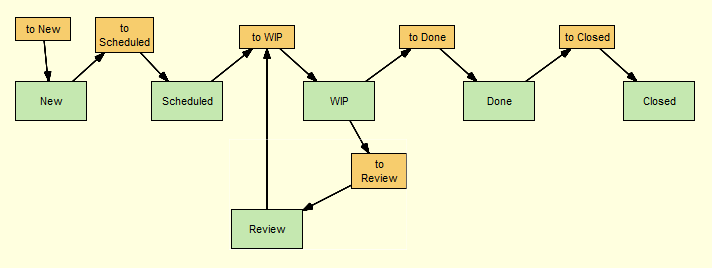
As described elsewhere, the Stage Generator creates a default transition for every stage; most of these transitions are used to link one stage to another, but a transition on the first stage in a workflow is generally not needed. The AccuRev administrator therefore deletes the to New transition on the New workflow stage. To do this, she simply selected the transition on the workflow diagram and clicked the Delete button ( ); she could have also selected the Delete choice on the transition context menu.
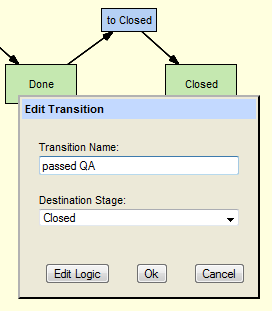
The engineering and release managers mention that they would like to change the default transition names to make the workflow process nomenclature more intuitive for AccuRev users. For example, they would like a QA engineer to click a button that says passed QA instead of to Closed when an issue passes QA testing and can be closed.
To rename the to Closed transition, the AccuRev administrator:
|
1.
|
|
2.
|
|
4.
|
When she has finished, she clicks the Save button (
|
When an engineer returns an issue to the product owner for more information, the Assigned To field should change from the engineer’s user name to that of the product owner. To accomplish this, the AccuRev administrator creates a setValue action for the need more info transition:
|
1.
|
|
2.
|
She clicks the Edit Logic button to display the Validation Actions tab, and sets the setValue action to hrondo, the product owner’s user name.
|
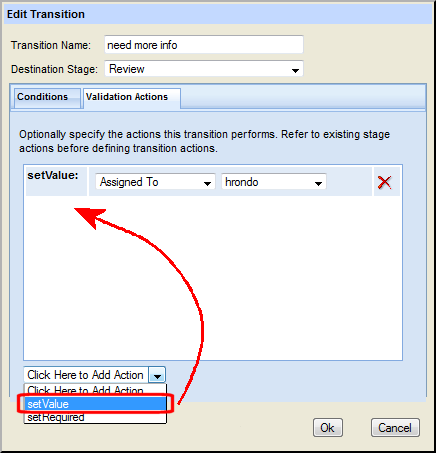
Now, when the user clicks the need more info transition button for an issue record, the value of the
Assigned To field is automatically changed to hrondo.
Assigned To field is automatically changed to hrondo.
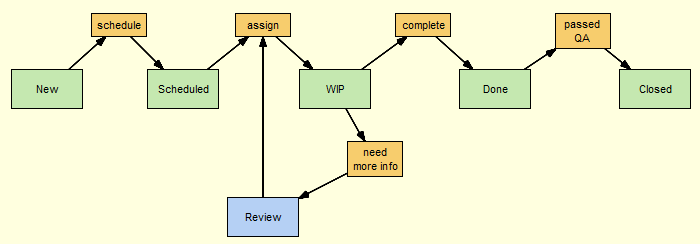
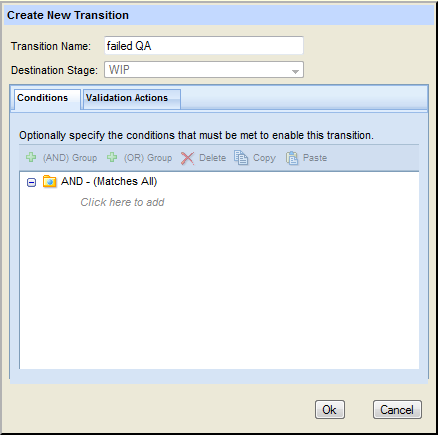
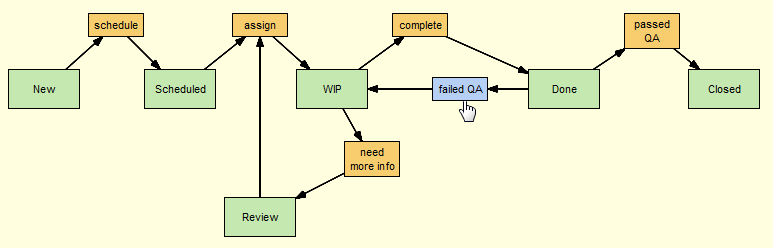
While reviewing the current workflow, the team notices that there is no way for QA to indicate that an issue has failed testing and to return the issue to engineering for more work—that is, to move the issue from Done back to WIP. To handle this case, the AccuRev administrator creates a new transition, failed QA, and uses it to link the Done and WIP stages:
|
1.
|
The Link Stages dialog box appears. Done is already specified as the source stage, and she selects WIP for the Destination Stage field.
|
2.
|
The assign transition is already being used to move issues from Scheduled to WIP, so the AccuRev administrator clicks the Create New Transition button (
|
|
3.
|
In the Transition Name field of the Create New Transition dialog box, she types failed QA and then clicks Ok to create the new transition.
|
|
4.
|
When the Create New Transition dialog box closes, the AccuRev Administrator clicks Ok on the Link Stages dialog box.
|
The new failed QA transition appears on the workflow diagram:
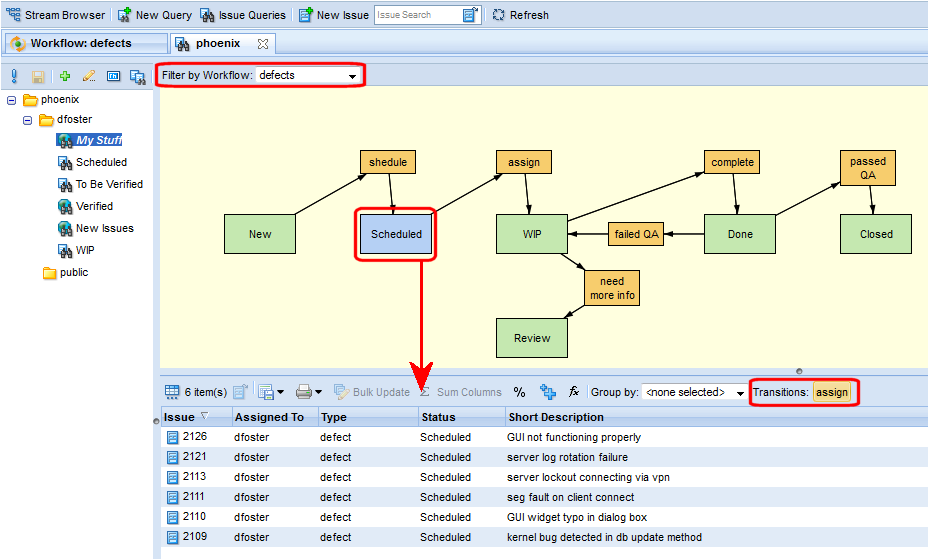
Before using the defects workflow to enforce Rapid Velo’s SCM policies, the AccuRev administrator wants to quickly review the issue processing features that are already available to her AccuRev users. By simply creating and activating the defects workflow, Rapid Velo’s AccuRev users can:
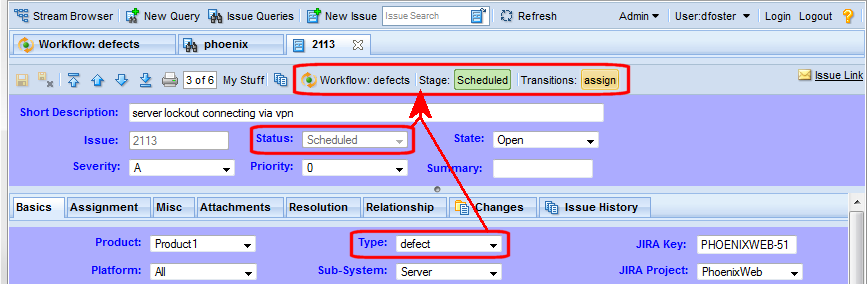
Here, for example, because issue 2113 is type defect, its processing is automated and enforced by the defects workflow (whose condition, you might recall, was specified as Type = defect). In this example, clicking the assign transition button moves the issue to the WIP stage, changing the value of the Status field from Scheduled to WIP in the process. Any logic defined for the WIP stage—an entry action or a validation action, for example—is executed at this time.
Tip: These workflow tools are also available in the Issue Edit form in the AccuRev Java GUI once the workflow has been created and activated.
AccuRev users can now also use the workflow to filter query results, and to quickly view and manage the issues in any workflow stage. As shown here, the defects workflow has been used to filter results from the My Stuff query to display only those issues that are defects (and not, say, enhancements).
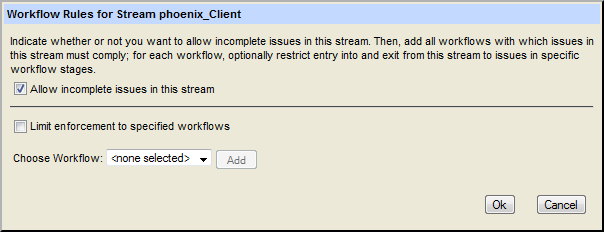
Satisfied that the defects workflow provides the required support for Rapid Velo’s issue processing automation and rules enforcement, the AccuRev administrator is ready to use that workflow to enforce Rapid Velo’s SCM development and release policies. In particular, Rapid Velo’s engineering organization wants to ensure that:

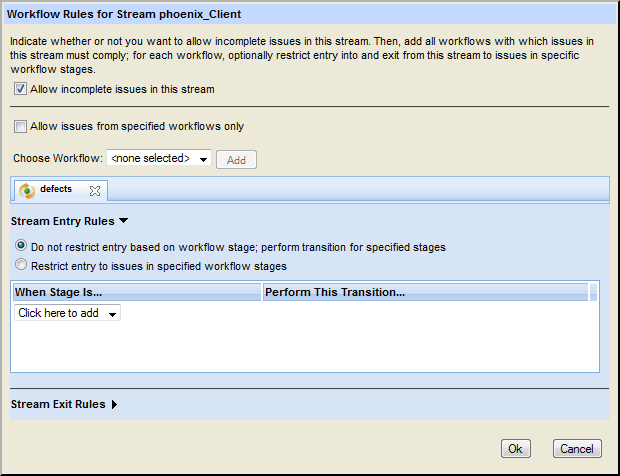
Since she wants to restrict entry to defects, she selects the defects workflow from the Choose Workflow field and clicks the Add button.
|
2.
|
To allow only defects in the phoenix_Client stream, she selects the Allow issues from specified workflows only check box.
|
|
3.
|
Next, she changes the default stream entry rule to Restrict entry to issues in specified workflow stages, and then specifies Closed for the workflow stage:
|
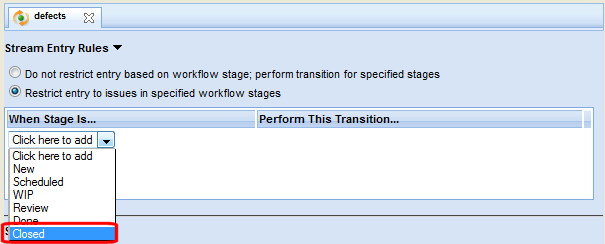
(Because Closed is the last stage in the workflow, it is not currently defined with a transition to another workflow stage.)
Tip: The workflow rules icon also appears in the StreamBrowser in the AccuRev Java GUI.
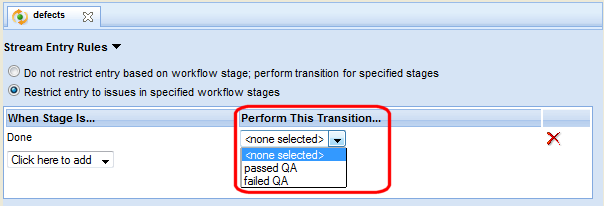
The rules for the phoenix_Client_QA stream are slightly more relaxed: issues of any type—defects, enhancements, and so on—can be in the stream, but if the issue is a defect, it must be marked Done. The procedure for setting this rule on the phoenix_Client_QA stream is the same as that for the phoenix_Client stream with one simple difference: when specifying the rule, the AccuRev administrator leaves the Allow issues from specified workflows only check box in its default state (not selected).
Once the Rapid Velo team identified the stages in the software development and release management processes they wanted to model, creating and activating a fully functional workflow took just a few minutes. The AccuRev administrator used the Stage Generator to create all workflow stages based on values from the status field in the AccuWork schema; refining the workflow as new requirements were identified—adding a new transition and changing the value of the Assigned To field, for example—was quick and easy. Integrating the finished workflow with the depot to enforce the company’s SCM policies was also accomplished in a few simple steps.