Tools for creating and implementing a workflow are available only in the Web UI for AccuRev. Before you begin, verify that the Admin menu appears on the AccuRev Web UI toolbar:
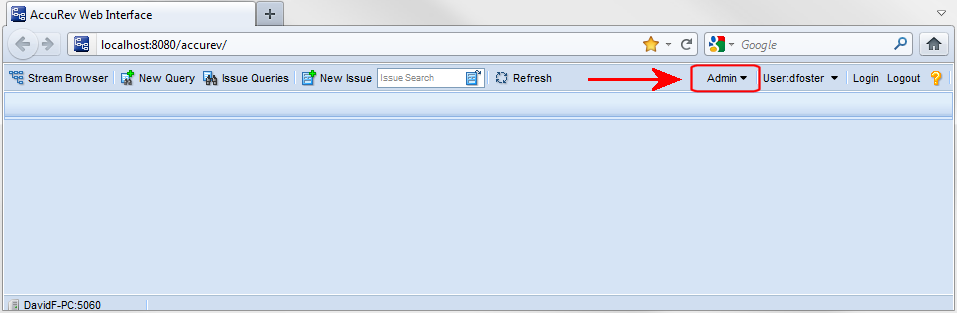
The Admin menu is the starting place for all workflow activities.
To create a workflow, first identify the field in your AccuWork schema that you want to use to represent the stages in your workflow—you might want your workflow to have New, Scheduled, WIP (work-in-progress), and Closed stages, for example.
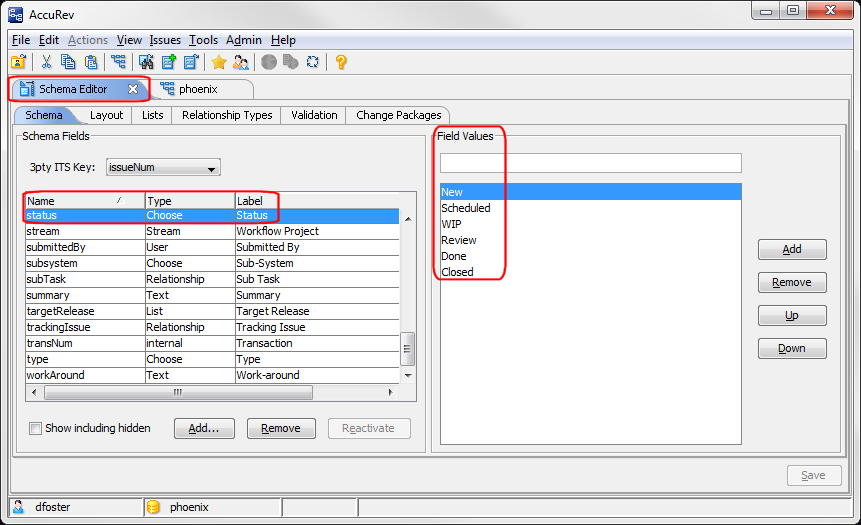
For more information. See the Java GUI online help for more information on using the Schema Editor.
|
1.
|
|
3.
|

Workflow conditions can be as simple as the one shown here, but you can use any combination of AND and OR statements you need. Note that only those issues that satisfy the conditions you specify here are subject to the workflow. In this example, issues with a type of, say, Enhancement are not subject to this workflow. Finally, the conditions you specify for a workflow must be unique for all workflows within a depot.
When you are finished specifying workflow conditions, click Ok. The Workflow Editor—an empty canvas and a toolbar—appears.
Note: A workflow is not activated until you set conditions for it. That is, you can fully describe a workflow’s stages and transitions, but you cannot use that workflow to automate issue processing or to enforce SCM policies until you specify the types of issues to which it applies.
For more information. The Set Workflow Conditions dialog box has the same features and uses the same mechanics as the AccuRev Web UI Query Builder. See Working with the Query Builder on page 64 for more information on this topic.
For more detailed information on creating workflows, see Creating and Managing Workflows on page 134.
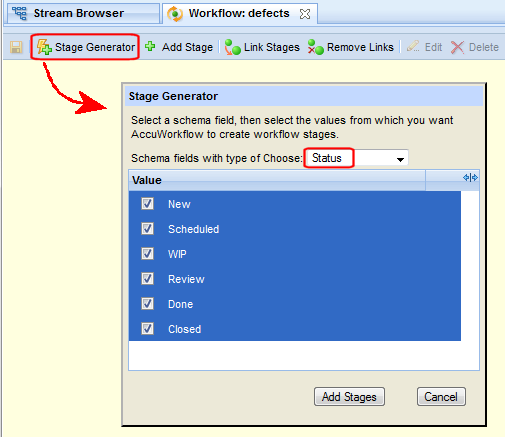
Now that you have created the workflow and specified conditions for it, you can create workflow stages and transitions. You can create stages and transitions manually, but we will use the Stage Generator to automatically generate these workflow objects for us.
|
1.
|
The Stage Generator dialog box appears. You use the Schema fields with type of Choose field to specify the field in the AccuWork schema whose values represent your workflow stages. You use the Value field to indicate the values for which you want to create workflow stages.
|
2.
|
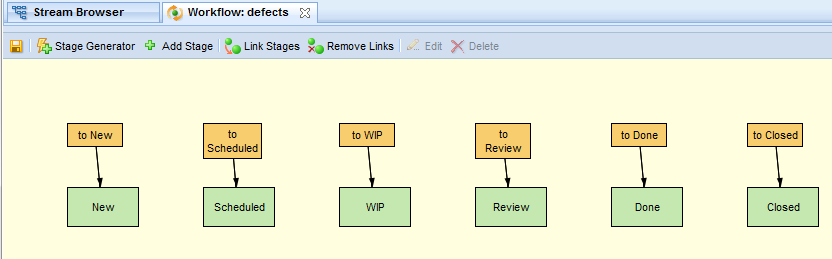
AccuRev populates the workflow with one stage for every value selected in the Stage Generator (New, Scheduled, and so on), and one transition for each stage (to New, to Scheduled, and so on):
|
3.
|
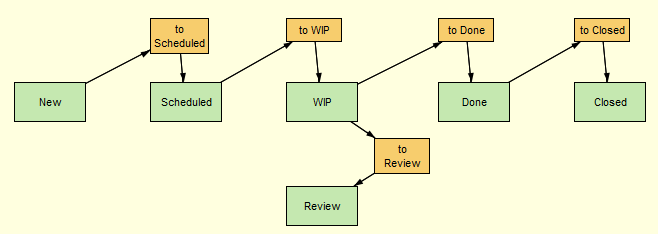
To link the New stage to the Scheduled stage, for example: right-click the Scheduled stage and choose Add Link > to Scheduled from the context menu, as shown here:
|
|
4.
|
Repeat this procedure to link the remaining stages in the workflow in the same way—link Scheduled to WIP, WIP to Done, and so on.
|
|
•
|
Delete the to New transition (new issues are created with a Status of New, and thus are placed in the New stage by default; that is, they do not come from another stage in the workflow).
|
|
•
|
Link the WIP and Review stages to reflect the process by which an issue is returned to the submitter for more information.
|
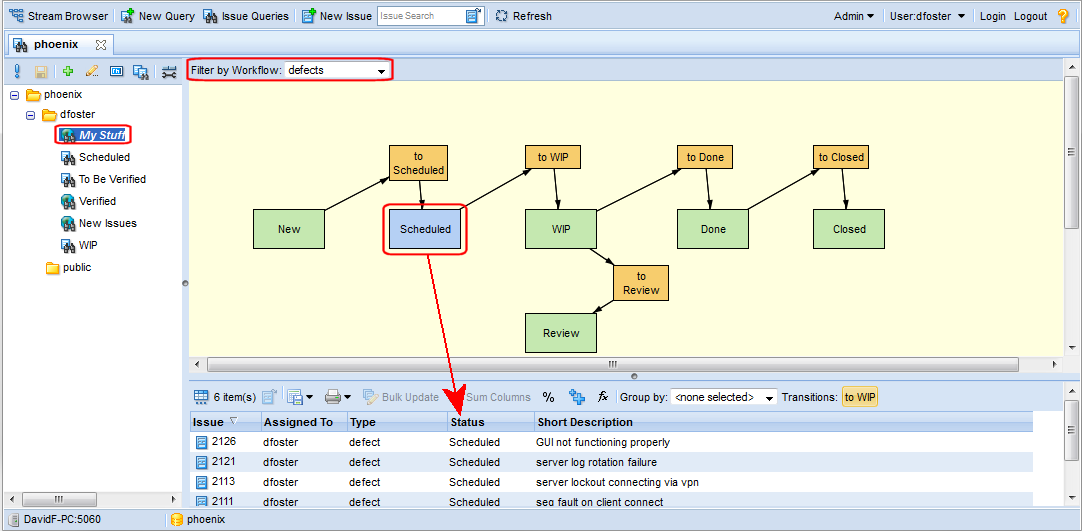
When finished, the resulting defects workflow should look something like this:
|
6.
|
At this step of the workflow implementation process, workflow for issue management is complete. Now that the workflow is activated (by specifying the workflow condition as Type = defect), and its stages and transitions have been defined, all issues whose Type field is set to defect are subject to the rules defined in this workflow.
For more information. See Creating and Managing Workflow Stages on page 138, Linking Workflow Stages on page 150, and Creating and Managing Workflow Transitions on page 146 for more information on the topics described in this step.
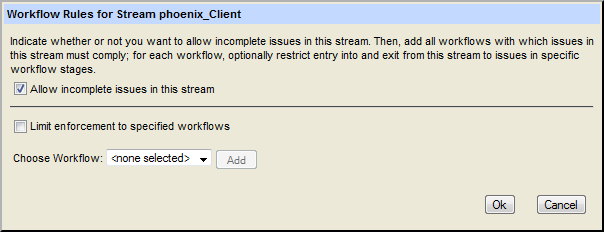
Once you have created a workflow, you can use it to enforce compliance with your SCM development and release policies. You might want to ensure that only defects in the Done stage can be promoted to your QA stream, and that only defects in the Closed stage can be promoted to your Production stream, for example. You do this using workflow stages to create rules that restrict entry into and, optionally, exit from a stream.
|
2.
|
Right-click the stream for which you want to enforce compliance and choose Workflow Rules... from the context menu.
|
|
3.
|
By default, AccuRev allows incomplete issues in a stream. Clear the Allow incomplete issues in this stream check box if you want to restrict entry to complete issues.
|
|
4.
|
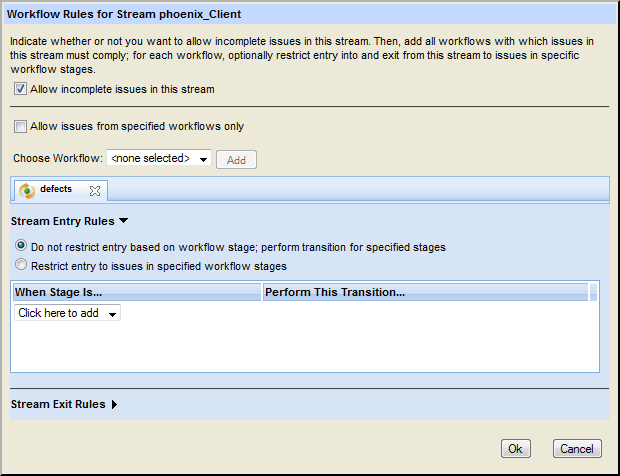
In the Choose Workflow field, select the workflow whose stages you want to use to create stream entry and exit rules. In this example, we use the defects workflow created earlier and click the Add button.
|
|
5.
|
By default, all issue types are allowed in the stream; AccuRev uses the specified workflow to enforce rules only on those issues that are subject to that workflow. If you want to restrict entry to this stream to only those issues that are subject to this workflow, select the Allow issues from specified workflows only check box; stream entry and exit rules, if any, are enforced on those issues.
|
To further restrict entry into or exit from a stream to issues in a specific workflow stage:
|
1.
|
In the Stream Entry Rules section, select the Restrict entry to issues in specified workflow stages radio button.
|
|
2.
|
In the When Stage Is column, select the stage you want an issue to be in before it can be promoted to this stream. For example, you might want to restrict entry to the QA stream to issues whose status is Done—that is, development is finished and the issue is ready to be verified by QA.
|
|
3.
|
Optionally, in the Perform This Transition field select the transition you want AccuRev to execute when the issue is promoted to the stream for which you are setting workflow rules. For example, when an issue is promoted to the QA stream, you might want to execute the to Closed transition, which changes the issue’s Status field from Done to Closed.
|
|
4.
|
If you choose, you can also specify rules to restrict exit from a stream; click the down arrow next to Stream Exit Rules to display those fields.
|
|
5.
|
If you want to set rules on this stream for a different workflow, return to Step 4; otherwise, click the Ok button on the Workflow Rules dialog box to save the workflow rules for this stream.
|
Note: Clicking the X icon on the workflow tab ( ) deletes the workflow rules for that workflow. It does not simply close the tab.
Tip: You can click this icon to display the Workflow Rules for Stream dialog box to review and modify the workflow rules specified for a stream at any time.
For more information. See Using Workflow to Enforce SCM Policies on page 161 for more information on the topics described in this step.
|
•
|
Clicking the stage button (here, it is New) displays a read-only version of the workflow diagram, providing users with an understanding of where their issue is relative to other stages in the workflow.
Clicking a transition button (here it is to Scheduled, but there might be more than one) moves the issue through the workflow. The availability of a transition is based on the issue’s current stage and any conditions you have defined for the transitions—you might specify a condition that makes a particular transition available only to a specific user or group, for example.
Finally, notice that the Status field is read-only—it can be updated only by AccuRev based on actions defined for the appropriate workflow stage or transition.
|
•
|
Once the defects workflow is associated with a stream, only issues whose type is defect are allowed in that stream.
|