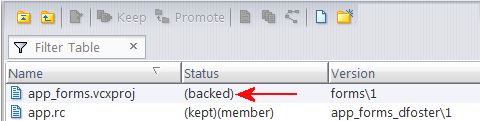
Perhaps the most common scenario is "non-conflicting development" -- modifying a file that no one else is working on concurrently and saving your work. Initially, the Status column in the details pane shows the file's status as (backed): your workspace contains an unmodified copy of a version in the backing stream. The Version column contains a version-ID, indicating which backing-stream version it is:
Note: You cannot edit a file in Incoming Changes mode.
Alternative: Right-click and choose Edit from the context menu.
Tip: You can use environment variable AC_EDITOR_GUI or EDITOR to control which text editor is opened. See ENV_VARS on page 268 of the AccuRev CLI User’s Guide for more information.
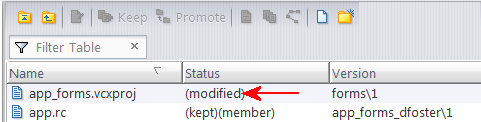
When you close the editor, the file's status changes to (modified). This indicates that you have modified the file in your workspace since the last time you synchronized the file in your workspace with the depot (with a keep or update command, for example). That is, you have changed the file in the local workspace, but not the element in the workspace stream.
To save your work in AccuRev, you use the Keep command. The Keep command creates a new version of the file in the workspace. The file's status changes to (kept)(member) to indicate that you have recorded a new version, and that the file is currently active in your workspace. (Active is an AccuRev term that means an element is a member of the workspace's default group. See The Default Group of a Workspace or Stream for more information.)
This version is said to record a content change to the file. The File Browser also has commands for performing namespace changes. See Renaming or Moving a File for more information.
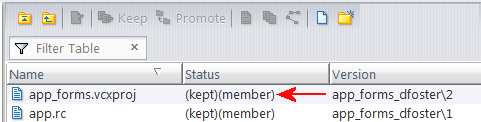
The Version column shows the version-ID of the newly created version. Note that this version is recorded in your private workspace (in this example, app_forms_dfoster); previously the Version column indicated that your workspace contained a version from the public backing stream (forms).
You can continue modifying the file and saving new versions in the depot with subsequent Edit and Keep commands. The file's status will alternate between (modified)(member) and (kept)(member). The persistence of the (member) indicator reflects the fact that the file remains active in your workspace until you promote your changes to the backing stream or undo your changes.
Tip: Keep is also available in the Explorer mode. Consider using the Outgoing Changes mode because it presents all unsaved work in one place.
|
2.
|
Alternative: Right-click and choose Keep from the context menu.
Tip: The Action column lists the commands that AccuRev performs to save your changes.
|
3.
|
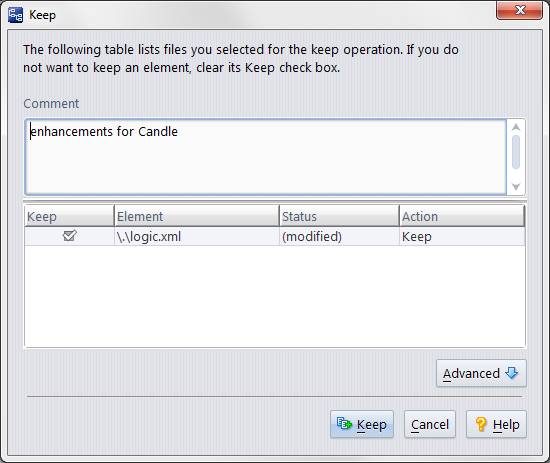
In the Comment field, optionally enter a description about the version you are creating.
|
Tip: AccuRev retains the comment you entered from your most recent keep.
|
4.
|
Click the Advanced button if you want to specify a file type or enable locking.
|
|
5.
|
|
6.
|
Click the Keep button to save changes for the selected files.
|
|
•
|
To rename an element within the same directory, invoke the
|
|
•
|
To move a file to a different directory in the depot, right-click the file and select
|
You can also use the Rename command to move a file to a different directory; specify a relative pathname (such as ..\otherdir\myfile.c) as the new name for the file. See Renaming an Element for more information.
AccuRev records a namespace change to a file in the same way it records a content change: by creating a new version of the file in the workspace stream. The file's status changes to (kept)(member). Making a namespace change to a file activates it -- creates a new version in the workspace stream and makes it a member of the workspace's default group -- just like keeping a content change.
If the file also has content changes that have not yet been saved with Keep, the status becomes (modified)(member).
After you rename an element, you are free to create a new element with the old name. If you do so, and then you decide to discard your renaming of the original element (Revert to Basis command), then the original element disappears from your workspace. (See also: Caution on Reusing the Name of a Renamed Element.)
Initially, the content changes and/or namespace changes you make to a file are recorded only in your workspace's private stream. This keeps your work isolated from your colleagues' work. When you are ready to share your changes with your colleagues, you promote the active version from your workspace stream to the backing stream. This makes your changes available to all workspaces that are based on the same backing stream.
|
•
|
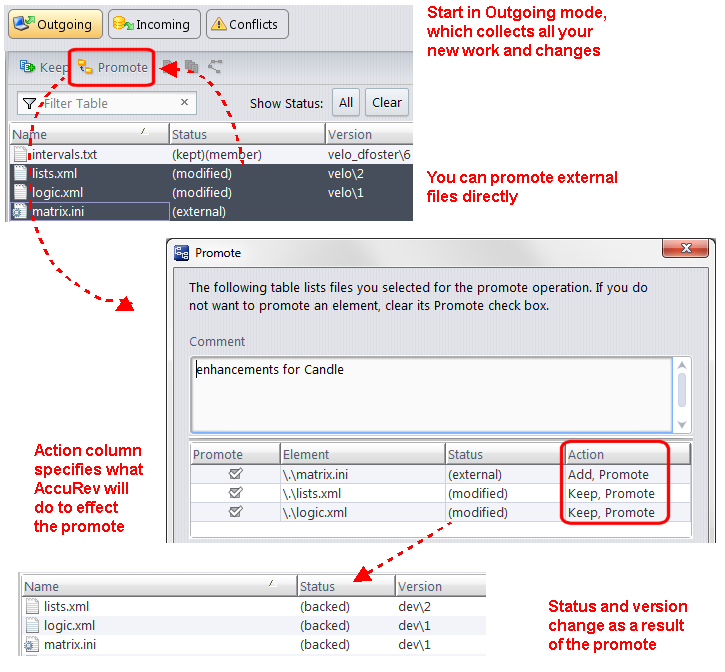
Before the promotion, it indicates the particular version of the file that is active in your workspace. (In this example, version velo\2 and velo\1 for lists.xml and logic.xml, respectively; matrix.ini has no version specified because it is external -- it has not been added to the workspace yet).
|
Having been promoted to the backing stream, the file is no longer active in the workspace (is no longer in the default group of the workspace stream). Accordingly, it loses its (member) status and returns to being (backed) -- its original status before you started working on the file. That is, the workspace returns to "inheriting" the version of the file currently in the backing stream -- which happens to be the version you just promoted there!
You use Promote to send the version of a file containing your changes to your workspace’s parent stream. This allows other users with workspaces on that same stream to get the changes in your version the next time they update their workspace. (Promote is also used to send versions from stream to stream. See Promote: Sharing Your Work for more information.)
Tip: Promote is also available in the Workspace Explorer mode, but it can be more convenient to use the Outgoing Changes mode because this mode presents all changed work in one place.
|
2.
|
Alternative: Right-click and choose Promote from the context menu.
|
4.
|
Click Ok.
|
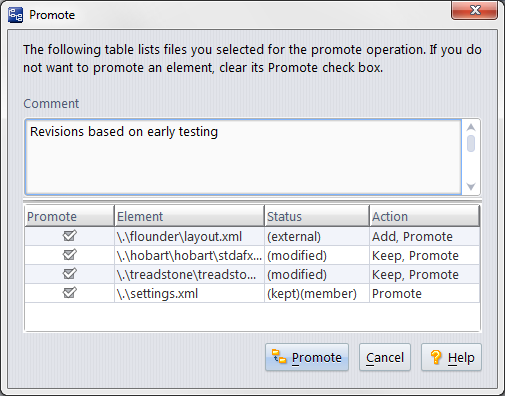
Tip: The Action column lists the commands that AccuRev performs to promote your version to the workspace’s parent stream. Note that you can promote new work that has not yet been added to AccuRev -- the Promote operation performs the necessary Add action for you.
|
5.
|
In the Comment field, optionally enter a description of the version you are creating.
|
Tip: AccuRev retains the comment you entered from your most recent promote.
|
6.
|
|
7.
|
Click the Promote button to send the version with your changes to the parent stream.
|
Inevitably, you sometimes decide not to share your changes with your colleagues -- instead, you can decide to discard the changes altogether (by using the Revert to Basis command) or to move the changes out of a parent stream but make them active in a child stream or workspace (by using the Demote command).
The Revert to Basis command (right-click the element, and then choose Revert To... > Basis Version) undoes all the content and/or namespace changes you have made to an active file. The file's status reverts to (backed), and your workspace "rolls back" to using the version that it contained the last time the file's status was (backed). It might be a version that you brought into your workspace with a recent Update command; or it might be a version that you created in your workspace, then Promote'd to the backing stream.
The variant command, Revert to Most Recent Version, is useful if you have modified a file's contents repeatedly, creating one or more intermediate versions in your workspace with the Keep command. Revert to Most Recent Version discards any content changes you have made since the most recent Keep. The file's status reverts from (modified) to (kept). The file remains active in the workspace, so it retains its (member) status.
See Revert: Undoing Changes for more information.
The Demote command moves an element version out of the default group of a stream, thereby rendering that version inaccessible in the stream. At the same time, that version is added to the default group of the child stream you specify as part of the demote process. In this way, the changes are not abandoned (as they are when you perform a Revert to Basis command) but, instead, are moved out of the parent stream and into a child stream.
See Demote: Moving Elements Out of a Stream for more information.
The following are not changes to a directory:
You change a directory's pathname in the same way you change a file's pathname -- with the Rename command (Edit > Rename) or with Cut and Paste commands. When you make such a change, AccuRev records a new version of the directory in the workspace stream.
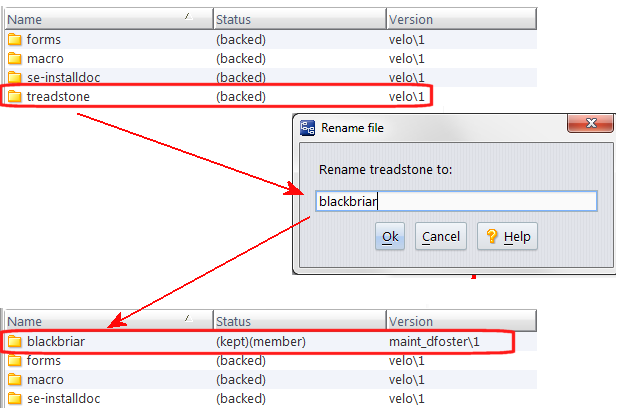
The new version-ID appears in the Version column of the Details pane (in this example, maint_dfoster\1). And the directory's status changes to (kept)(member) -- just as it does for a file's namespace change.
By definition, deleting a file at the operating system level makes it disappear from disk storage. Operating system tools, such as Windows Explorer or the UNIX ls command, will detect that the file no longer exists. But the file does not disappear from the File Browser display. AccuRev knows that the file should be in the workspace, because the file element still exists in the workspace's built-in stream. (The workspace stream is located in the AccuRev depot. It's unaffected by the operating system's delete-file commands.)

Deleting a directory at the operating system level is similar to (but potentially more destructive than) deleting a file. The entire directory subtree is deleted from disk storage, and the directory is listed by the File Browser as (missing). To recover the entire directory tree, invoke the Populate command from the directory's context menu. Be sure to select the Recursive option from the Populate dialog.
See Delete: Deleting Elements from a Workspace Tree for more information.
Deleting a file at the AccuRev depot level (rather than simply at the operating system level) is called defuncting, and is implemented by the Defunct command.
|
•
|
Defuncting "activates" a file in the workspace stream, recording the fact that you've made a change to the file. In addition to getting (defunct) status, the file gets the (kept) and (member) statuses, just as if you had performed a Keep command.
|
The Defunct command does not actually remove the file element from the AccuRev repository. Because AccuRev is TimeSafe, old versions of the file continue to exist in the repository. You can see such versions in snapshots of streams, in History Browser displays, etc. You can restore such elements with the CLI command undefunct.
See Defunct: Removing Elements from the Workspace for more information.
As you and your colleagues make changes to a project's code base, the contents of your private workspaces diverge more and more. It's a software-development best practice to periodically incorporate others' changes into your workspace, effectively resynchronizing the workspaces (partially or fully). The Update command performs this task, by copying versions that your colleagues have promoted to the backing stream into your workspace.
This is an oversimplification. For some elements, you must use the merge operation to incorporate other's changes into your workspace. For a complete discussion of the update operation, see Update: Keeping Your Workspace Current.
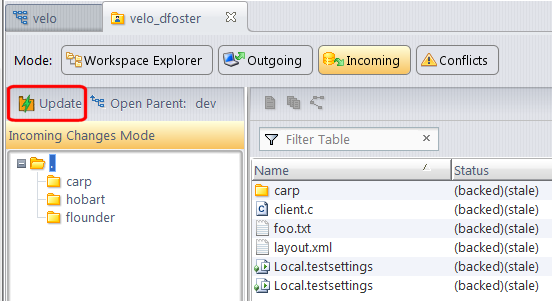
Tip: The Update command is available in all File Browser modes. Consider first displaying the workspace using the Incoming mode to get a preview of the changes that will be made to your workspace. See Incoming Changes Mode for more information.
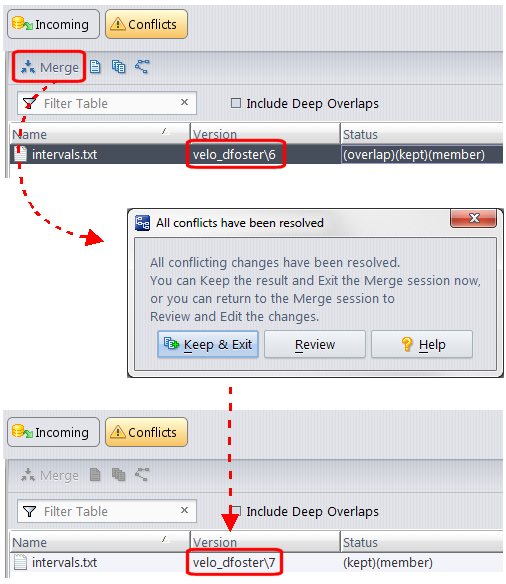
AccuRev supports concurrent development: two or more users can start with the same version of a file and make changes to that file independently -- both content changes and namespace changes. After one of the users promotes his changes to the backing stream, each of the others must merge her own changes with the newest version in the backing stream, using the Merge tool. We describe here how to initiate a merge operation.
As you work on a file, keeping intermediate versions in your workspace, the file's status alternates between (modified) and (kept). At any point, you may notice that an additional indicator, (overlap), appears in the Status column. To make sure you notice, the File Browser displays the entry with a yellow highlight.
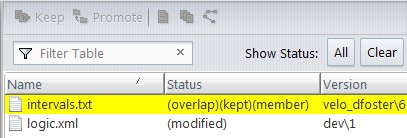
Tip: Elements with a (twin) status are also highlighted in yellow. See (twin) for more information. Consider using the File Browser Conflicts mode to display all overlap and twin elements in your workspace. See Conflicts Mode for more information.
Whenever a file's status is (overlap), the Merge command is enabled. The execution of a Merge command concludes with AccuRev prompting you to keep the new version in your workspace.
The status (underlap) is similar to (overlap), in that an element has changed in your workspace and also in the backing stream. With (underlap), the changes in your workspace version have already been promoted to the backing stream (from another workspace, or from a stream elsewhere in the depots stream hierarchy). You can resolve an underlap in the same way as an overlap -- by merging and promoting. But in many cases, it is more appropriate to use the Revert to Basis command to undo the changes in your workspace.
Sometimes you might simply wish to undo the changes that created the (overlap) condition. In AccuRev, you accomplish an "undo" using the Revert command. Revert lets you:
See Revert: Undoing Changesfor more information.