This section describes how to create, edit, and clone AccuWork issues. See Issue Form if you are interested in details about the AccuWork Issue form itself.
|
1.
|
Note: While required fields have red labels, whether or not a field is required is determined by your AccuRev administrator and how he or she has configured your site’s AccuWork schema. See Issue Form for more information on this topic.
|
4.
|
|
1.
|
Tip: The Open Issue button is also available on the Query Results pane toolbar. See Query Tab Layout for more information.
Tip: If you have implemented third-party issue tracking system (ITS) keys in your AccuWork schema, this dialog box displays a pair of radio buttons that let you indicate whether you want to use AccuWork issue numbers or third-party ITS keys when looking up issues. See Using Third-Party Keys in the AccuRev GUI.
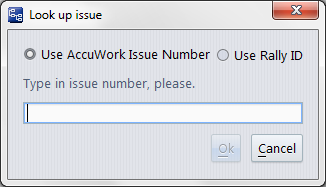
The Issue form for the issue you specified appears. See Issue Form for more information on the form.
A typical AccuRev repository contains multiple depots. Each depot can have its own AccuWork configuration. In each depot, the issue records are numbered sequentially: 1, 2, 3, ... The Create Issue or Look Up operation applies to the current depot.
AccuWork can be configured to use a lookup field other than the default (field name issueNum, field label Issue). In this case, the label for the configured field appears in the prompt window, and you must enter a value that exactly matches (except for uppercase/lowercase) some issue record's value of that field.
Cloning an issue creates a new issue record based on the issue you have chosen to clone. You might want to clone an issue when it contains a lot of information that is relevant to the new issue you want to create and you do not wish to recreate this information manually.
|
•
|
Opening it. See Modifying an Existing Issue for more information.
|
|
2.
|
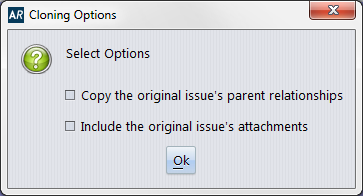
In either case, the new issue appears on its own tab. The Short Description field, if present in your schema, includes a prefix of [Clone of <issue number> to help distinguish it from the original issue.
|
3.
|
Make any changes required and then click either the Save button (
|
The cloned issue is created as a new issue only after you click the Save button ( ) or the Save & Close button (
 ).
).
For example, imagine you have submittedBy and dateSubmitted fields in your schema, which record the username of the user who created an issue and the date it was created. By default, the issue record AccuWork creates during cloning will also get those values -- even if the clone operation was performed by a different user at another date and time. If you want, you can use the "initialization of cloned issue" validation condition to set new values for these fields -- and any other fields you wish. In this case, you might want to set submittedBy to "CUR_USER" and dateSubmitted to "CUR_DATE". Other examples for values you might wish to reset are an issue’s state or status. See Validation Tab to learn more about using the schema to specify issue record initialization and validation.
Note: Remember that the content of Issue forms, including some subtabs, is determined by how your AccuRev administrator has configured your AccuWork schema -- you might not see an Attachments tab on the Issue form at your site, for example. For general information about the Issue form, see Issue Form.
|
•
|
In addition, the value of the shortDescription field (if present in your schema) is given a prefix of [Clone of <issue number>] to help distinguish it from the original issue. You can, of course, change the shortDescription to whatever you like.
AccuWork allows you to define parent/subtask relationships between issues. You might want to do this when you have a single issue (or story) that is made up of two or more individual tasks that you want to be able to manage separately. In AccuWork, you can create separate issues to represent those tasks and associate them, as subtasks, with the parent issue. For example, imagine an issue such as User wants reporting. In fleshing out this story, you might discover that it really consists of a number of individual requirements, each of which you want to manage as its own task. Using parent/subtasks, you might end up with the following issues:
|
•
|
23425 -- User wants reporting (parent issue)
|
|
•
|
23426 -- Support PDF, CSV, and HTML report formats (subtask issue)
|
|
•
|
23448 -- Support online help (subtask issue)
|
|
•
|
23517 -- Support custom reports (subtask issue)
|
|
1.
|
In the Query Results pane of the Queries tab, locate the issues for which you want to create a parent/subtask relationship. (See The AccuWork Query Editor if you need help understanding the Queries tab.)
|
Tip: You always drag-and-drop the issue you want to create as the subtask. The parent issue is always the target.
|
2.
|
Click the Subtasks tab.
|
|
4.
|
To use an existing issue to specify the parent/subtask relationship, click the Link issue... button (
|
AccuWork displays the Link with Issue dialog box. Enter the appropriate issue number and click Ok to create the relationship.
|
5.
|
To create a new issue to specify the parent/subtask relationship, click the Link new issue... (
|
AccuWork displays a new Issue form. When you are done, click the Save or Save & Close button. AccuWork both creates the new issue and the parent/subtask relationship.
AccuWork always sorts issues using data in the parent issue, even if the subtask issue. Consider the following simple example, which shows the default sort order for the Query Results pane, by Issue number in ascending order:
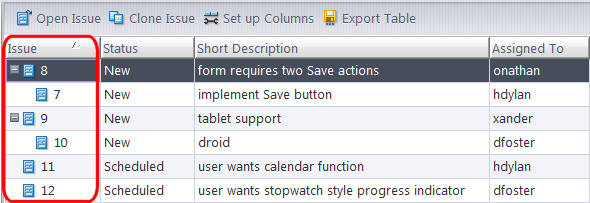
Similarly, if we next sort on Assigned To, issue 12 is listed first because its value, dfoster, is lowest in the alphabet. Note that it also appears after the value xander, because that issue (10) is a subtask of issue 9 with which xander is associated.

While the sort behavior of subtask issues is intuitive, it might not be immediately apparent why sorting on a particular column, like Assigned To in the previous illustration, yields the results it does -- especially if the Issue column is obscured from view.
|
•
|
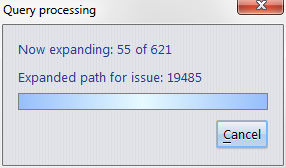
The Now expanding: field shows the total number of issues whose paths need to be expanded to display the subtask, and how many have already been expanded. In this example, AccuRev has expanded 55 of the 621 paths to subtask issues.
|
|
•
|
The Expanded path for issue: field identifies the last issue number (or third-party key) that has been expanded.
|
Processing a substantial number of subtask issues can take a long time. You can click Cancel at any time to stop the subtask issue path-expansion processing. AccuRev will display expanded paths for any issues it has processed at that time, and you can manually expand the paths for any remaining issues if you choose. Cancelling this processing does not affect the result set in any way.