Set Preferences
GitCentric provides a dialog for controlling various aspects of your display.
1. In the upper right corner of the GitCentric window, click
My Account from the username drop-down.
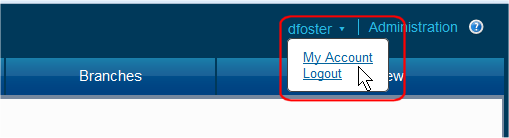
2. On the My Account page, click
Preferences.

3. Most of these settings are self-explanatory, and are summarized in
Preferences on page 58. However, the Show Site Header setting is non-obvious and requires some set-up to make it work. Use the following procedure to set up a site header (and footer) within Gerrit Code Review.
Define and Display a Site Header or Footer for Gerrit Code Review
Gerrit Code Review provides the option of displaying a header and/or a footer in its web UI:
1. Create an image file or files that you want displayed for the header and/or footer. Place the file or files in <gc_home>/site/static
2. Create an XML-compliant file named GerritSiteHeader.html in <gc_home>/site/etc. Include a pointer to the image file or files in <gc_home>/site/static that you want to use for the header. Note that this file must be valid XHTML. It is not sufficient for it to be valid HTML. For example, the following example would not work if you left out the superfluous “</img>” closing tags. This example creates a site header from two image files displayed horizontally as a table row, with a link to the AccuRev web site from the splash image.
Example:
<div id="gerrit_header">
<table border="0" cellpadding="0" cellspacing="0" id="masthead" width="100%">
<tbody><tr><td valign="center">
<a href="http://www.accurev.com/">
<img height="150" src="static/splash.jpg"></img></a>
</td>
<td width="100%"></td>
<td align="right" valign="bottom">
<img height="150" src="static/titletop.png"></img>
</td>
</tr>
</tbody>
</table>
</div>
3. If you also want a site footer, repeat the previous step for a file named GerritSiteFooter.html.
4. To enable the display of the header and footer, in the Web UI click Settings -> Preferences -> Show Site Header.