|
•
|
A fatal error is typically associated with a lost network connection or system failure. In AccuSync, the name of a synchronization pattern that encounters a fatal error is displayed in red; clicking the tab next to the synchronization pattern name displays information about the error.
|
Tip: If AccuSync encounters a fatal error, consider increasing the network retry count, retry delay, or both. See Changing Network Settings for more information.
|
•
|
A synchronization error occurs when AccuSync is unable to synchronize issue records. This can happen for a number of reasons, including one or more of the following:
|
If AccuSync encounters a synchronization error, verify that your AccuWork and ITS schema have the necessary fields, and that your mapping definitions and field mappings (including any filters and transformers they use) are specified correctly. See Making Changes to AccuSync™ Configurations for more information.
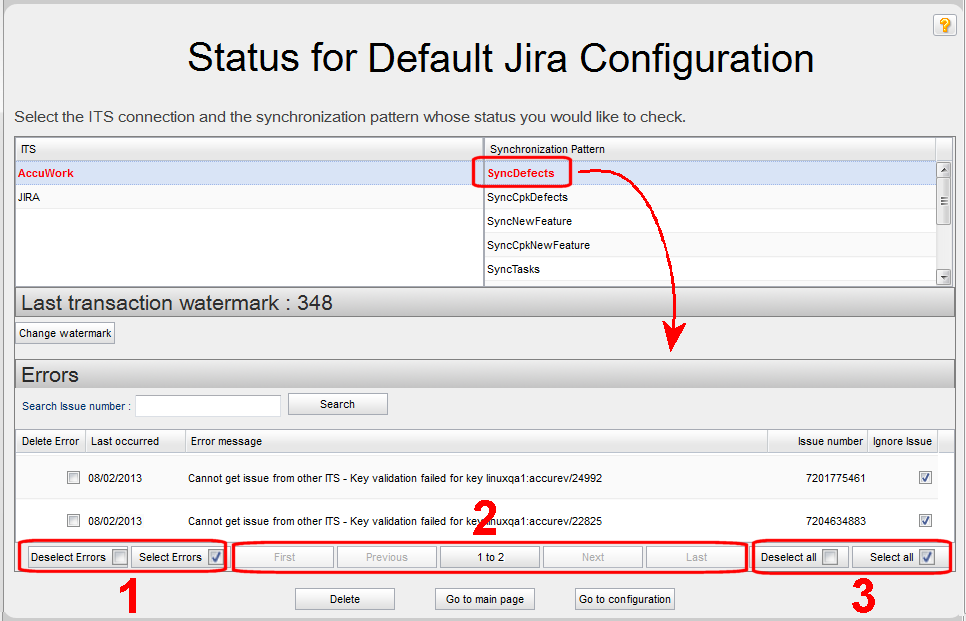
(1) Quickly toggle the Delete Error check box for all issues. (See Deleting Errors for more information on this subject.)
Tip: The center field in this set of controls shows the current set of all issues that are currently being displayed (1 to 3, as shown in the preceding illustration, or 1 to 25 of 678, for example).
(3) Quickly toggle the Ignore Issue check box for all issues. (See Suspending Synchronization for an Issue for more information on this subject.)
To search for an issue with a synchronization error, type the issue number in the Search issue number field and click the Search button.
Tip: To select the delete check box for all errors, click the check box in the Errors table heading.
|
2.
|
Click the Delete button under the Errors table.
|
Use the Ignore Issue checkbox if you want AccuSync to skip the associated issue during subsequent synchronizations. You might want to suspend synchronization for an issue that is reporting errors while you troubleshoot the cause in order to eliminate repetitive entries in the Errors table (and to suppress email notification, if you have enabled it).
Note that AccuSync will not attempt to synchronize the issue as long as the Ignore Issue checkbox is checked. Once you have identified and addressed the root cause, clear the Ignore Issue checkbox and AccuSync will try to synchronize the issue again.
Tip: The Ignore Issue checkbox is checked by default. Use the Deselect all button to clear this field for all errors.
AccuSync emails errors it encounters if you have enabled email notification. (See Email Notification for AccuSync Events for more information.)
|
1.
|
On the AccuSync Management Console main page, click the Edit button (
|
|
2.
|
Click the Edit Admin Details button.
|
|
3.
|
Click the Advanced Settings tab to expand that section.
|

|
4.
|
|
5.
|
Click the Save button.
|
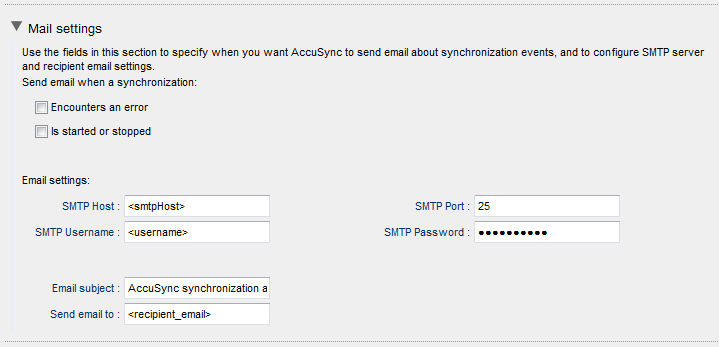
You specify this information on the Mail Settings panel of the Admin Details for Configuration page.
Note: AccuSync sends a separate email for each error it encounters each time the synchronization pattern is run. You can suppress repetitive email for any error you choose. See Suspending Synchronization for an Issue for more information.
|
1.
|
On the AccuSync Management Console main page, click the Edit button (
|
|
2.
|
Click the Edit Admin Details button.
|
|
3.
|
Click the Mail Settings tab to expand that section.
|
|
5.
|
Complete the SMTP Host, SMTP Port, SMTP Username, and SMTP Password fields with values that are appropriate for your environment.
|
|
6.
|
The value in the Email subject field is used for all AccuSync email notifications, regardless of their type. Change the default value (AccuSync synchronization alert) as needed.
|
|
7.
|
Use the Send email to field to specify the email addresses of the individuals you want to receive synchronization alerts. This is typically the email address of the AccuSync or IT system administrator, as appropriate. Use commas to separate multiple email addresses.
|
|
8.
|
Click the Save button.
|