Field mappings associate a field in an AccuWork issue with a field in an ITS issue -- Name with Name, Description with Description, and so on. During synchronization, the value of a field in one system replaces the value of the corresponding field in the other system depending on the synchronization type specified. See What is AccuSync™? for a simple illustration of this process.
Tip: Create required field mappings as part of your basic mapping definition. This way, you only have to specify them once. See Base Mapping Definitions for more information on this topic.
In some cases, however, your systems might use different values for the same field. Imagine a Severity field, for example. In AccuWork, this field might use values of A, B, and C to describe an issue’s severity. The same field in your ITS, however, might use values of Critical, High, and Moderate. In cases such as this, you need to define a mapping group to provide AccuSync with the information it needs to synchronize fields that use different values (A=Critical, B=High, and C=Moderate, for example).
You choose the mapping group you want to use for a field mapping at the time you create the field mapping. For this reason, you must create the mapping group before you create the field mapping itself. See Creating a Mapping Group for more information.
Field mappings inherit the synchronization type (two-way or one-way) from the synchronization pattern associated with their mapping definition. If you want, you can override the synchronization type for individual field mappings. You might want to specify one-way synchronization for a particular field mapping and use two-way synchronization for the remaining field mappings in the mapping definition, for example. See Synchronization Types for more information.
Transformers are bidirectional AccuSync utilities that convert values when synchronizing fields in one system with fields in the other. Transformers perform these conversions using predefined settings, except in the case of the Special Value Transformer, which uses the mapping group you specify. AccuSync includes several predefined transformers. You can also create custom transformers.
|
•
|
AccuWork Change Package Data to String – Adds new lines to change package information to make the data more legible. For example, the AccuWork Change Package Data to String Transformer converts this change package information:
|
|
•
|
AccuWork Change Package Promote Data to String – Adds new lines to change package promote information to make the data more legible. See the description of AccuWork Change Package Data to String Transformer for an example.
|
|
•
|
Special Values – Uses the mapping group you specify to convert the value of a field in one system to an appropriate value in the other system. See Mapping Groups.
|
|
•
|
AccuWork Change Package Data to JIRA Custom Field – Displays change package information in a JIRA custom field as HTML. Information includes element ID, file type, path, and actual and basis version numbers.
|
|
•
|
AccuWork Change Package Promote Data to JIRA Custom Field – Displays change package promote information in a JIRA custom field as HTML. Information includes transaction ID; date; user; type; element ID, path, and virtual and real versions; and comments.
|
|
•
|
JIRA User to AccuWork User – Uses the email suffix specified in the JIRA connection combined with the AccuRev user name to create the email name required for JIRA users. See Creating the AccuWork™ and ITS Connections for more information.
|
A mapping group, if specified, can be used to synchronize fields that take user names when the users were created with different names on the two systems (oarmstrong on one and owen.armstrong on the other, for example). See Mapping Groups for more information.
|
•
|
Special JIRA Values – Uses the mapping group you specify to convert the value of a field in AccuWork to an appropriate value for a JIRA custom field. See Mapping Groups.
|
|
•
|
Rally Discussion to AccuWork Comments (Text) Transformer – retains any formatting used in Rally Discussion and AccuWork Comments fields.
|
|
•
|
Rally Username to AccuWork Username Mapper – for Rally to AccuWork synchronizations, strips the email suffix (specified as part of the Rally connection) from Rally usernames so they can be added to AccuWork. For AccuWork to Rally synchronizations, the email suffix is added to the username before the name is added to Rally.
|
For example, if @accurev.com is specified as the email suffix, when a Rally issue with the username hrondo@accurev.com is synchronized with AccuRev, the AccuWork issue is given the user hrondo. See Creating the AccuWork™ and ITS Connections for more information on specifying the email suffix.
Note: You can use a mapping group with this transformer to override its default behavior. You might need to do this if the same user was defined using different usernames on the systems you are synchronizing (jhasler on one, and haslerj on the other, for example). In this case, AccuSync would use the mapping group to ensure that jhasler was synchronized as haslerj, in addition to performing the usual email suffix conversion.
You choose the transformer you want to use for a field mapping in the Transformer field. You can associate a transformer with a field mapping when you create or edit the field mapping:
If the transformer takes an argument, you specify the argument using the Transformer configuration field. Clicking the Configure Properties button displays the Mapping Groups page, which allows you to create a mapping group if one does not exist already.
AccuRev includes a Java project you can use to create a custom transformer, which you can use to manipulate field mapping data as your needs require. The custom transformer Java project is installed to the userTransformersSampleProject directory where you installed AccuSync (c:\Program Files (x86)\AccuSync\userTransformersSampleProject\, for example).
AccuRev includes sample Java programs you can use to model your custom transformer. The programs are in userTransformersSampleProject\src\com\accurev\its\bridge\ where you installed AccuSync.
|
4.
|
When the code compiles successfully, build the project from the command line using build.xml. This file is in the userTransformersSampleProject directory where you installed AccuSync.
|
The build process creates a .jar file in the userTransformersSampleProject\build directory where you installed AccuSync.
|
5.
|
The custom transformer is now available and appears in the Transformer drop-down list box on the Field Mapping dialog box.
You need to create a mapping group for any field whose values differ across the systems you are synchronizing. You specify that mapping group as the argument for the Special Value Transformer when you create the field mapping for that field. See Mapping Groups and Using Transformers for more information.
|
2.
|
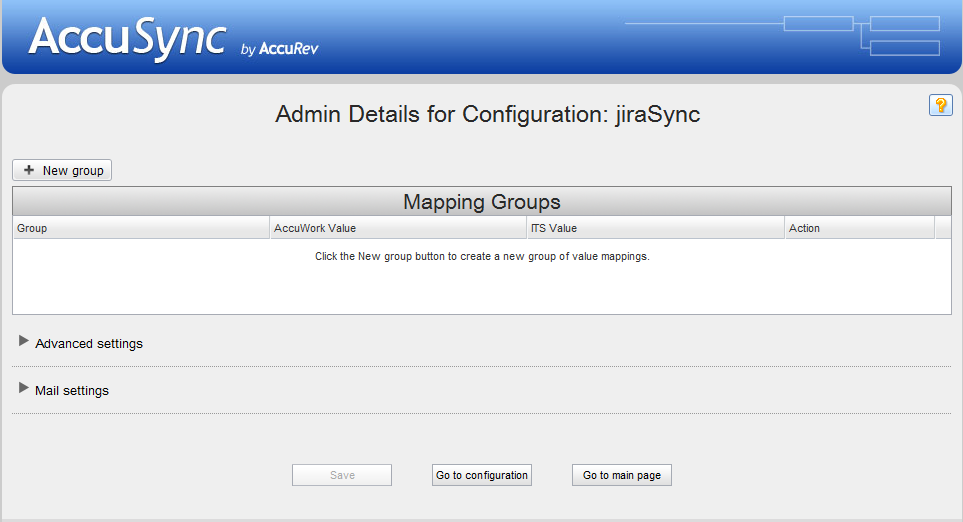
Click the Edit Admin Details button.
|
|
3.
|
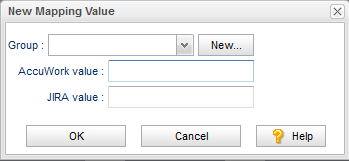
Click the New Group/Value button.
|
|
4.
|
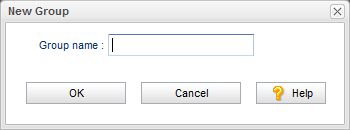
Click the New... button to define the new group.
|
|
5.
|
The New Mapping Values dialog box reappears; the name of the group you just created appears in the Group field.
|
6.
|
In the New Mapping Values dialog box AccuWork value and ITS value fields, enter the value pair for this group. For example, a value of “A” in AccuWork might correspond to a value of “Critical” in your ITS.
|
|
7.
|
Click OK.
|
|
8.
|
|
9.
|
Choose the group to which you want to add another value pair from the Group drop-down list.
|
|
11.
|
Tip: If you are mapping fields whose values differ across the systems you are synchronizing, you must first create a mapping group for that field. See Mapping Groups for more information.
|
2.
|
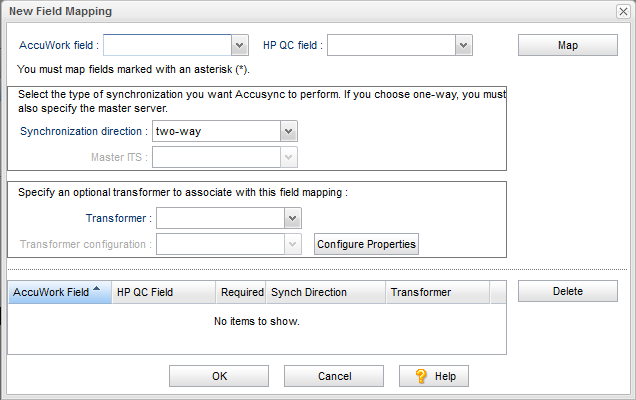
For the mapping definition for which you want to create field mappings, click the Edit Mapping Definition button (
|
|
3.
|
In the Field Mappings table, click the Add new... button.
|
|
4.
|
Note: By default, every field mapping inherits the synchronization type specified for the synchronization pattern to which the mapping definition belongs. You can override that synchronization type for an individual field mapping. See Synchronization Types Inherited from Synchronization Pattern for more information.
|
6.
|
Optionally, choose a transformer from the Transformer drop-down list for this field mapping.
|
Note: If you use the Special Values Transformer, you must specify the mapping group you want to use. To use an existing mapping group, choose one from the Transformer configuration drop-down list. If you have not already created the mapping group for this field mapping, click the Configure Properties button to open the Mapping Groups page. See Transformers for more information.
|
7.
|
Click the Map button.
|