Step 2: Set Up the AccuWork™ Schema
The field mappings in an AccuSync Configuration rely on fields defined in both the AccuWork schema and your ITS schema: if you want to synchronize the Status field in your ITS, there must be an equivalent and compatible field in AccuWork, regardless of its name (the equivalent field might be called State in AccuWork, for example). Further, the values for fields with a type of Choose must be defined in the respective schemas as well. For example, when you define a Project field with a type of Choose, you must also define the values that can be specified for that field (Acme, Windfall, and Gimble, for example). In AccuWork, the schema also controls which fields are displayed for an issue record.
Note: Regardless of whether you use the default AccuWork schema for your ITS or modify your current AccuWork schema, you must define values for your ITS projects and applications in your AccuWork schema. See Using Choose Type Fields for more information.
ClearQuest, HP QC, Rally, and Remedy users only: When you have finished setting up the AccuWork schema, you must add custom fields to your ITS schema for the AccuWork data you want to store and display in your ITS. See Step 4: Add AccuWork Fields to Your ITS Schema for more information.
Using the Default AccuWork™ Schema
The AccuSync installation includes a default AccuWork schema for your ITS located in \defaultAccuWorkSchema\its where you installed AccuSync (c:\Program Files (x86)\
AccuSync\defaultAccuWorkSchema\rally, for example). This AccuWork schema includes all the fields needed to synchronize AccuWork and ITS issues, as well as many fields that, while not required to support issue synchronization, are considered useful in most installations, like the Status field, for example.
AccuSync\defaultAccuWorkSchema\rally, for example). This AccuWork schema includes all the fields needed to synchronize AccuWork and ITS issues, as well as many fields that, while not required to support issue synchronization, are considered useful in most installations, like the Status field, for example.
To use the default AccuWork schema, simply copy the defaultAccuWorkSchema\its\dispatch directory to the \dispatch directory for any depot you plan to synchronize with your ITS:
|
•
|
|
•
|
|
•
|
|
•
|
|
•
|
<storage> is the AccuRev installation \storage directory; c:\Program Files (x86)\
AccuRev\storage, for example |
|
•
|
After you have copied the default AccuWork schema to each of the depots whose issues you want to synchronize with those in your ITS, you must create values for your project (or, in the case of Remedy, application) mapping group. Go to Using Choose Type Fields for more information.
Modifying an Existing AccuWork™ Schema
AccuRev recommends that you use the default AccuWork schema for your ITS that is included in your AccuSync installation, as described in Step 2: Set Up the AccuWork™ Schema. However, users upgrading from AccuBridge might prefer to make changes to their existing AccuWork schema, as described in this section.
|
1.
|
Create fields in the AccuWork schema to store ITS data. You create new fields using the Schema tab of the AccuWork Schema Editor. See Create Fields in the AccuWork™ Schema for more information.
|
|
2.
|
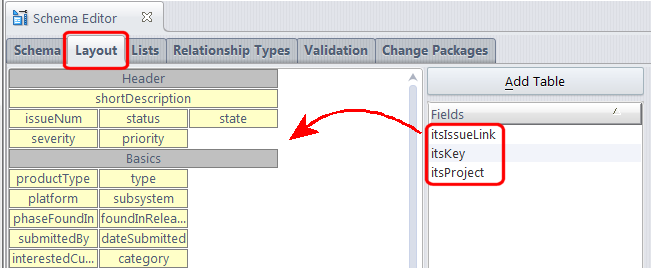
Add fields to the AccuWork Issue Edit form to display ITS data. You add display fields using the Layout tab of the AccuWork Schema Editor. See Add Fields to the AccuWork™ Issue Edit Form for more information.
|
Create Fields in the AccuWork™ Schema
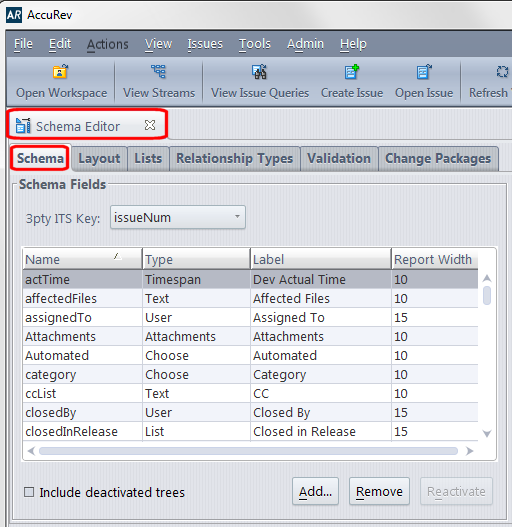
The following tables summarize the fields you must create in the AccuWork schema for supported ITSs. These are the minimum fields required for AccuSync to synchronize issues with your ITS. Consider creating other fields in the AccuWork schema as needed. For example, you might want to create a state field with a type of Choose whose values are Defined, In-Progress, Completed, and Accepted, for example.
Tip: The Label column has been left empty; consider using it to record the name you plan to use for the field’s label in the AccuWork Issue Edit Form, as described in Add Fields to the AccuWork™ Issue Edit Form. When defining the field Label, consider using the system name with which you are synchronizing as part of the name to remove any ambiguity -- JIRA Issue ID, for example.
The following table identifies the Rational ClearQuest (ClearQuest) field types and describes how each field is used by AccuSync. New fields must use the name and type shown here.
|
Note: If you are currently using AccuBridge, note that the name of the ClearQuest key field has changed.
|
|||
|
Note: If you are currently using AccuBridge, note that the name of the ClearQuest issue link field has changed.
|
|||
The following table identifies the minimum fields required to create incident records in BMC Remedy.
The following table identifies the Rally field types and describes how each field is used by AccuSync. New fields must use the name and type shown here.
|
Note: In Rally, multiple nested projects may have the same name. For example, Project_1 may contain child project Project_ABC and Project_2 may also contain a child project named Project_ABC. For nested projects having the same name as other nested projects, specify the full pathname for the project, using the pipe character.
|
The following table identifies the JIRA field types and describes how each field is used by AccuSync. New fields must use the name and type shown here.
|
Note: If you are currently using AccuBridge, note that the name of the JIRA key field has changed.
|
|||
|
Note: If you are currently using AccuBridge, note that the name of the JIRA issue link field has changed.
|
|||
|
Note: Make sure to specify values for your JIRA projects. See Using Choose Type Fields for more information.
|
|||
|
Note: If the type field is already defined in your AccuWork Schema, make sure it is of the type Choose and that values for the field have been specified.
|
The following table identifies the HP Quality Center (HP QC) field types and describes how each field is used by AccuSync. New fields must use the name and type shown here.
|
Note: If you are currently using AccuBridge, note that the name of the HP QC key field has changed.
|
|||
|
Note: If you are currently using AccuBridge, note that the name of the HP QC issue link field has changed.
|
Generally speaking, it is best to use the Choose type for fields that have pre-defined values, even if those values change from time to time. For example, you might have a Project field whose values change every release cycle -- Acme_2.5, Acme_2.6, Acme_3.0, for example. While you might be inclined to create the Project field using the Text type to avoid periodically updating the AccuWork schema, you should consider using the Choose type to eliminate the opportunity for user error -- acme_2.5 and Acme_2.5 are considered different values because AccuSync is case-sensitive, for example. This recommendation is especially true in environments that take advantage of AccuSync’s two-way synchronization.
When creating a Choose type field -- for Project or Status, for example -- remember to also create the values for those fields.
Add Fields to the AccuWork™ Issue Edit Form
If you update the AccuWork schema after you have created an AccuSync Configuration for a depot that uses that schema, you must refresh the AccuSync Configuration to make it aware of those changes. You do this by clicking the Reload Configuration Cache button ( ) on the AccuSync Management Console main page. See Making Changes to AccuSync™ Configurations for more information.