Step 7: Edit the AccuWork™ and ITS Connection Settings
How to Copy an AccuSync™ Configuration
|
1.
|
On the AccuSync Management Console main page, click the Copy Configuration button (
|
Tip: The Copy Configuration button is grayed out if the configuration is running.
|
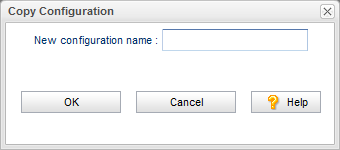
2.
|
Enter a name in the New configuration name field and click OK.
|
Editing AccuWork™ Connection Settings
|
1.
|
On the AccuSync Management Console main page, click the Edit button (
|
Alternative: Double-click the AccuSync Configuration.
|
2.
|
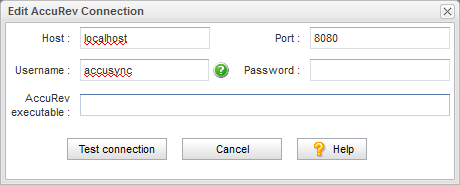
In the Connections table Action column, click the Edit Connection button (
|
Note: The Status column displays the stop icon ( ) at this point because the connection has not yet been established. For more information about the connection status icons, see Connections Table: Action and Status Information.
|
•
|
Host and Port: These are the values that correspond to the AccuRev installation with which you will be synchronizing your ITS.
|
|
•
|
Username and Password: Be sure to enter the username and password of the AccuSync user you created specifically for AccuSync. See Step 5: Create the AccuSync User for more information.
|
|
•
|
AccuRev executable: Use this field to optionally specify the absolute path of your AccuRev executable (accurev.exe). If you leave this field empty, AccuSync looks for accurev.exe in your systems’s PATH.
|
|
4.
|
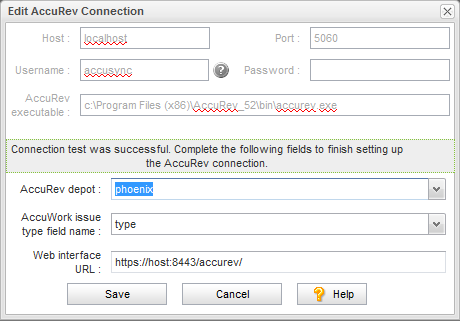
Click the Test Connection button.
|
|
•
|
AccuRev depot: Choose the depot you want to synchronize with your ITS.
|
Tip: When you select a depot, a default value appears in the AccuWork issue type field name field.
|
•
|
AccuWork issue type field name: The internal name of the field that displays the issue type (defect, task, and so on) on the AccuWork Issue Edit Form. Unless you have changed the name in the AccuWork schema, the name of this field is type.
|
Note: The field’s name typically differs from its label. For example, the field named type is displayed on the Issue Edit Form using the label Type.
|
•
|
Web Interface URL: Enter the URL for the machine hosting the AccuRev Web Interface. For example: http://localhost:8080/accurev/.
|
|
6.
|
Click the Save button.
|
|
1.
|
On the AccuSync Management Console main page, click the Edit button (
|
Alternative: Double-click the AccuSync Configuration.
|
2.
|
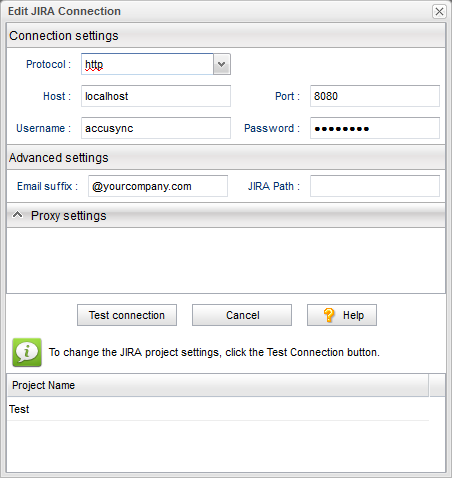
Note: Fields on the Edit Connection dialog box vary based on ITS. The dialog box for JIRA is shown here.
|
3.
|
Specify the values required to connect to your ITS. See Edit ITS Connection Dialog Box if you need help with this step.
|
|
4.
|
Click the Test Connection button.
|
When the connection succeeds, new panels appear on the Edit Configuration dialog box. Fields on this panel vary based on your ITS. See Testing the ITS Connection for more information.
Note for JIRA users: If the connection to JIRA does not succeed, make sure that the JIRA plugin for AccuSync was installed and that JIRA has been configured to accept remote API calls. See Step 1: Configure JIRA for AccuSync for more information.
Note for Rally Users: You cannot select a Task project without also selecting the corresponding Defect or Story project.
|
5.
|
Click the Save button.
|