This chapter describes the management of data elements.
Exercise centralized control
The APS Data Element Facility lets you exercise centralized control over
the data elements (screen field definitions) used in APS applications. As the
APS Administrator, you establish centralized control when you define and store
data elements in the APS data element library. APS defines a data element
library, APSDE, during installation. To simplify maintenance tasks and APS
screen file migration, we recommend that you allocate only one data element
library for all of your projects and groups.
Define and store in the data element library
Data elements that you define and store in the APS data element library
are global data elements. Developers copy global data elements from the data
element library as they create their screens. If developers can modify the data
element, APS considers the data element to be a local data element and no
longer under the control of the data element library.
Implement varying levels of control
You can implement varying levels of centralized control over data
elements using the following Data Element Facility features:
- The Data Consistency feature lets you control whether or not
developers can create their own screen fields, or if they must copy data
elements from the data element library.
- The Context feature lets you create contexts to create multiple
definitions for a field. You can define a maximum of ten contexts in which
global screen fields can be used. For example, you may create categories of
test and production fields, or update and display-only fields.
- The Field/Screen Cross Reference list allows you to identify all the
screens that reference a data element. When you must update a data element, you
can generate the relevant screens from this list.
You can control whether developers must select data elements from the
data element library or whether they can create their own screen fields in
their programs. To do so, set the Data Consistency option as follows:
- Access the Data Element Facility Screen as follows:
- From the APS Main Menu, enter 2 in the Option
field. APS displays the Dictionary Services screen.
- Enter 3 in the Option field. APS displays the Data
Element Facility screen.
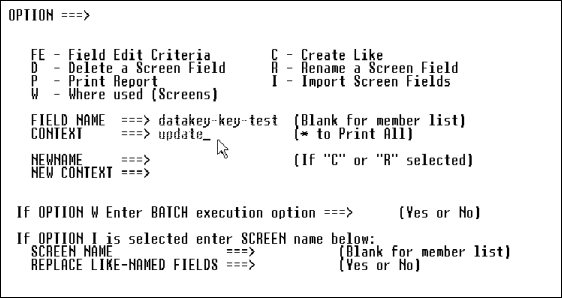
- Enter admin in the Option field. APS displays the Data
Consistency Option screen.
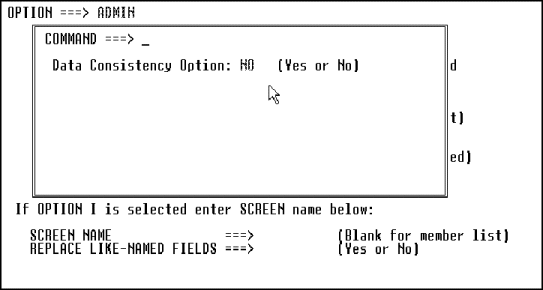
- If you do not want developers to define their own screen fields,
enter yes in the Data Consistency Option field. Yes means developers
must select data elements from the data element library and cannot change the
attributes of the data elements. No, the default value for this field, means
developers can define their own screen fields. They can also select data
elements from the APS data element library. However, if the developer changes
the attributes of a data element, the data element becomes a local data
element.
You define and store data elements in the APS data element library using
the Data Element Facility screen. From this screen, you can also:
- Add and modify field definitions.
- Assign field edits.
- Delete, rename, copy and print a report for a field.
- Import screen fields and their edit criteria into the data element
library.
To add or modify screen field definitions, perform the following:
- Access the Data Element Facility Screen as follows:
- From the APS Main Menu, enter 2 in the Option
field. APS displays the Dictionary Services screen.
- Enter 3 in the Option field. APS displays the Data
Element Facility screen.
- On the Data Element Facility screen, type the data element name you
want to add or modify in the Field Name field. If applicable, type a context
name in the Context field and press Enter. APS displays the Screen Field
Definition screen.
Note: If you are adding a new data element, you can define
different sets of attributes for the screen field by assigning a context to
each set. Once you associate a context with the screen field definition, APS
requires that context whenever you reference the field. For more information
about contexts, see Defining Contexts.
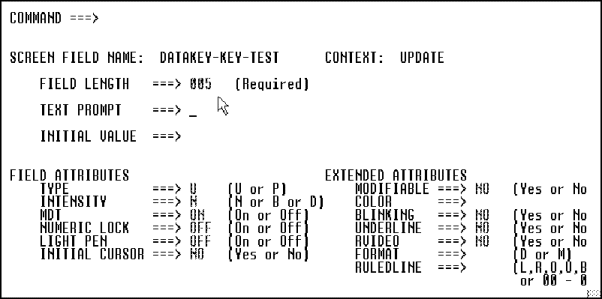
- On the Screen Field Definition screen, complete the following fields
as described below.
Field
|
Description
|
|
Field Length |
Specify the character length of the screen field. Note: If you
change the length of a field, reassign the field edits for the field because
APS deletes any previously defined field edits of that field |
|
Text Prompt |
Type a prompt you want to appear for the screen field
definition. Maximum 40 characters. For example: Enter Name. |
|
Initial Value |
Specify an initial value for the field. Maximum 27
characters. |
- Press Enter. APS provides default values for the Field and Extended
Attributes fields. If you do not want to use the default values, simply type
over it with the value you want to use. Valid values for these fields are:
Field/Extended Attribute
|
Values
|
|
Type |
| u |
Default. Unprotected, both input and
output. |
| p |
Protected output only. |
| t |
Text with default attributes changed. |
|
|
Intensity |
| n |
Default. Normal. |
| b |
Bright. |
| d |
Dark (non-display). |
|
|
MDT |
Modified Data Tag. Specifies whether or not to return to the
program the data displayed on the screen by the end user when the end user
presses Enter. Valid values are:
| on |
The terminal always sends field data to the program. This
is the default for I/O fields. |
| off |
The terminal sends the field's data to the program only
if the end user modified it. The unmodified data is lost because the MDT value
changes to on when the end user modifies a field. This is the default for text
fields. |
|
|
Numeric Lock |
Activates the numeric keyboard shift lock function when the
cursor moves into the field. This hardware dependent feature does not guarantee
that the user can only enter numeric data in the field. Valid values are:
| on |
Lock on. |
| off |
Lock off. |
|
|
Light Pen |
Specifies the field is light pen detectable. Valid values
are:
| on |
Detectable. |
| off |
Default. Not detectable. |
|
|
Initial Cursor |
Indicates whether the cursor is positioned on the field when
the screen is sent. Valid values are:
yes
no (default) |
|
Modifiable |
Enables/disables the end user from modifying the field.
|
|
Color |
Specifies the initial color of a field on a full color
terminal. The Screen Painter does not generate a color attribute unless you
specify a valid color code. Valid values are:
| nu |
Neutral or blank |
| bl |
Blue |
| yl |
Yellow |
| pl |
Pink |
| tq |
Turquoise |
| gn |
Green |
|
|
Blinking, Underline, RVideo |
These are mutually exclusive attributes for highlighting a
field. Valid values are:
| yes |
Highlighting on. |
| no |
Default. Highlighting off. |
If you set one of these fields to yes, you must set the other
two fields to no. |
|
Format |
Specify the character format for a field on DBCS terminals. If
this field is blank, the character format of the field is EBCDIC only.
|
|
Ruledline |
Specifies to place lines around a field on DBCS terminals. If
this field is blank, APS does not display lines around the field. Valid values
are:
| 1 |
Line to the left side of the field. |
| r |
Line to the right side of the field. |
| o |
Line over the field. |
| u |
Line under the field. |
| b |
Line surrounding the field. |
| oo-of |
Combination of lines. |
|
- Assign field edits as follows:
- Ensure that you have entered the field name and context.
- Type fe in the Option field and press enter to access the
Field Edit facility. For more information about assigning field edits, see the
User's Guide chapter Painting Character Screens.
To import all fields, including their field edits from an application
screen, perform the following:
- Access the Data Element Facility Screen as follows:
- From the APS Main Menu, enter 2 in the Option
field. APS displays the Dictionary Services screen.
- Enter 3 in the Option field. APS displays the Data
Element Facility screen.
- On the Data Element Facility screen, type i in the
Option field.
- Complete the following fields on the Data Element Facility screen as
follows:
Field
|
Description
|
|
Screen Name |
Type the name of the screen to import. |
|
Replace Like-Named |
| yes |
Overlay identical field names. |
| no |
If like-named fields exists in the data element library
and their context is blank, the fields you import do not overlay the existing
fields. |
|
- Press Enter to submit the batch job. To ensure the integrity of the
data elements imported, this job requires exclusive control of the APSDE
library.
- After APS submits the job, exit the Data Element Facility to make the
data element library available.
To copy, delete, rename, or report on a data element strored in the data
element library, perform the following tasks:
- Access the Data Element Facility Screen as follows:
- From the APS Main Menu, enter 2 in the Option
field. APS displays the Dictionary Services screen.
- Enter 3 in the Option field. APS displays the Data
Element Facility screen.
- On the Data Element Facility screen, type the letter that corresponds
to the task you want to perform in the Option field.
- Complete the remaining fields for the task you want to perform on the
Data Element Facility screen as follows:
Task
|
Field
|
Description
|
|
Copy |
Field Name |
Name of the field to be copied. |
|
|
Newname |
Name of the new field. |
|
|
Context |
Optional. Context of source field. |
|
|
New Context |
Optional. Context for new field. |
|
Delete |
Field Name |
Name of the field to delete. |
|
Print Report |
Field Name |
To report on a specific field, type a field name. Otherwise
leave blank to report on all fields. |
|
|
Context |
To report on field(s) with a specific context, type a context
name. Otherwise, type * for all contexts. |
|
Rename |
Field Name |
Current name of the field. |
|
|
Newname |
New name for the field. |
|
|
Current Context |
Optional. Current context. |
|
|
New Context |
Optional. New context. |
- Press Enter to process the task.
- After performing any of the above tasks, reorganize the internal
index of the APS data element library. To do so, enter apsbuildi in the
Option field. Note: This command is for APS Administrators only.
- Once you associate a context with the field definition, APS requires
that context whenever you reference the field.
- Only one user at a time can add data elements. New data elements are
not available and do not appear in the elements lists until you have completed
your work and exited the facility.
- If you rename a field and you specify a new context for the field,
APS searches your application for screens that reference the field context. If
APS finds screens that reference the context, it displays a list of screen
names and a message that the data element cannot be renamed. If you are
renaming the data element from the member list that references multiple
screens, APS displays *NO/REN* in the status field. If APS does not find any
references to screens or the context and new context are the same, APS renames
the field.
Contexts let you create multiple definitions for a field. For example,
there might be two purposes (contexts) for presenting a field it could be an
input/output field on one screen, and a output-only field on another screen.
For each purpose, different attributes could be assigned to the same field.
Therefore you assign a context name for each purpose.
To display all contexts, enter conlist in the Option field
of the Data Element Facility screen.
To define a context name:
- Access the Data Element Facility Screen as follows:
- From the APS Main Menu, enter 2 in the Option
field. APS displays the Dictionary Services screen.
- Enter 3 in the Option field. APS displays the Data
Element Facility screen.
- From the Data Element Facility screen, enter context in the
Option field. APS displays the Context Table Maintenance screen.
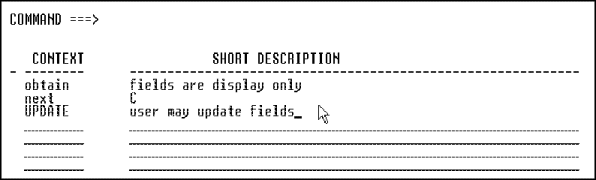
- Enter the context name and a short description. If you want to have
multiple definitions for a field, you must define at least one context on the
Context Table Maintenance screen. You can define as many as ten contexts, using
any values you want. Context Table Maintenance does not offer predefined
contexts.
- Access the Data Element Facility Screen as follows:
- From the APS Main Menu, enter 2 in the Option
field. APS displays the Dictionary Services screen.
- Enter 3 in the Option field. APS displays the Data
Element Facility screen.
- From the Data Element Facility screen, enter context in the
Option field. APS displays the Context Table Maintenance screen.
- Enter d in the column next to the context name you want to
delete. If a field on any application screen references the context, APS lists
the screens where the fields appear. You cannot delete a context until you
remove the fields that reference it from all application screens.
- Identify the fields to delete by accessing each screen listed and
pressing PF9 to list the fields used on a screen and their contexts.
The Field/Screen Cross Reference screen allows you to view a list of
screens that reference a specified field. Use this screen to identify and
update screens affected by changes to global data elements. APS displays the
word LOCAL in the Field Type column if a developer changed a data element
selected from the APS data element library. If the data element selected
remains unchanged, the term GLOBAL appears in the Field Type column. Use the
Field/Screen Cross Reference screen to identify and update screens affected by
changes to global data elements.
To view a list of screens that reference a specified field, perform the
following:
- Access the Data Element Facility Screen as follows:
- From the APS Main Menu, enter 2 in the Option
field. APS displays the Dictionary Services screen.
- Enter 3 in the Option field. APS displays the Data
Element Facility screen.
- From the Data Element Facility screen, type w in the
Option field. APS displays a screen.
- Type a field name (and context if applicable) and press Enter. APS
displays the Field/Screen Cross Reference screen.
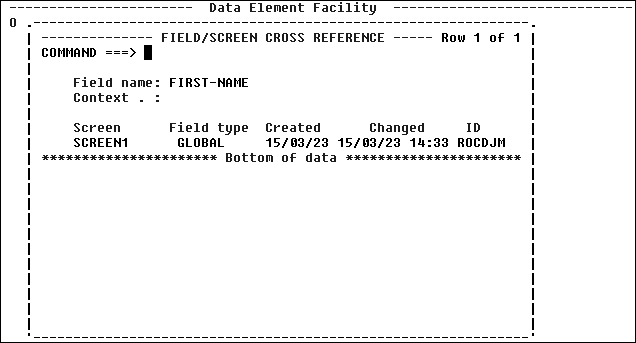
- Generate all screens that use the global definition directly from the
Field/Screen Cross Reference screen. To do so, enter g next to one or
more screen names, or enter gen in the Command field to generate
all the screens listed.
Using the Data Element Library Administration facility, you can:
- Migrate data elements and contexts from one data element library to
another.
- Migrate screens and their data elements from one project and group to
another.
- Promote the context of a data element to another context within a
data element library.
- Update data element references in the screen definitions to a new
context.
To do so, follow these steps:
- Access the Data Element Facility Screen as follows:
- From the APS Main Menu, enter 2 in the Option
field. APS displays the Dictionary Services screen.
- Enter 5 in the Option field. APS displays the Data
Element Library Administration screen.
- Enter one of the following options in the Option field:
Option
|
Description
|
|
MD |
Migrate data elements and contexts from one data element
library to another. If the context does not exist in the destination, APS adds
it to the destination context file. |
|
MS |
Migrate screens and their data elements from one project and
group to another. |
|
PD |
Promote the context of a data element to another context
within a data element library. |
|
PS |
Promote the context of all the data elements used by a screen
to another context. APS updates the data elements references in the screen
definition to the new context. |
|
SO |
Update data element references in screen definitions to a new
context. The data elements with the new context should already exist in the
data element library specified in the source. |
- If you selected any of the Cross Data Element Library function
options, enter a destination project and group.
- Enter a source project and group, unless you want to use the
environment project and group and data element library settings.
- If the data element library location is different from the source or
destination project and group, specify a data element prefix in the Data
Element Library Prefix field.
- Enter the screen name in the Screen field. To display a
selection list, press Enter. Enter s next to the screen name to select a
screen name from the selection list.
- Enter the name of the data element in the Element field. To
display a selection list, leave this field blank and press Enter. Enter
s next to the data element name to select a data element name from the
selection list.
- Enter s or d in the Collision Priority field if the
destination element/context already exists. If you enter an s, the
source attributes overwrites the destination element or context. If you enter
d, the destination attributes remain unchanged. If you leave this field
blank when a conflict occurs, the Conflict Resolution screen displays. This
screen displays the source and destination attributes for the element or
context. Select the one you want for the destination.
- To prevent the Conflict Resolution screen from displaying, enter
yes in the Global field. Doing so sets the global collision
priority value to the value entered in the selection field. APS resolves
conflicts based on the global setting.
- To optionally perform this process in batch mode, enter yes in
the Batch Execution field. Note that, during the batch process, APS locks the
Data Element Index file and cannot be simultaneously updated online until APS
completes the batch process.
Copyright © 2002 Micro Focus International Limited. All rights reserved.
This document and the proprietary marks and names
used herein are protected by international law.