Figure 9-1: Access Online Express
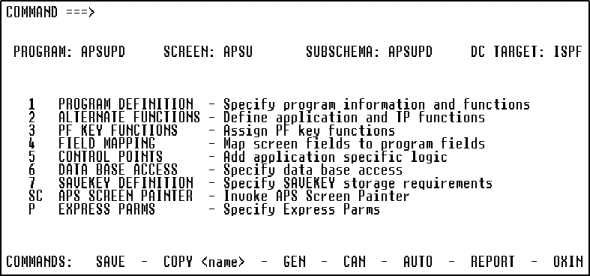
Figure 9-2: Online Express Menu
In this chapter, you learn about Online Express, define program functions, and map screen fields.
In this section you learn the concepts of processing logic in Online Express, and you access Online Express to specify the Parts Update program logic.
You complete your application by defining its processing logic using Online Express, a menu-driven painter that offers a fill-in-the-blanks approach. You use Online Express for any type of online application. Online Express references the information that you have specified in the other APS painters and importers, and prompts you to define the processing logic for those specifications. You do the following to define the program in Online Express:
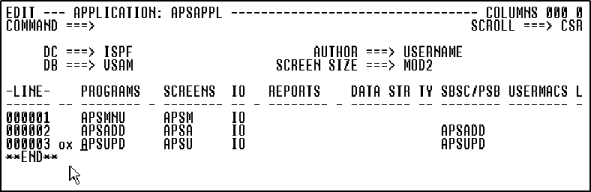
Start this procedure where the last one ended -- in the Main Menu.
Figure 9-1: Access Online Express
Figure 9-2: Online Express Menu
You are in Online Express and are ready to begin specifying program logic by selecting the predefined function codes the program requires.
Online Express has an extensive help facility that you can select from the action bar, or access from your screen by pressing PF1.
When you access the Online Express Menu and the warning message DEFAULT PROGRAM NOT FOUND displays, press PF3 to erase the message from the screen.
Other functions you can perform in Online Express are:
In this section, you specify basic program information and select predefined functions, and then specify the method for executing the functions.
This program:
The end user will execute these database and teleprocessing functions by entering a function code in the screen field named Function. Additionally, the end user will press the PF3 function key to return control to the Main Menu program, which displays the application Main Menu screen.
Begin this procedure where the last one ended -- in the Program Definition screen.
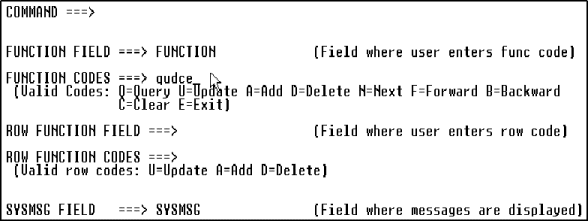
Figure 9-3: Select Predefined Program and Database Functions
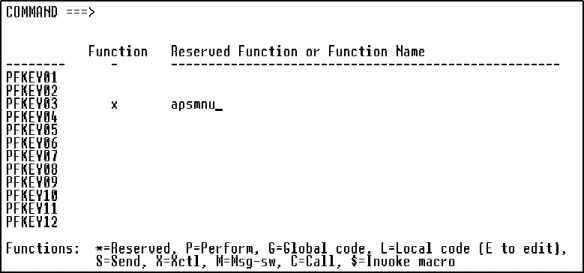
Figure 9-4: Assign Functions to PF Keys
You have defined your program specifications and specified how they are executed. Next, you map the screen fields to the appropriate fields in the imported VSAM database.
Teleprocessing (TP) functions transfer screen data and program control from the current program to another screen or program. The APS predefined TP functions include the following:
|
TP Function |
Description |
|---|---|
|
S(end) |
Transmit an input/output screen. |
|
M(SG-SW) |
Schedule a new program and optionally pass a screen record or other data record to it. |
|
X(CTL) |
Transfer control to another program. |
|
C(all) |
Call a subroutine or perform a CICS LINK. |
|
C(lear) |
Move spaces to all I/O fields. |
|
E(xit) |
Terminate the program. |
Database functions read from and write to your application's database. The APS predefined database functions include the following:
|
Read Function |
Description |
|---|---|
|
Q(uery) |
Obtain one or more records and display data on the screen. |
|
B(ackward) |
Page backward through a repeated record block. |
|
F(orward) |
Page forward through a repeated record block. |
|
N(ext) |
Retrieve the next sequential record and display data; not applicable to SQL. |
|
R(efresh) |
Re-read the database when the end user executes any database write function on one or more repeated record block rows, and re-display the record block to reflect the database updates. |
|
A(dd) |
Store records. |
|
D(elete) |
Erase records. |
|
U(pdate) |
Modify records. |
The screen design dictates which functions act on which fields. The Parts Update screen displays data one occurrence at a time, displaying information about a particular part. To query the record in this tutorial, the end user will enter q(uery) in the Function field and a value in the record key field, Part Number -- you assigned the query function in step 1. Then, in step 3, you assigned the X(CTL) function to the F3 key so that the end user can press F3 to transfer to the Main Menu.
Any function that you define for this program acts on all fields. You can select any of the following functions:
|
A(dd) |
D(elete) |
N(ext) |
S(end) |
|
C(all) |
E(xit) |
Q(uery) |
U(pdate) |
|
C(lear) |
M(SG-SW) |
R(efresh) |
X(CTL) |
The function field on the Parts Update screen has the default name FUNCTION. If you assign the function field a different name, you would enter that name in the Function field on the Program Definition screen.
The system message field on the Parts Update screen has the default name SYSMSG. If you assign the system message field a different name, you would enter that name in the SYSMSG field on the Program Definition screen.
In this section, you map the screen fields to the appropriate fields in the VSAM database. You specify each screen field's corresponding database field, and indicate whether the screen field is an input field, an output field, or both.
To help you do so quickly, Online Express displays all screen fields that you defined in the Screen Painter.
Start this procedure where the last one ended -- on the PF Key Functions screen.

Figure 9-5: Initial Field Mapping Screen Lists Screen Fields
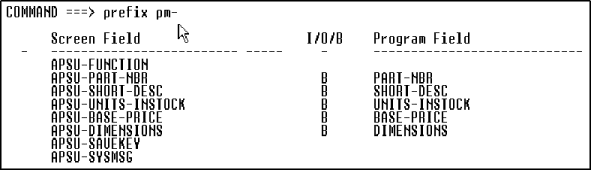
Figure 9-6: Map Screen Fields with the * Command
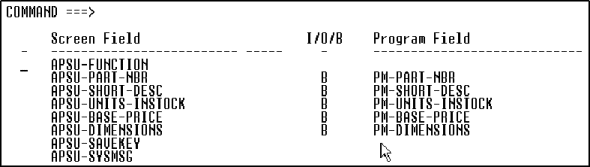
Figure 9-7: Assign a Prefix to Program Field Names
You have completed field mapping and are ready to define program database access.
Use the prefix command in any of the following formats:
|
pre[fix] fldprefix |
Add fldprefix to fields on all lines. |
|
pre[fix] fldprefix m n |
Add fldprefix to fields from line m through line n. |
|
pre[fix] fldprefix * n |
Add fldprefix to fields from line 1 through line n. |
|
pre[fix] fldprefix n * |
Add fldprefix to fields from line n through the last line. |
Notice that the FUNCTION, SAVEKEY, and MESSAGE fields were not copied, because they don't correspond to database record fields -- they're defined only in your program and are reserved for special purposes in Online Express.
Use of the * command assumes the screen field names are the same as the database record names (except for the prefixes), which is true for this program.
To clear some or all of the values you entered, you can enter the reset command in any of the following formats in the Command field:
|
reset |
Clear values on all lines. |
|
reset m n |
Clear values from line m through line n. |
|
reset * n |
Clear values from line 1 through line n. |
|
reset n * |
Clear values from line n through the last line. |
Copyright © 2002 Micro Focus International Limited. All rights reserved.
This document and the proprietary marks and names
used herein are protected by international law.