
Figure 6-1: Access the Scenario Painter

Figure 6-2: Display Screen Titles
In this chapter, you create a screen flow prototype and run the scenario.
In this section you create a screen flow prototype in the APS Scenario Painter.
Before you generate your screens, you can review their design and flow with the end user in the APS Scenario Painter. You can define a sequence of screens, called a scenario, enter data in those screens, and display the screens to the end user.
By using the Scenario Painter early in the development process, you can work with end users to precisely define screen format and sequence before the development efforts begin.
The Scenario Painter automatically creates a scenario by displaying a list of your application screens, where you can reorder the screens as you like, delete screens, or add new screens (whether or not they have been painted). You can also enter descriptive information.
Start this procedure where the last one ended -- in the Application Painter.
Figure 6-1: Access the Scenario Painter
Figure 6-2: Display Screen Titles
You have created the screen flow prototype and are ready to run it.
For a new prototype definition, the Scenario Painter lists the screens as they appear in the application definition.
To reset the screen flow to its sequence at the beginning of the session, type reset in the Command field.
The Scenario Painter has an extensive help facility that you can select from the action bar, or access from your screen by pressing PF1.
You can enter descriptive information about each application screen by typing the desired text in the User Comment field.
To modify the scenario in this tutorial, use the ISPF I(nsert), D(elete), C(opy), and M(ove) line commands to reorder, insert, and delete screen names until the prototype represents the scenario you want to test. A prototype definition can include up to 160 screens.
To describe the screen for the end user, enter text in the User Comments field. For example, a user comment might identify the varying conditions under which the same screen displays multiple times.
In this section, you run the scenario sequentially, display descriptive information about the scenario, and simulate the movement of data.
The Scenario Painter offers data simulation capabilities that allow you to quickly establish and demonstrate online application flow. During prototype sessions, you can capture, save, and reuse data to simulate realistic data movement to the end user. All of the data that you enter automatically becomes available to other screens and displays in identically named fields.
While running a scenario, you can display descriptive information on the last line of the screen, such as the screen name, scenario sequence number, total number of scenario screens, screen title, and any descriptive text entered in the User Comment field. This information is particularly useful when running large scenarios.
Start this procedure where the last one ended -- in the Scenario Painter.
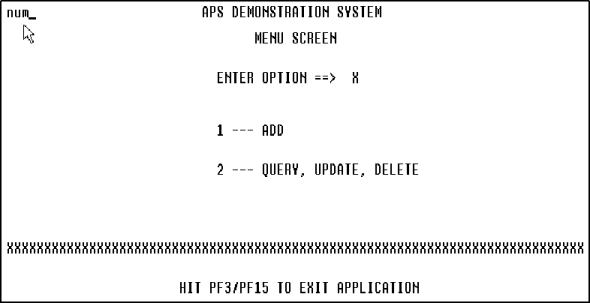
Figure 6-3: Display the First Screen in the Scenario
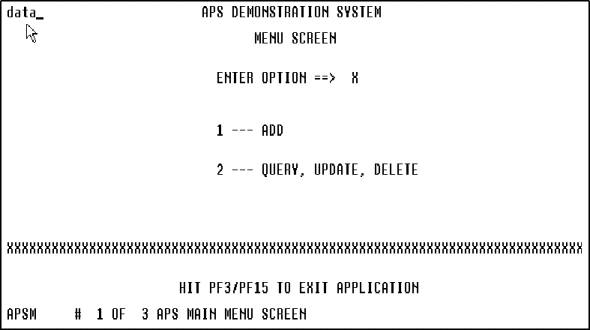
Figure 6-4: Display Information about the Scenario
Figure 6-5: Eliminate the Xs from I/O Fields
Figure 6-6: Enter Sample Data
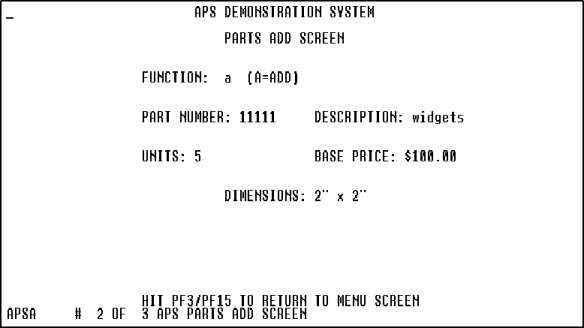
Figure 6-7: Display the Last Screen

Figure 6-8: Turn Off Data Simulation
You have demonstrated the screen flow prototype. The next step in this tutorial is to assign field edits in the screen fields.
To store the current data entered in this session for use in future prototyping sessions, while running he scenario, type save in the upper left corner of the screen.
The READ command displays data saved by the most recently executed SAVE command and also executes the DATA command.
After viewing the last screen in the scenario, press Enter to exit the Scenario Painter.
To modify the viewing sequence of the screens, type any of the following commands, followed by a space, in the top left corner of the displayed screen.
|
Command |
Description |
|---|---|
|
start, first |
Display the first screen in the prototype. When you press Enter, the second screen displays, and so on. |
|
last |
Display the last screen in the prototype. |
|
end, can, quit |
Terminate the prototype and return to the invoking screen. |
To display screens consecutively, press Enter repeatedly until all screens display. If a screen named in your prototype is not yet painted in the Screen Painter, a message displays that information.
Copyright © 2002 Micro Focus International Limited. All rights reserved.
This document and the proprietary marks and names
used herein are protected by international law.