
Figure 5-1: Creating a Screen
In this chapter, you learn about the Screen Painter, paint a screen and assign field attributes.
In this section you learn what the APS Screen Painter does, and you set screen design options.
The APS Screen Painter lets you paint character-based screens that are intuitive and easy to use. You first paint text, input/output fields, and then blocks of fields that accept multiple record occurrences. You then specify field names, field attribute and edit criteria, and generation parameters. The APS Generators retrieve this screen information from the Application Dictionary to produce native screen source code.
A character screen consists of fields and blocks of fields that you paint on a blank screen. You paint two types of fields in the APS Screen Painter:
Using a series of related screens in the Screen Painter, you can also:
The Screen Painter also provides editing and design options to help you paint the screen. For example, you can specify where the Command field automatically appears on your screen, and can determine whether your text displays in upper case, lower case, or both.
Start this procedure where the last one ended -- in the APS Screen Painter. When the Screen Painter first appears, it is blank except for a line indicating the Command field.
Figure 5-1: Creating a Screen

Figure 5-2: Access Your User Profile
|
Command location |
Type top, so the Command field always appears in the upper-left corner, or type bottom for the lower-left corner, if you prefer. |
|
Caps on/off |
Type off, so text fields remain in the case (upper or lower) you enter them. |
|
Nulls on/off |
Type on, so you can insert data directly into a row. |
|
Keys on/off |
Type on, so the PF key definitions display at the bottom of your screen. |
You have set your screen design options and are ready to paint the Parts Update screen.
The screen design options you select remain in effect for all application screens until you change them, either in the current editing session or a subsequent one.
The Screen Painter has an extensive help facility that you can select from the action bar, or access from your screen by pressing PF1.
Other functions you can perform in the Screen Painter are:
In this section, you paint the text and I/O fields for the Parts Update Screen, paint a field for system messages, paint a field to save the database key, and assign a title to the screen.
When you paint a screen, you generally:
The savekey field is the unlabeled I/O field of nine bytes that precedes the system message field in Figure 5-3.
Start this procedure where the last one ended -- on a blank screen in the Screen Painter. Figure 5-3 illustrates the Parts Update screen to paint.
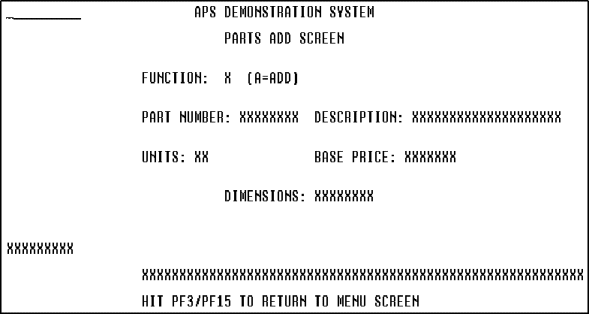
Figure 5-3: Paint a Screen Mock-Up

Figure 5-4: Enter the TITLE Command
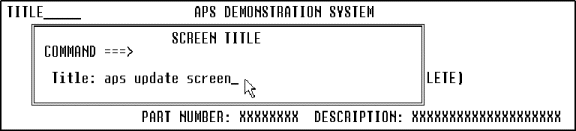
Figure 5-5: Assign a Screen
Title
You have painted your screen mock-up and are ready to assign attributes to the I/O fields.
To change a field length, move the cursor to the Xs designating the field and type in your changes. You can space over or delete the Xs representing the field, or extend the field with more Xs.
To delete screen text, use the Delete key to erase all of part of a field or row.
The screen title does not appear on your screen mock-up; it displays in the Scenario Painter when you test the screen.
In this section, you assign various attributes to each I/O field.
The APS Screen Painter supports full and extended 3270 attribute capabilities, including:
For example, you can enhance the presentation of I/O and text fields by changing the default values for attributes such as intensity, color, and underlining. For I/O fields, you can modify attributes to protect a field from data entry and position the cursor on a particular field. Additionally, you can change the APS default field name to something descriptive to the application.
APS assigns default attribute values to each field for you. You can quickly override the default by typing over the value.
Start this procedure where the last one ended -- on the Parts Update screen painting screen.
You have completed screen painting. You are now ready to prototype your screen flow where, in an actual application development cycle, you demonstrate the application to your end user.
An I/O field name can have a maximum of 16 characters. Text fields do not have names because programs do not reference them.
If you give a screen field the same name as its corresponding database field, APS Online Express automatically maps the relationship for you, prefixing the field name with the screen name; otherwise you must map the screen field to the database in your program.
If the same field appears on several screens, give it the same name on each screen. APS lets you pass data between identically named fields on different screens during scenario prototyping and ISPF prototyping.
Copyright © 2002 Micro Focus International Limited. All rights reserved.
This document and the proprietary marks and names
used herein are protected by international law.