This chapter explains the installation of APS for z/OS on the
mainframe.
The previous chapter contains a table of data set names. There are two
data set names for the APS product referred to as apshlq and apsmlq. For the work in this chapter and
future reference to these datasets in APS for z/OS, they should be known as
&APSLIB and &APSREL respectively. We also refer to &APSPRE as the
concatenation of both of these data set names. For example, if you set
apshlq to "SYS1" and
apsmlq to "APS5000", the
value of &APSLIB is "SYS1", &APSREL is "APS5000",
and &APSPRE is "SYS1.APS5000".
In the previous chapter we refer to the optional demo project data set
names as dmohlq and
dmomlq. For the work in this chapter
and future reference to these datasets in APS for z/OS, they should be know as
PROJECT and GROUP respectively. We also refer to &DSNPRE as the
concatenation of both of these data set names. For example, if you set
dmohlq to "TEST" and
dmomlq to "DEMO5000", the
value of PROJECT is "TEST", GROUP is "DEMO500", and
&DSNPRE is "TEST.DEMO5000".
| &APSLIB |
apshlq |
|
| &APSREL |
apsmlq |
|
| &APSPRE |
apshlq.apsmlq |
|
| PROJECT |
dmohlq |
|
| GROUP |
dmomlq |
|
| &DNSPRE |
apshlq.dmomlq |
|
During installation, APS displays ISPF installation screens where you
enter data. When you complete the installation process, you have:
- A file-tailored CLIST and logon procedure for executing APS software
- JCL residing in appropriate skeleton libraries tailored to your
specifications
You can use the CLISTs and JCL as is, or you can modify them to suit
your needs.
We recommend that you install and run the normally-generated version of
APS before attempting any customization. This way, you're sure to have the APS
baseline CLISTs and JCL.
Note: APS does not modify any user-supplied data sets (such as
ISPF libraries or COBOL runtime libraries).
The steps outlined in this section guide you through the installation
procedure. Before you start, you should gather all the information required for
the installation. If you do not already have this information, please see the
appendix Pre-installation
Checklist.
The data set &APSPRE.CLIST contains a member named APS50SYS. Copy
APS50SYS to a TSO system CLIST library that is concatenated to the SYSPROC
ddname, and rename it to APS5000.
After you successfully install the APS software, any user can access APS
from the TSO READY prompt by typing %APS5000. The user is then prompted
for the APS software project and group.
To link the APSMESG and APSCOMP load modules, edit and submit the
APSLINK JCL as follows:
- Edit the &APSLIB.&APSREL.CNTL(APSLINK) member, setting
APSLIB=&APSLIB, APSREL=&APSREL, and SOUT=sysout class
- Change the JOB card, and make any other required changes to the JCL,
then submit APSLINK.
Ensure that RC=0. If not RC=0, make the necessary corrections and rerun
the JCL.
Execute the APS-supplied CLIST, APS@PROC, to install APS ISPF panels and
access the APS software. The APS@PROC CLIST displays data entry panels that
primarily request data set name information. APS@PROC then file-tailors the
standard APS CLIST and skeleton JCL. Be prepared to supply both the information
you gathered on the pre-installation checklist, and the keywords listed
below.
|
Keyword
|
Description
|
|
APSLIB |
First level prefix of your &APSPRE. |
|
APSREL |
Second level prefix of your &APSPRE. |
|
ISPPLIB |
Complete high-level prefix of your system ISPF panel library.
|
If your &APSPRE is SYS1.APS5000 and your system ISPF panel library
data set name is ISP.SISPPENU, execute the APS@PROC CLIST and supply the
keywords as follows.
- From the READY prompt enter:
EX 'SYS1.APS5000.CLIST(APS@PROC)' 'APSLIB(SYS1) APSREL(APS5000)
ISPPLIB(ISP.SISPPENU)'
To be prompted for the keywords, enter:
EX 'SYS1.APS5000.CLIST(APS@PROC)'
- APS@PROC prompts you to enter the values of APSLIB (SYS1) and APSREL
(APS5000); the value of ISPPLIB defaults to ISP.ISPPENU. If the ISPF profile
data set has not yet been used, the APS@PROC CLIST also prompts you for the
project and group data set. For example, if your &DSNPRE for the the
existing project.group data set is TEST.DEMO5000, you respond to the prompts as
follows.
*** ENTER PROJECT ===> TEST
*** ENTER GROUP ===> DEMO5000
The APS@PROC CLIST displays the APS Install Menu with the values you
entered for APSLIB and APSREL.
Note: If your APS for z/OS Install Menu does not look like
Figure 3-1, or if you receive an error message
indicating that you need to retrieve a license from Micro Focus, then your
license is not installed properly. Go back to Step 1 and perform substeps 6 and
7.
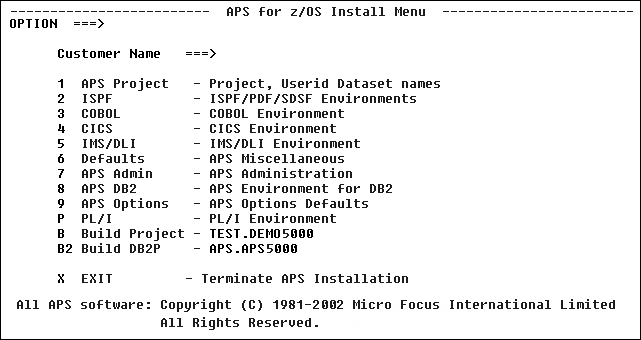
Figure 3-1: APS for z/OS Install Menu
- On the Install Menu screen, select option 9.
- On the APS Options screen, select option O.
- On the Generator Options screen, type NO in the OVERRIDE
field.
- Type END or press PF3 until you return to the Install Menu
screen.
- On the Install Menu screen, select all options not followed by N/A
(not applicable) in sequence, and modify the information as appropriate for
your site. For more information about APS@PROC, seeAPS@PROC CLIST. If any data set name field is not
applicable (N/A) to your site, type none in the field; do not leave any
field blank.
- After completing each of these screens, type END or press PF3
to return to the Install Menu. If an error message appears in the top right
corner of your screen, correct the appropriate field.
To cancel APS@PROC at any time, press PA1. To begin again,
re-execute APS@PROC from the READY prompt. As you proceed through each panel,
be sure you fill in all information appropriate for your installation.
Note for SQL users: Select suboption B2 before exiting
the APS Install Menu. This option updates the DB2 CLISTs and ISPSLIB JCL
members that build the APS/SQL common data area. Specific information about the
APS/SQL installation is detailed in the following chapter.
- After completing the information on the panels for all applicable
options, select option B. This option builds the APS5000 CLIST, APS5000
LOGON PROC, and APS5000 panels for your project. These are new members that
have no affect on your existing logon dataset.
- From the Install Menu, type END or press PF3 to complete the
rest of the installation. APS@PROC CLIST invokes the APS5000 CLIST, built with
the B option, that brings up the APS Main Menu (an Micro Focus-modified version
of ISR@PRIM). You can access the APS Main Menu again by executing %APS5000 from
the READY prompt. For additional information, see APS@PROC CLIST.
Warning: Using APS@PROC CLIST to revise values specified
during installation (instead of using the above procedure), might reset all the
values to their original specifications.
- After completing the APS Install screens and the BUILD option on the
APS Install Menu, you may want to change some of the information supplied on
the install screens without losing the values specified during installation. To
do so, return to the install screens as follows.
- Go to the READY prompt and type %APS5000 to return to the
APS Main Menu.
- Enter =A.4.2.2.3 in the Command field to transfer
to the APS ALLOCATE PROJECT DATASETS screen.
- Select option 2 to display and process the APS Install
screens and to BUILD APS5000 CLIST, PANEL, and LOGON PROC.
If you want to allocate APS data sets using a TSO logon procedure, copy
the APS-generated logon procedure to your system procedure library. The
APS@PROC CLIST creates a member named APS5000 in the &DSNPRE.ISPSLIB data
set. Copy this member to your system PROCLIB so that you can use it as the
logon procedure to access APS.
If your installation has multiple APS project.groups, you must rename
APS5000 when copying it to your system PROCLIB because each &DSNPRE project
needs its own logon PROC member.
Once you rename and copy the logon procedure into your system PROCLIB,
authorize users to use it as you would any new logon procedure.
If VB CLISTs are your site standard, reblock the APS-supplied FB
&APSPRE.CLIST and &DSNPRE.CLIST.
- Create new &APSPRE.CLISTX and &DSNPRE.CLISTX variable-blocked
CLISTs.
- Copy, via ISPF 3.3, all the members of &APSPRE.CLIST to
APSPRE.CLISTX.
- Copy, via ISPF 3.3, all the members of &DSNPRE.CLIST to
&DSNPRE.CLISTX.
- Delete &APSPRE.CLIST and rename &APSPRE.CLISTX to
&APSPRE.CLIST.
- Delete &DSNPRE.CLIST and rename &DSNPRE.CLISTX to
&DSNPRE.CLIST.
- Modify &APSPRE.ISPSLIB(SSMPROJ) so that all future CLIST data
sets will be VB.
If you are installing APS software for the first time, you need to
provide job card information. You must specify a job class. You can also
specify a job card, for example, card J1, J2, J3, J4, or J5, that appears on
the APS JOB CONTROL CARDS screen.
- Access the APS JOB CONTROL CARDS screen by typing =A.0.6 from
the APS Main Menu.
- Modify the defaults shown below, for job cards J1 through J5.
APS Job Control Cards Screen
 ------------------  APS Job Control Cards  --------------

 OPTION ===>

 J1 ===> //userid1 JOB (9999),'userid',
         // CLASS=A,MSGCLASS=X,
         // MSGLEVEL=(0,0)

 J2 ===> //userid2 JOB (9999),'userid',
         // CLASS=A,MSGCLASS=X,
         // MSGLEVEL=(0,0)

 J3 ===> //userid3 JOB (9999),'userid',
         // CLASS=A,MSGCLASS=X,
         // MSGLEVEL=(0,0)

 J4 ===> //userid4 JOB (9999),'userid',
         // CLASS=A,MSGCLASS=X,
         // MSGLEVEL=(0,0)

 J5 ===> //userid5 JOB (9999),'userid',
         // CLASS=A,MSGCLASS=X,
         // MSGLEVEL=(0,0)
  ENTER CHANGES or END to EXIT
Alternatively, edit file-tailored JCL in
&APSPRE.ISPSLIB(SSMJOB). This data set contains sample file-tailored JCL
that Micro Focus uses to submit APS jobs. You can set the default job class,
&SSMCLASS, and other &SSM variables in &APSPRE.ISPSLIB(APS5000)
prior to running the APS@PROC CLIST.
- If you want to customize the variables temporarily or for only one
project, modify &DSNPRE.GENPANEL(APS5000), which you create by file
tailoring the APS@PAN skeleton. Note that these changes are overlaid if you run
the APS@PROC CLIST again.
The DDIFILE is a VSAM file that contains information about DBDs and PSBs
for IMS or DL/I data bases, and subschema information and file definitions for
VSAM files. This step is necessary each time a new &DSNPRE project is
created.
- On the APS Main Menu, enter =4.3. The DDIFILE Utilities screen
appears.
- On the APS DDIFILE Utilities screen, select option, 2
Initialize DDI File. APS displays the Initialize DDIFILE screen.
- On the Initialize DDIFILE screen, enter values for the following
fields.
|
Field Name
|
Value
|
|
Number of Records |
Appropriate number of records for your DBD, PSB, or subschema
DDIFILE.
Calculate the number of records as follows;
- Eight records per DBD
- Three records per PSB
- For VSAM subschemas, two records per DDISRC member.
|
|
Number of Secondary |
Default: blank (0); you can override.
|
|
VSAM Volume ID |
Your VSAM volume ID
|
|
Replace any Existing DDIFILE |
Yes or no |
- Press Enter to submit the batch job that creates the DDIFILE.
- Initial load the dataset as follows.
- Edit &DSNPRE.DDIBKUP.
- Insert 21 zeroes into the first record.
- Save the dataset.
- Go to the DDIFILE Utilities screen (=4.3).
- Select option 4, Restore DDI. Press Enter.
APSCOMP is an APS precompiler that runs in the Extended Link Pack Area
(ELPA). This precompiler is a special option available to users of MVS/XA with
COBOL for MVS runtime libraries (APSCOMP replaces APSBIG).
Before you install APSCOMP in the ELPA, be sure that you have the COBOL
for MVS runtime library (1.5 or higher) installed in your ELPA.
- Copy &APSPRE.LOADLIB2(APSCOMP) to a system ELPA library.
- Copy &APSPRE.LINKLST to a system LINKLIST library.
- IPL your system with the CLPA option before activating APSCOMP.
- Activate or deactivate APSCOMP for any &DSNPRE project.
- Run A.4.2.2.3.2.6 for the project. To do so, specify YES or
NO to APS Pre-Compiler in ELPA on the Miscellaneous System Defaults
panel.
After installation, allocate additional project and group data sets.
- From the APS Main Menu, enter option 4 in the Option
field.
- Enter option 2 in the Option field.
- Enter option 1 in the Option field.
- Enter option 3 in the Option field. The APS Project
Dataset Configuration screen displays.
- Complete the Project Dataset Configuration screen fields.
|
Field
|
Description
|
|
Target Project |
The name of the new project. For example, myproj. Must be 1-8
alphanumeric characters; the first character must be alphabetic.
|
|
Target Group |
The name of the new Group. For example, mygrp. Must be 1-8
alphanumeric characters; the first character must be alphabetic.
|
|
Create Data Element Library |
Default: No. A Data Element library is automatically created
during APS installation. We recommend that you have just one Data Element
library so that you can easily maintain centralized control of your data
elements.
|
|
Disk Volume |
Enter a valid volume serial number.
|
|
Disk Unit |
Valid values are 3330, 3340, 3350, 3380 DISK.
|
|
Target DDI Prefix |
The project and group qualifiers of the DDIFILE data set for
the new Project and Group. Default: targetproject.targetgroup.
|
- Select option 1, Allocate Project Datasets. The Allocate
Project Datasets screen displays.
- Complete the Allocate Project Datasets screen fields.
|
Field Name
|
Value
|
|
Create DDIFILE |
Yes or no.
|
|
Target DDI Prefix |
Accept default values or override.
|
|
Number of Records |
Appropriate number for new Project and Group.
Calculate the number of records as follows.
- Eight records per DBD
- Three records per PSB
- For VSAM subschemas, two records per DDISRC member.
|
|
Number of Secondary
|
Default is blank (0); you can override. |
|
VSAM Volume |
Your VSAM volume ID.
|
|
Replace DDIFILE |
Yes or no. |
- Press Enter to submit batch jobs to create the DDIFILE and the new
Project and Group.
- After both jobs complete, display the APS Project Dataset
Configuration screen.
- On the APS Project Dataset Configuration screen, select option
B to build the APS5000 CLIST, skeleton logon procedure, and panel for
the new Project and Group.
Copyright © 2002 Micro Focus International Limited. All rights reserved.
This document and the proprietary marks and names
used herein are protected by international law.