Trend Attributes
The following fields in the Trend section are required attributes to specify when creating a trend.
|
Field |
Description |
|---|---|
|
Name |
Name for the trend. Spaces and special characters are allowed. The name you enter here is the alias that appears in data source pick lists in other editors. |
|
Query |
Specifies the query that this trend uses. See Queries
Trends tend to use up system resources, so make your queries for trends as refined as possible. Caution:
|
|
Enabled |
By default, the Enabled check box is checked. This activates the trend to begin working on live data as soon as the trend is created. Uncheck this box if you want to experiment with the trend before pushing it live. |
The following example shows a trend that uses the Events Count query as its basis.
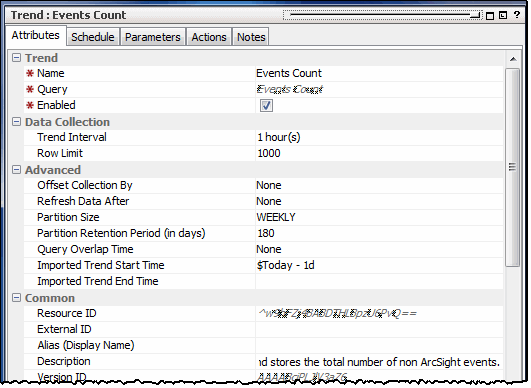
The Data Collection section provides default values for row limit and query duration.
|
Field |
Description |
|---|---|
|
Trend Interval |
Time span over which the trend operates. The default is one hour. For example, if the query counts the number of logins, this setting counts the number of logins every hour. |
|
Row Limit |
Maximum number of rows of data the trend captures. The default number is 1000. You can modify the trend's row limit without affecting the base query's row limit. |
The Advanced section provides optional settings to offset trend data collection and refresh trend data at a specified point in the future. By default, the offset and refresh values are set to None. You can keep the defaults or modify as needed.
|
Field |
Description |
|---|---|
|
Offset Collection By |
Delays trend data collection by the time period specified. Offsetting trend data collection time enables you to compensate for events that arrive to the Manager late, either from a time zone lag or other data collection lag. Trend data collection starts after the time delay entered here. Enter a time delay and select Hours or Minutes from the drop-down menu. The default offset is None. |
|
Refresh Data After |
Triggers the system to re-evaluate the query data automatically at a later time to capture any additional events that may have come in late. Enter a refresh interval and select Hours or Minutes from the drop-down menu. The default refresh is None. Note: The Manager supports late arrival of events. For example, a SmartConnector can send a batch of events later if it is falling behind. Consider explicitly scheduling a refresh of trend data only if SmartConnectors frequently lag behind in sending events to the Manager. If SmartConnectors rarely go down and are generally on time delivering events, there is no need to set this option. Caution: Automatic data refreshes can be resource intensive. If possible, consider manually refreshing your trend for a special reason, such as, after system downtime that causes trends not to run on schedule. For manual refreshes, click the Refresh Trend Runs button on the trend editor's panel, then cancel when done. |
|
Partition Size |
Specifies the time range of partitions for this trend data, which in effect determines the partition size. The default “time slice” for trend tables is WEEKLY. That is, if the default setting is used, each partition would contain a week's worth of data. Partition size can be set to weekly or monthly. You can always modify the Partition size as needed by editing the trend definition. The Partition Size works in concert with the Partition Retention Period, described next. |
|
Partition Retention Period (in days) |
Specifies the number of days to retain the partitions from this trend as active in the ArcSight database. The default is 180 days. You can always modify the Partition Retention Period as needed by editing the trend definition. Note: The Partition Retention Period works in combination with the Partition Size. The system makes sure you always have as much data, if not more, than you specified in the configuration of these two settings. Similarly for factors such as time zones and daylight savings time, more data (never less) is retained. For example, if the Partition Size is set to MONTHLY and the Partition Retention Period is 45 days, the system stores two months’ worth of data in two partitions. If the Partition Retention Period is set to 0 days, the data collected from one run of the trend is retained until the next partition is started. For example, if the Partition Size is MONTHLY and the Partition Retention Period is 0 days, then you keep one month's worth of data. Make sure that the trend start date is appropriate; a trend with a MONTHLY partition size, 0 days retention, and a start date near the end of the month would not maintain data for very long. |
|
Query Overlap Time |
The query overlap time is the amount of time by which the next query should overlap with the previous query (overlapping the tail-end of the previous query). By default, queries for interval trends have no gaps and overlaps. The default overlap is 0 (None), which corresponds to the normal non-overlapping trend query case. By setting a query overlap time, you can configure a trend to support calculations like trailing N-day moving averages. The query overlap time extends the trend to include overlapping query ranges. For example, to collect moving average data over a 10 day period, you could run the query each day over the previous 10 days. A query overlap time set to 0 (the default) would result in non-overlapping runs, such that the query would run every 10th day over the previous 10 days. On the other hand, to get an overlapping trend run, you could specify a 9-day overlap. With this setting, the query would run every day (10 day query - 9 day overlap) over the previous 10 days. The trend would gather data every day for days 1-10, 2-11, 3-12, and so forth. Notes:
|
|
Imported Trend Start Time |
This applies to trends created and packaged here for use in another Manager. If the trend is packaged without schedule start and end times, the trend start time specified here is used when the trend is imported. Consider using a dynamic start time such as If the trend is exported without Schedule start and end times and no value is specified for Imported Trend Start Time, then when the trend is imported it defaults to use Note: The imported trend start time takes effect only if the trend is exported without Schedule start time. To exclude the Schedule start time from a trend upon export, set the package Format option to export. For information, see the description of the package's Format options in Creating or Editing Packages. |
|
Imported Trend End Time |
If the trend is packaged without schedule start and end times, the trend end time specified here is used when the trend is imported. If the trend is packaged without Schedule end time and no value is specified for Imported Trend End Time, then when the trend is imported it defaults to using no end time. With this setting, the trend runs indefinitely until it is manually disabled or edited to include an end time. Note: The imported trend end time takes effect only if the trend is exported without Schedule end time. To exclude the Schedule end time from a trend upon export, set the package Format option to export. For information on this, see the description of the package Format options in Creating or Editing Packages. |
Entering data in the Common and Assign sections is optional, depending on how your environment is configured. For information about the Common and Assign attributes sections, as well as the read-only attribute fields in Parent Groups and Creation Information, see Common Resource Attribute Fields.
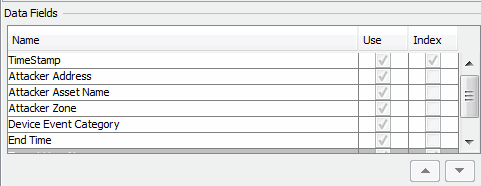
The Data Fields section is where you build the trend schema. This is populated automatically when you first select the query to use in this trend. The list shows the data fields collected by the query you chose. By default, all the query fields are selected for use in the trend. If you do not want to use a particular data field, clear (click to remove the check mark) the Use box for that item. Also, you can select which fields you also want to index. Indexing is done mostly for query efficiency, and TimeStamp is selected by default. It is helpful if the query you are using returns a large amount of data, and you want to run sub-queries on the data.
The Summary box at the bottom displays a summary of the query interval and the schedule on which it runs.