Configuring the NFS Server
You can configure an NFS server using one of following methods:
- Configure a virtual machine which will be the host NFS server
- Configure the native NetApp service provided by Azure to provision NFS shares
Configuring a Virtual Machine as the Host NFS Server
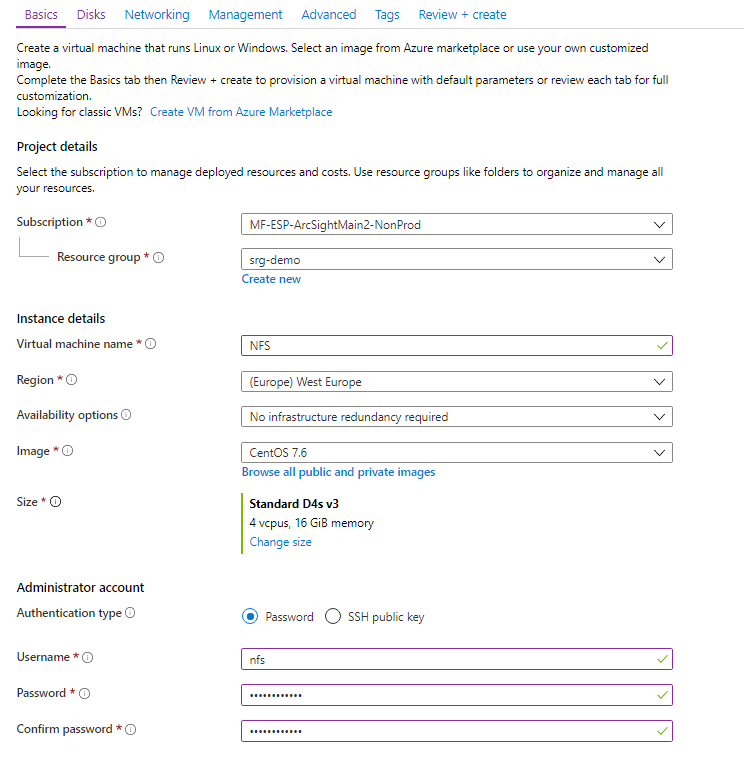
1. Create a Virtual Machine NFS Server
- Create a resource of type CentOS-based.
- For select your resource group.
- In , enter a VM name.
- For , select Change size. In the popup, choose D4s_V3, and click OK to confirm. (You can select a different size according to your expected workload.)
- Set the to your preferences. Enter the Administration account details accordingly. In the examples given here, we use the username/password authentication.
- Click Next: Disks.
- Click Create.
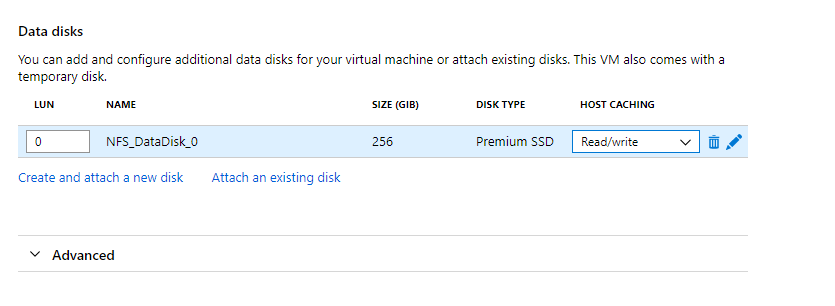
- Attach a new disk and select a size that will meet your requirements. (IOPS should be 1100 or higher.)
- After you add the disk, change the value in Host Caching to Read/write.
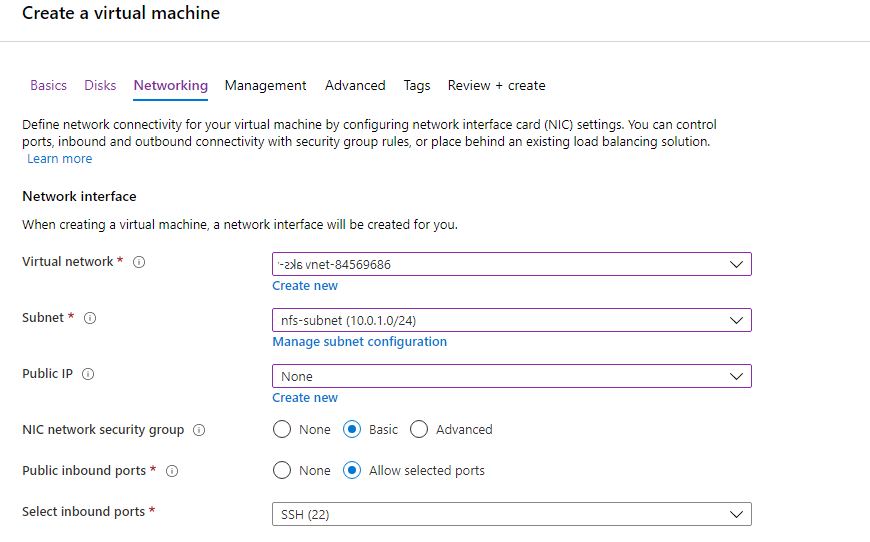
- Click Next: Networking
- On the tab, select values as follows:
- : select the virtual network you created earlier (for example, demo-vnet).
- select nfs-subnet.
- select Basic.
- select None.
- Click Review + create.
- When validation is passed, click Create.
By default, the VM has a small (30GB) disk for the operating system and approximately the same size for the temporary disk. For NFS, we need to attach a new disk with IOPS 1100 or higher for better performance.
Required permissions: Create security groups, network interface and CentOS-based virtual machines
- Set your main resource group name to an environment variable:
- Create a network security group for NFS by running this command:
- Get the nfs-subnet ID and store it to an environment variable for later usage. (We will find subnet nfs-subnet in virtual network demo-vnet in resource group srg-demo.)
- Create the network interface
nfs-VMNicin the subnet from previous command in your resource using network security group nfs-nsg by running the following command: - Create the NFS VM by running this command:
-
--sizeis adjusted according to expected workload. To get a list of supported sizes, run the following command:# az vm list-sizes -l <LOCATION> | jq ".[] | .name"
-
--imagecan be any supported CentOS. To get a list if CentOS images run the following command:# az vm image list -l <LOCATION> -f CentOS --all
# RESOURCE GROUP=<your resource group name>
For example:
# RESOURCE GROUP=srg-demo
# az network nsg create -g $RESOURCE_GROUP -n nfs-nsg
# SUBNET_ID=$(az network vnet list -g $RESOURCE_GROUP | jq -r '.[] | select(.name == "<your_virtual_network_name>") | .subnets[] | select(.name == "<your_NFS_subnet>") | .id')
# az network nic create --name "nfs-VMNic" --resource-group $RESOURCE_GROUP --ip-forwarding "true" --network-security-group "nfs-nsg" --subnet $SUBNET_ID
# az vm create --name "nfs" --resource-group $RESOURCE_GROUP --image "OpenLogic:CentOS:7.7:latest" --size "Standard_D4s_v3" --nics "nfs-VMNic" --data-disk-sizes-gb "256" --admin-username nfs --admin-password myStrongPassword@!123
Parameters:
--data-disk-sizes-gb is specified according to workload. Use 256, 512, 1024 and so on.
For example:
{
   "fqdns":"",
   "id":"/subscriptions/af379ae8-90b3-4368-8fe7-b6a55ab17720/resourceGroups/srg-demo/providers/Microsoft.Compute/virtualMachines/nfs",
   "location":"westeurope",
   "macAddress":"00-0D-3A-AA-E4-F7",
   "powerState":"VM running",
   "privateIpAddress":"10.1.2.4",
   "publicIpAddress":"",
   "resourceGroup":"srg-demo",
   "zones":""
}
The private IP will be used to access the NFS VM from the jumphost.
2. Format the Disk on the NFS VM Using the Azure Cloud Shell
- When your NFS VM deployment completes, determine its private IP address using the
azcommand. Note the value for later usage. - From your jump host, SSH to the VM using its private IP address.
- Log in using the user and password you specified earlier for the NFS VM.
- Become
root. - Find the device for the data disk by executing the command:
- Using
fdisk /dev/sdc, create a new primary partition on whole device. Set it as type 83 - Linux. - After saving the new partition table, run the command:
- Create a mountpoint. Run the command:
- Get the partition UUID. Run the command:
- In a text editor, open the file
/etc/fstab. Add an entry to have this new partition mounted after restart. For example: - Mount a new disk partition. Run the command:
- Verify it is properly mounted. Run the command:
For example:
# ssh nfs@10.1.2.4
# fdisk -l
/dev/sdc.For example:
# fdisk /dev/sdc
Welcome to fdisk (util-linux 2.23.2).

Changes will remain in memory only, until you decide to write them.
Be careful before using the write command.
Device does not contain a recognized partition table
Building a new DOS disklabel with disk identifier 0xc6a2cea5.
The device presents a logical sector size that is smaller than
the physical sector size. Aligning to a physical sector (or optimal
I/O) size boundary is recommended, or performance may be impacted.

Command (m for help): n
Partition type:
p   primary (0 primary, 0 extended, 4 free)
e   extended
elect (default p): p
S

Partition number (1-4, default 1):
First sector (2048-536870911, default 2048):
Using default value 2048

Last sector, +sectors or +size{K,M,G} (2048-536870911, default 536870911):
Using default value 536870911
Partition 1 of type Linux and of size 256 GiB is set

Command (m for help): w
The partition table has been altered!
# mkfs.xfs /dev/sdc1
# mkdir /nfs
# blkid /dev/sdc1
For example:
/dev/sdc1: UUID="3696c212-1778-43d5-9d27-d9164686c327" TYPE="xfs"
UUID=3696c212-1778-43d5-9d27-d9164686c327 /nfs xfs defaults 0 0
# mount -a
# df -h
For example:
Filesystem      Size  Used Avail Use% Mounted on
/dev/sda2        30G  1.3G   29G   5% /
devtmpfs        7.9G     0  7.9G   0% /dev
tmpfs           7.9G     0  7.9G   0% /dev/shm
tmpfs           7.9G  9.0M  7.9G   1% /run
tmpfs           7.9G     0  7.9G   0% /sys/fs/cgroup
/dev/sda1       497M   65M  433M  13% /boot
/dev/sdb1        99G   61M   94G   1% /mnt/resource <- Azure temporary drive
tmpfs           1.6G     0  1.6G   0% /run/user/0
/dev/sdc1       264G   33M  264G   1% /nfs          <- your new partition for suite installation
3. Prepare the NFS Server and Export Mountpoints
- Check if
nfs-utilsis installed. - If
nfs-utilsis not installed, install it by running the following command: - Configure NFS. Below is the suggested structure of the NFS volumes.
- For every NFS volume, run the following set of commands on the VM for NFS.
- After configuring all 5 required volumes, run the following commands.
# rpm -qa | grep nfs-utils
Sample ouput: nfs-utils-1.3.0-0.61.el7.x86_64. The version might vary depending on your OS
# yum install -y nfs-utils
/nfs/itom-vol
/nfs/db-single-vol
/nfs/db-backup-vol
/nfs/itom-logging-vol
/nfs/arcsight-volume
mkdir -p /nfs/volume_name
chown -R <uid>:<gid> /nfs/volume_name
echo "/nfs/volume_name *(rw,sync,anonuid=<uid>,anongid=<gid>,all_squash)">>/etc/exports
For example:
mkdir -p /nfs/itom-vol
chown -R 1999:1999 /nfs/itom-vol
echo "/nfs/itom-vol *(rw,sync,anonuid=1999,anongid=1999,all_squash)">>/etc/exports
--system-group-id and --system-user-id. In addition, if you are using NetApp with NFSv4 configuration, consider applying stickybits to all <NFS_root_directory> shares with:
# chmod g+s #chmod w+s# exportfs -ra
# systemctl restart rpcbind
# systemctl enable rpcbind
# systemctl restart nfs-server
# systemctl enable nfs-server
NFS configuration is now complete.
4. Next Step: Create and Attach the Data Disk to Nodes
Using NetApp as an NFS Server
You can use Azure's NetApp service as an NFS server. To request access to the service, see the Azure NetApp Files waitlist submission page. You must wait for an official confirmation email from the Azure NetApp Files team before continuing.
- Create a resource of type Azure NetApp Files.
- Choose a name and your subscription for the resource.
- For Resource group, select your Kubernetes resource group where you have your virtual network and subnet for NFS.
- For Location, select your resource group as in Step 3.
- Click Create and wait for account creation.
- Set your main resource group name to an environment variable:
- Create the NetApp account by running the following command:
-
<ACCOUNT NAME>is your NetApp account name. -
<LOCATION>is the same as for AKS.
# RESOURCE_GROUP=<your resource group name>
For eample:
# RESOURCE_GROUP=srg-demo
az netappfiles account create -g $RESOURCE_GROUP --name <ACCOUNT_NAME> -l <LOCATION>
For example:
# az netappfiles account create -g $RESOURCE_GROUP --name SrgDemoNetAppAdmin -l westeurope
Parameters:
2. Set Up the NetApp Capacity Pool
- In the Azure NetApp Files tab, browse to your NetApp account.
- In Storage Services, select Capacity Pools.
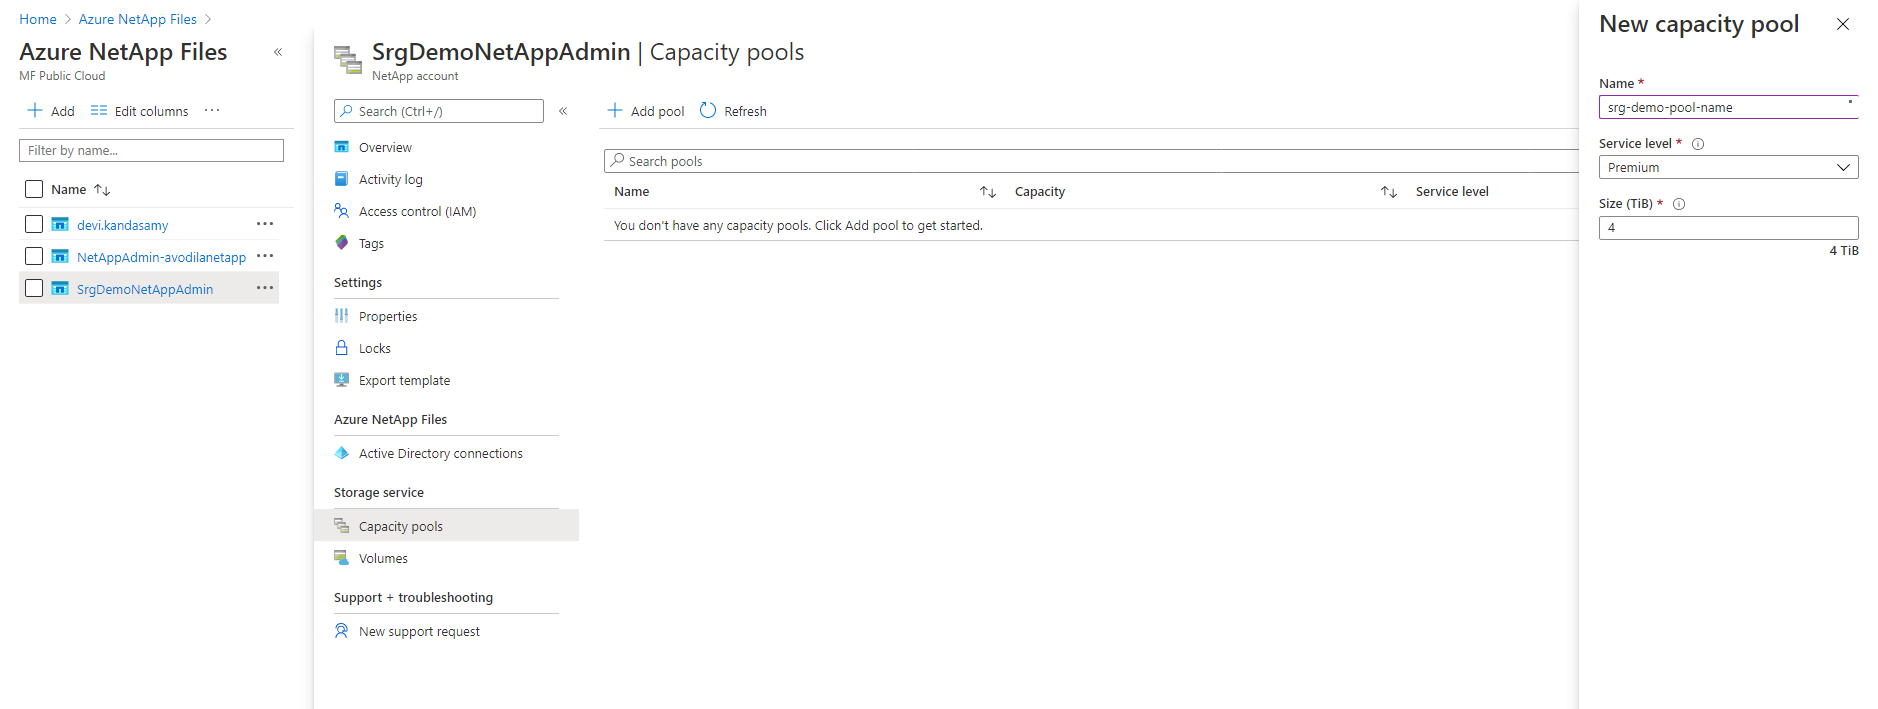
- Click + and enter values for the following:
- Name: enter a name for the pool.
- Service Level: select a service level.
- Pool Size: enter 4 (TB) for the pool size. (This is a service minimum.)
- Set your main resource group name to an environment variable:
- Run the command:
-
<POOL_NAME>is your new pool name. -
<ACCOUNT_NAME>is the NetApp account name specified in previous step.
# RESOURCE_GROUP=<your resource group name>
For example:
# RESOURCE_GROUP=srg-demo
# az netappfiles pool create -g $RESOURCE_GROUP --account-name <ACCOUNT_NAME> --name <POOL_NAME> -l <LOCATION> --size 4 --service-level premium
Parameters:
For example:
# az netappfiles pool create -g $RESOURCE_GROUP --account-name SrgDemoNetAppAdmin --name srg-demo-pool-name -l westeurope --size 4 --service-level premium
3. Create and Prepare the Volume
- In your NetApp account resource, browse to Storage service.
- Select Volumes.
- Press + Add volume.
- Enter a name for the volume.
- Ensure that your volume is in the same virtual network as
aks-virtual-networkandnfs-subnet. - For Subnet, select nfs-subnet.
- Click Next:Protocol
- Ensure that the Protocol type is NFS and Version is NFSv4.1.
- In Export policy section , select the checkbox for 0.0.0.0/0 Read & Write.
- Enter the file path that will be used to create the export path for the volume.
- Click Review + Create at the bottom of the page. If you are satisfied with your settings, click Create.
Microsoft.NetApp/volumes.
- Set your main resource group name to an environment variable:
- Run the command:
-
<INDEX>- integer number of nfs creation rule. -
<ACCOUNT_NAME>is your netApp account name. -
<POOL_NAME>is the capacity pool created on the previous step. -
<VOLUME_ROOT>is your volume root name. -
<LOCATION>is location of your NetApp. -
<VOLUME_SIZE>size for NFS volume in GB. -
<FILE_PATH>is the path to your volumes. -
<VIRTUAL_NETWORK>the virtual network to which your subnets belong. -
<NFS_SUBNET_NAME>is your subnet for NFS. -
<CLIENT_LIST>Specification as comma separated strings with IPv4 CIDRs, IPv4 host addresses and host names to access the NFS share. Ensure to include either the range of subnets and separate IP addresses or hostnames along with the jumphost.
# RESOURCE GROUP=<your resource group name>
For example:
# RESOURCE GROUP=srg-demo
# az netappfiles volume create -g $RESOURCE_GROUP --account-name <ACCOUNT_NAME> --pool-name <POOL_NAME> --name <VOLUME_ROOT> -l <LOCATION> --service-level premium --usage-threshold <VOLUME_SIZE> --file-path <FILE_PATH> --vnet <VIRTUAL_NETWORK> --subnet <NFS_SUBNET_NAME> --protocol-types NFSv4.1 --rule-index <INDEX> --allowed-clients <CLIENT_LIST>ntsLIST>
Parameters:
For example:
az netappfiles volume create -g $RESOURCE_GROUP --account-name SrgDemoNetAppAdmin --pool-name srg-demo-pool-name --name volumename -l westeurope --service-level premium --usage-threshold 100 --file-path "nfs" --vnet demo-vnet --subnet nfs-subnet --protocol-types NFSv4.1 --allowed-clients 20.120.3.0/24 --rule-index 1
4. Configure and Create the Volumes
- Find your
<mount_path_ip>and<mount_path_file_name>by navigating to your volume page. They were confirmed in the previous step after successful creation of the prepared volume. Note both of these parameters for later use. - Log in to the jump host.
- If not already present, install the NFS client by sudo:
- Get and unzip the file
cdf-deployer.zip - In the
scriptsfolder, run the following command:

# yum install nfs-utils if not present
# sudo ./createFileStore.sh <mount_path_ip> <mount_path_file_name>
For example:
sudo ./createFileStore.sh "10.1.2.4" "/nfs"