Preparing the Jump Host Virtual Machine
Portal
- Create resource of type CentOS-based and enter these values:
- For Resource group, use the resource group you created for the ACR.
- In Virtual machine name. assign a VM name.
- For Size, leave at the default value.
- Set the Authentication type to your preferences and supply the Administration account details accordingly. In our examples, we use the username/password authentication.
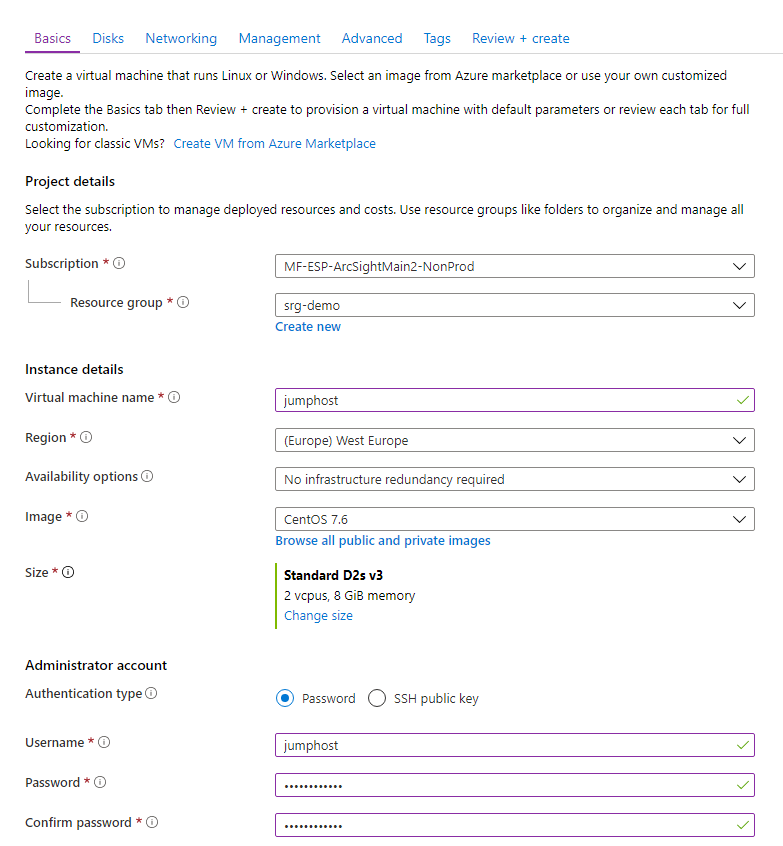
- Click Next: Disks. No actions need to be taken on this page, so click Next: Networking, and then enter the following values:
- For Virtual network, select the virtual network you created previously (its name has the format demo-vnet).
- For Subnet select jumphost-subnet.
- For NIC network security group, select Basic and Allow SSH port to connect.

- Click Review + create. Then, after validation, click Create to start the deployment.
- When deployment completes, browse the to VM overview and note the jump host's Public IP address.
CLI
Required Permissions:create security groups, network interfaces, public IPs, and CentOS-based virtual machines
- Set your main resource group name to an environment variable:
# RESOURCE_GROUP=<your resource group name>
For example:# RESOURCE_GROUP=srg-demo
- Create a network security group for the jump host by running the following command:
# az network nsg create -g $RESOURCE_GROUP -n jumphost-nsg
For example:# az network nsg create -g srg-demo -n jumphost-nsg
- Open the SSH port (if needed) by running these commands:
# az network nsg rule create -g $RESOURCE_GROUP -n ssh --nsg-nam jumphost-nsg --priority 1000 --destination-port-ranges 22
- Prepare the jump host public IP:
# az network public-ip create -n jumphost-PublicIP -g $RESOURCE_GROUP --allocation-method "Static" --sku "Standard"
- Get the subnet ID and store it in an environment variable for later usage.
# SUBNET_ID=$(az network vnet list -g $RESOURCE_GROUP | jq -r '.[] | select(.name == "<your vnet name>") | .subnets[] | select(.name == "<your jumphost subnet>") | .id')
SUBNET_ID=$(az network vnet list -g $RESOURCE_GROUP | jq -r '.[] | select(.name == "demo-vnet") | .subnets[] | select(.name == "jumphost-subnet") | .id')- Create the network interface
jumphost-VMNicin your resource group with public IPjumphost-publicIPwith network security groupjumphost-nsgby running the following command:# az network nic create --name "jumphost-VMNic" --resource-group $RESOURCE_GROUP --public-ip-address "jumphost-PublicIP" --ip-forwarding "true" --network-security-group "jumphost-nsg" --subnet $SUBNET_ID
- Create the jump host VM by running the following command:
az vm create --name "jumphost" --resource-group $RESOURCE_GROUP --image "OpenLogic:CentOS:7.7:latest" --size "Standard_D4s_v3" --public-ip-address-allocation "static" --nics "jumphost-VMNic" --admin-username jumphost --admin-password myStrongPassword@!123where:
- Size might be a smaller value. To get a list of supported sizes, run the command:
az vm list-sizes -l <LOCATION> | jq ".[] | .name" - Image can be any supported CentOS. To get a list of CentOS images, run the command:
az vm image list -l <LOCATION> -f CentOS --all
- Size might be a smaller value. To get a list of supported sizes, run the command:
Example result:
{- Finished .."fqdns": "",
"id": "/subscriptions/af379ae8-90b3-4368-8fe7-b6a55ab17720/resourceGroups/srg-demo/providers/Microsoft.Compute/virtualMachines/jumphost",
"location": "westeurope",
"macAddress": "00-0D-3A-BD-08-42",
"powerState": "VM running",
"privateIpAddress": "10.0.2.4",
"publicIpAddress": "51.124.17.183",
"resourceGroup": "srg-demo",
"zones": ""
}
Use the VM Public IP address to permit SSH access to the jump host from outside. (The SSH port needs to be open if access is permitted from outside.)
Configuring the Jump Host
- Using the VM's public IP, SSH to the jump host VM and become
root.
- Run the following commands:
# curl -LO https://storage.googleapis.com/kubernetes-release/release/$(curl -s https://storage.googleapis.com/kubernetes-release/release/stable.txt)/bin/linux/amd64/kubectl
# chmod 755 kubectl
# mv kubectl /bin
# yum install epel-release -y
# yum install jq -y
- Install the Azure client for CentOS by running these commands:
# rpm --import https://packages.microsoft.com/keys/microsoft.asc
#sh -c 'echo -e "[azure-cli]\nname=Azure CLI\nbaseurl=https://packages.microsoft.com/yumrepos/azure-cli\nenabled=1\ngpgcheck=1\ngpgkey=https://packages.microsoft.com/keys/microsoft.asc" > /etc/yum.repos.d/azure-cli.repo'
# yum install azure-cli
- Log in to your Azure account and follow the console instructions by running:
# az login
- Get your Kubernetes cluster credentials by running the following command:
# az aks get-credentials --resource-group <your resource group name> --name <your kubernetes resource name>
For example:# az aks get-credentials --resource-group srg-demo --name srg-demo-aks
- Check if
kubectlcan access the cluster by running:# kubectl get nodes
Example output:
NAME STATUS ROLES AGE VERSION
aks-agentpool-36457641-vmss000000 Ready agent 137m v1.13.11
aks-agentpool-36457641-vmss000001 Ready agent 137m v1.13.11
aks-agentpool-36457641-vmss000002 Ready agent 137m v1.13.11
Since RDP will be required for your jump host, the following configuration steps will be required:
- The installation of xRDP
- Installation of a preferred desktop environment (choice of XFCE, MATE, or GNOME)
- Opening of an RDP port on the jump host network security group (NSG)
To configure RDP on your jump host:
- Connect to the jump host and become
root.
- Install and enable xrdp. Run these commands:
# yum install -y epel-release
# yum install -y xrdp
# systemctl enable xrdp
# systemctl start xrdp
- Check whether the firewall is running; if so, then open RDP port 3389/tcp by running these commands:
# firewall-cmd --add-port=3389/tcp --permanent
# firewall-cmd --reload
- Install your preferred desktop environment (XFCE, MATE or GNOME). This example will use MATE. Run these commands:
# yum install -y epel-release
# yum groupinstall -y "MATE Desktop"
- Wait for the install to complete, and then reboot the jump host.
- Connect to the jump host and stay as a jump host user.
- Create the Xclients file for the user, which will be used to log in. Run these commands:
# echo "mate-session" > ~/.Xclients
# chmod a+x ~/.Xclients
- Do one of the following:
- On the Azure Portal, open the RDP port on the jump host network security group (NSG), and then proceed to Step 9, OR,
- Run the following command (after which, the procedure is complete)
# az network nsg rule create -g <RESOURCE GROUP> -n rdp --nsg-nam jumphost-nsg --priority 1001 --destination-port-ranges 3389
For example:
# az network nsg rule create -g srg-demo -n rdp --nsg-nam jumphost-nsg --priority 1001 --destination-port-ranges 3389
jumphost-NSG- In Settings, click Inbound security rules.
- Click Add and then enter values for these settings:
- In Name, enter a name for the NSG.
- In Destination port ranges enter 3389.
az cli commands can be run from your jump host instead of using the Azure Cloud Shell.Next Step: Prepare the NFS Server