Selecting a Public Hosted Zone and Creating a Record Set
In the Route 53 service, DNS records are organized in hosted zones. A hosted zone is analogous to a traditional DNS zone file; it represents a collection of records that can be managed together, belonging to a single parent domain name. All resource record sets within a hosted zone must have the hosted zone's domain name as a suffix.
In this section you will select a public hosted zone, which must be previously created by an AWS administrator, and create the record set.
- Using the Find Services search tool, locate and browse to the Route 53 dashboard.
- In the left navigation panel, select Hosted Zones. Ignore any error message about insufficient permission.
- From the list of hosted zones, select a public zone. For our example, we use
arcsight-dev.com.

- Click the public hosted zone domain name to list the record sets in the public zone.

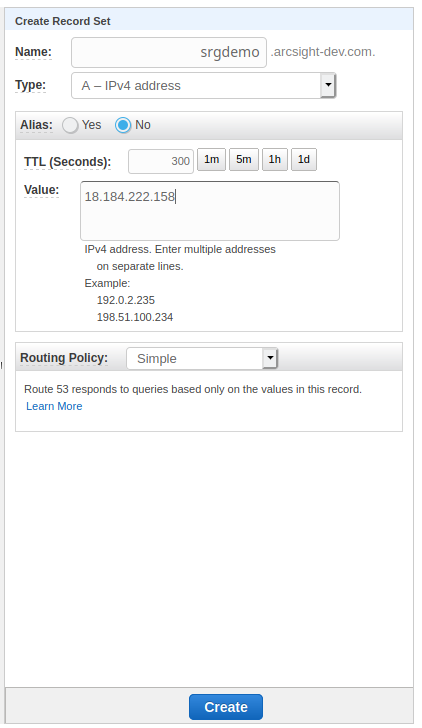
- Click Create Record Set and specify or verify values for the following parameters:
- Name: Choose a name for the A-record. The record set FQDN will then be composed from this name and the public hosted zone domain name. In our example we will use
srgdemo. Our example installation will then be available at the URL:
srgdemo.arcsight-dev.com.
Record the record set FQDN in the AWS worksheet. - Type: A - IPv4 address.
- Alias: No
- TTL: Leave default.
- Value: Specify your bastion's public IP address.
- Routing Policy: Simple

- Name: Choose a name for the A-record. The record set FQDN will then be composed from this name and the public hosted zone domain name. In our example we will use
- Click Create. The new record set is displayed in the list.
- Run the following command to select public hosted zones:
aws route53 list-hosted-zones \
| jq -r '.HostedZones[] | select(.Config.PrivateZone==false) | "Id:   " + .Id,"Name: " + .Name," " '
A list of hosted public zones is returned. For example:
Id:   /hostedzone/ZX47W6PZ55K6H
Name: connector.arcsight.com.
Id:   /hostedzone/Z3EAG7KOHX70J0
Name: arcsight-dev.com.
Id:   /hostedzone/Z8OJ5ACJB4YR6
Name: hello.com.
Id:   /hostedzone/Z1I5DUB009TKO3
Name: devops-conn.arcsight.com.
- Choose one of the public hosted zones. For example, we will use the public hosted zone (name shown includes a period):
arcsight-dev.com.
Record the chosen public hosted zone name and ID in the AWS worksheet underHosted zone nameandHosted zone Idrespectively. - Choose a subdomain in the selected public hosted zone. For example, we will use
srgdemo. Combining the subdomain and hosted zone name with a final period will give us the complete DNS name where our new cluster will be accessible.
Example:srgdemo.arcsight-dev.com. - From the directory
arcsight-platform-cloud-installer-<version>/aws-scripts/objectdefs/, copy the supplied templateCreateRecordSetInHostedZone.jsonto the working folder. - Open the template in a text editor and set values for the following placeholders:
<Record name>:Combine the name of the hosted zone (for example,srgdemo) and Hosted zone name (for example,arcsight-dev.com) to create the DNS name and then append the dot character (.)Example: srgdemo.arcsight-dev.com.<Record type>:Replace with a value ofA.<Record value>:Use your bastion IP address.
The placeholders in the template use syntax<placeholder name>, for example,<Record name>.The following example shows a modified JSON template. Notice that the trailing period in the record name is mandatory.
{
   "Changes":[
      {
         "Action":"UPSERT",
         "ResourceRecordSet":{
            "Name":"srgdemo.arcsight-dev.com.",
            "Type":"A",
            "TTL":300,
            "ResourceRecords":[
               {
                  "Value":"3.120.237.11"
               }
            ]
         }
      }
   ]
}
- Run the following command:
aws route53 change-resource-record-sets \
--hosted-zone-id <Hosted zone Id> \
--change-batch file://CreateRecordSetInHostedZone.json
Where:
<Hosted zone Id>: Use the hosted zone ID retrieved above. For example: /hostedzone/Z3EAG7KOHX70J0
--change-batch: Replace the parameter here with your own modified instance of the JSON file CreateRecordSetInHostedZone.json.
The command returns a change request. For example:
{
   "ChangeInfo":{
      "Id":"/change/C04669622EJ7JNXG69KJO",
      "Status":"PENDING",
      "SubmittedAt":"2020-06-09T09:35:06.376000+00:00"
   }
}
Later, the status will change to INSYNC. To validate the status, run this command:
aws route53 get-change --id <change id>
Output example:
{
   "ChangeInfo":{
      "Id":"/change/C04669622EJ7JNXG69KJO",
      "Status":"INSYNC",
      "SubmittedAt":"2020-06-09T09:35:06.376000+00:00"
   }
}
Next Step: Bootstrapping CDF