Configure Network and Zone Model
Network and zone model can be configured in ArcSight Enterprise Security Manager (ESM) or ArcSight Management Center (ArcMC).
Prerequisites
Ensure that the following components are installed and are available:
-
ArcSight ESM
-
Transformation Hub
-
Download the content package ArcSight_Provider_Portal.arb from Software Licenses and Downloads (SLD).
Configuring Network and Zone Model in ArcSight ESM
The content package includes a reference network model and rules that can be reused. For more information about configuring the network model in ArcSight ESM, see Modeling the Network.
To set up content in ESM, perform the following steps:
-
Create customers. The customer name must be the same as the tenant key in ArcSight Platform.
-
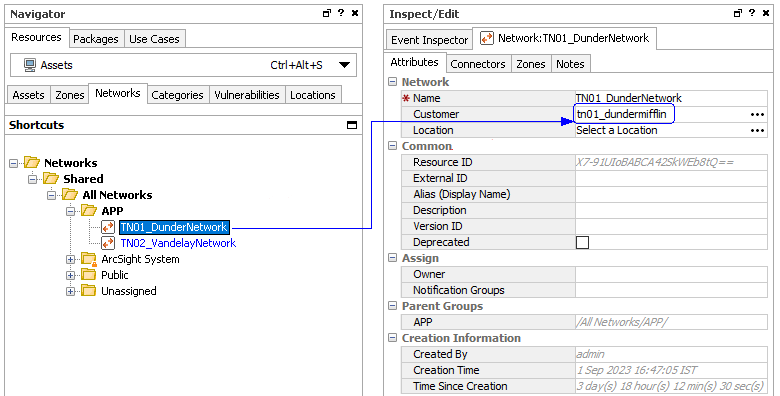
Create networks for each customer as required and map the network to the correct customer as shown in the following image:
-
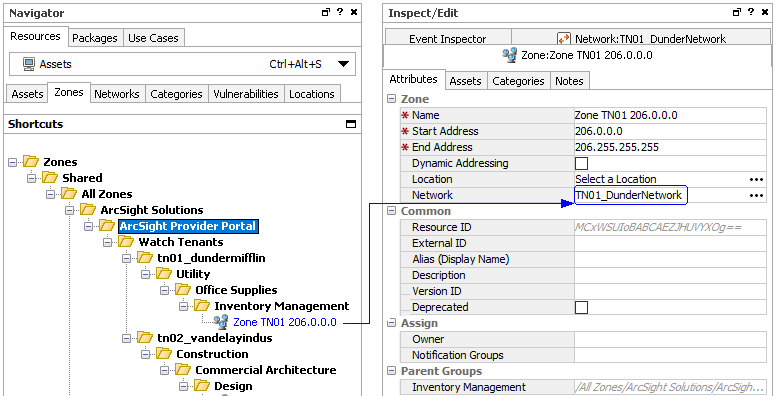
Create zones and assign them to correct the network as shown in the following image:
Update Rules to Add the Required Fields
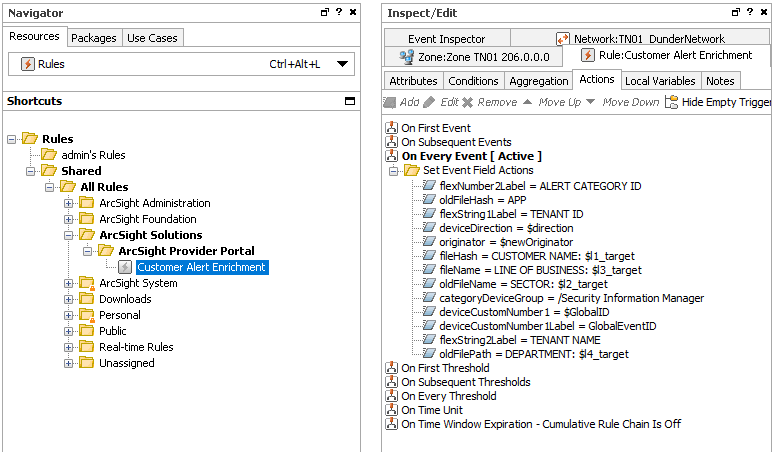
Ensure that the enabled rules are configured to populate and aggregate the correct fields required for ArcSight Platform. Refer to the sample content package for more information on how to set up the fields as shown in the following image:
Configuring Network and Zone Model in ArcMC
Before you define the network and zone model in ArcMC, register each SmartConnector that sends the events to Transformation Hub. For more information, see Managing SmartConnectors with ArcSight Management Center.
Perform the following steps to define and push the network and zone configurations in ArcMC:
-
Manually create the networks.csv and zones.csv. The networks.csv defines the networks that will be used in the zones.csv file. The zones.csv file defines the zones within the networks already defined by the networks.csv file.
Ensure that the network and zone configuration files are valid and the data within the files exactly maps to the ESM network model. -
Push the network and zone configuration files corresponding to each tenant to the SmartConnector associated with the tenant. For information on how to push the network model to SmartConnectors using ArcMC, see ArcMC Network Models.
For the Smart Connector to apply the zone model, in the Network group of the destination parameters, you must set the value for the Zone Population Mode field to "Rezone (override)". This can be done using ArcMC or directly in the SmartConnector by running setup. For more information, see Configuring Network in the SmartConnector documentation.