|
Export Type |
Description |
Details Required |
|---|---|---|
|
Save to local disk |
Saves the file in a local system from which you access Logger or a browser for viewing or saving.
|
|
|
Export to remote location (Appliance) |
Saves the file in a remote location. On a Logger Appliance, the file is written to an NFS mount, or a CIFS mount..
Note: Make sure to configure a remote file system prior exporting results in your appliance. For more information, see Remote File Systems. |
|
|
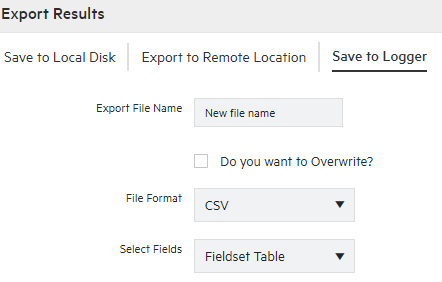
Save to Logger |
Saves the file in Logger. To view the saved files in Logger, go to Configuration > Search > Saved Search Files.
|
|


|
Details required |
Description |
|---|---|
|
File Format |
Select CSV to produce a comma-separated values file. You can also export a file containing search results in charts. OR Select PDF to produce a report-style PDF that contains the search results in tables and charts. Tip: Charts are only included if the search query contains an operator that creates charts, such as chart, top, and so on.
|
|
Export file name |
Specify the name of the file. If the file name already exists and the overwrite box is not checked, an error is generated. If the Overwrite box is checked, the existing file is overwritten. |
|
Select Fields |
Specify the fields to be included in the exported file. Select Fieldset Table to drag and drop to the Selected Fields column. Select Fieldset Text to write down the fieldsets. To select all the fields, check the all fields box. To export fields created as a result of Note: Export meta data fields along with other fields. Exporting only the meta data fields ( Event Time, device and Logger) is not supported by Logger.
|
|
Title (for PDF only) |
Enter a meaningful name that appears on top of the PDF file. Make sure to select the All Fields option for this option to appear. If no title is specified, search result will be named as “Untitled”. |
|
Chart Type (for PDF only) |
Select the type of chart to include in the PDF file. You can select from: Column, Bar, Donut, Area, Line, Stacked Column, Stacked Bar. Note: If the Chart Type is different from the chart displayed on the Search Results screen, the value selected for this option overrides the one shown in the screen. |
|
Chart Result Limit (for PDF only) |
Specify the number of unique values to plot. Default: 10 If the configured Chart Result Limit is less than the number of unique values for a query, the top values equal to the Chart Result Limit are plotted. |
|
Include Event Total |
Select to include the total number of events in the exported search results. |
|
Include only CEF Events |
Select to include CEF events in the exported search results. |
|
Rerun query |
Select to rerun the query before exporting the search results. |