Identifying I/O Data Elements Manually
Follow the instructions below to identify I/O data elements manually.
-
Select a business function, rule set, or rule, then right-click in the I/O Data Elements tab and choose
Create in the pop-up menu. The I/O Data Element dialog opens.
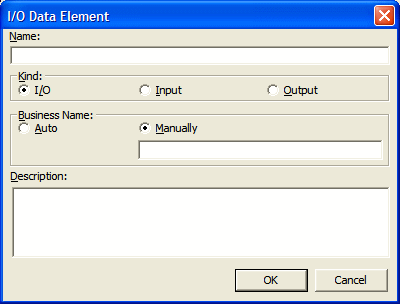
- In the Name field, enter the name of the data element as it appears in the code.
-
In the Kind group box, choose:
- I/O for an input and output field.
- Input for an input field.
- Output for an output field.
-
In the Business Name area, select:
- Auto if you want to automatically retrieve the business name for the I/O element from your project glossary.
- Manually if you want to enter the business name for the I/O element by hand. Enter the name in the field below the radio button.
- In the Description field, enter a description of the I/O element.
- Click OK to dismiss the dialog and return to the Rules window. The specified field is listed in the I/O Data Elements tab in the righthand pane of the window.
-
Repeat this procedure for each field you want to add to the rule.
Tip: To edit a field in the table, select the field and choose Edit in the right-click menu. The I/O Data Element dialog opens, where you can make the necessary changes. To delete a field, select it and choose Delete in the right-click menu.