Setting up Authentication
The following content is available in the Databridge Installation Guide.
The first time the console is run use dbridge for the User Name and Password. Once signed in, select the menu icon ( ) on the left-side of the header, this will expand a left-side navigation menu. Select Authentication to configure authentication for the Databridge Administrative Console.
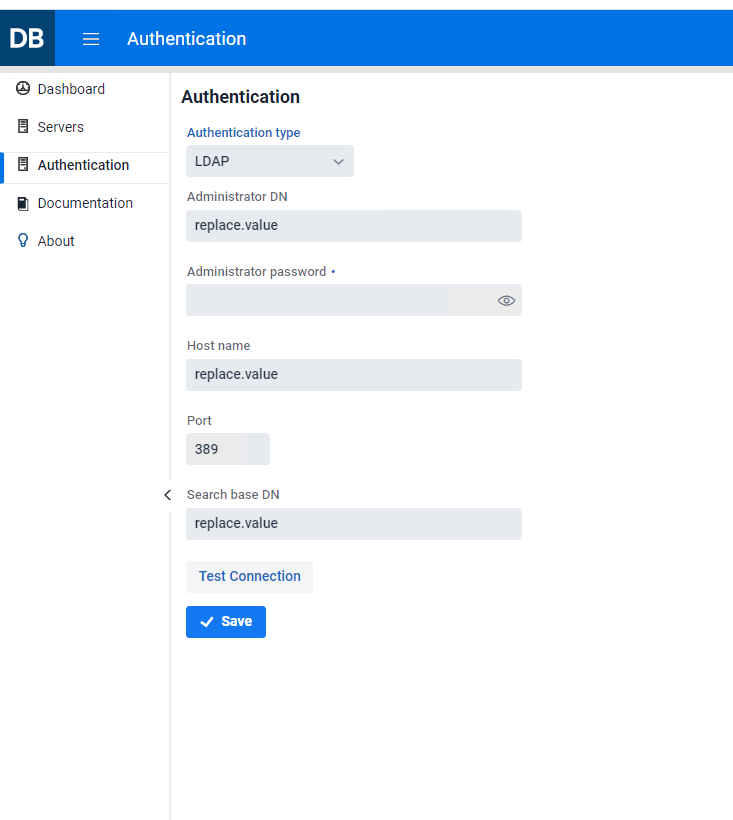
Chose the desired authentication mode using the drop down titled Authentication type, the available options are LDAP (default) and Simple authentication.
Setting up LDAP
To setup LDAP for the site contact IT personnel and ask them to provide you with the information needed.
Remote desktop to your site's network authentication server and open an elevated Command Prompt (or have someone authorized perform the task below).
-
To search the entire domain use the first line returned from a
dsquery*command as the base DN. To limit the scope of the base DN, one can use an OU. Running adsquery OUwill provide a list of Organizational Units from which the base DN can be selected. Enter this information into the Search base DN input field.Example
"CN=example, CN=com" or "OU=DBUser, CN=example, CN=com"
-
To get the value for the Administrator DN input field enter the command
"dsquery user -name username, where username is the userid of an administrator on the authentication server. Copy the output line, and paste it into the Administrator DN input field. -
Enter the hostname of the network authentication server into the Host Name input field.
-
Enter the password for the administrator(s) selected in step 2 into the Administrator password input field.
-
Ensure that the default port of 389 is correct for your site.
-
Select Save.
These changes will only take effect after restarting the service. At this point, you will be able to connect to the Administrative Console from a browser using your network credentials, though this alone is not enough to gain access to the Client Managers.
For access to the Client Manager(s), userids will need to be given access to a Client Manager. To grant access, the administrator(s) will need to assign users a role to access the Client Manager(s). To do this, assign a predefined role (Administrator, Operator, User, or Custom) to the user. For more information on user permissions, see the managing users section of this guide.
Caution
How do you gain access to the Client Manager to assign roles?
When upgrading from previous versions, the userids and roles will be honored in the new Administrative Console. If this is not the case, dbridge will be available from the Client Manager configuration file to get initial access to the Client Manager page with permissions to manage users. As a backup, in the case that neither of the aforementioned options are available, the dbridge userid and password is automatically added as an administrator for the first sign-on to the Client Manager following an upgrade. The service will automatically detect if there was an upgrade the first time it is started.
Creating Userid/Password Pairs
When Simple authentication is setup, the administrator will need to add the userid/password pairs as seen in the screenshot below.
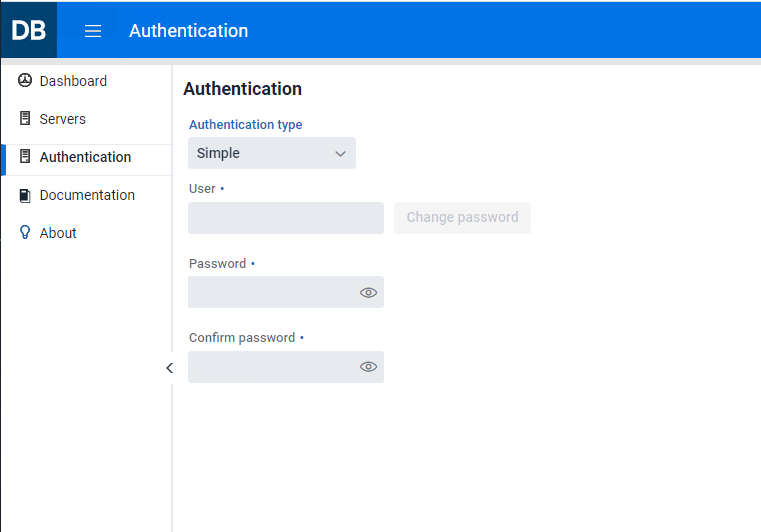
Enter as many userid/password pairs as needed. Users can access this dialog in the same way as an administrator, but they will only be able to view and change their own password. Userids and passwords are stored in the file osp-users.csv in the sub-directory microservices\auth-service of the install directory for the Administrative Console, and all passwords are encrypted.
Userids assigned with Simple authentication behave in the same manner as the LDAP userids. Userids must be registered with each Client Manager in exactly the same way as LDAP users.
For more information on granting access to the Client Manager(s), see the managing users section.
Caution
Change the password for the userid dbridge as soon as possible. Leaving the password value dbridge can lead to unauthorized access to the Administrative Console.