Getting Started
This section contains the essentials for configuring Enterprise Server after installation is complete. If you want to explore some of the optional configuration features of Enterprise Server, such as caching, see Additional Configuration Options.
Note
To use Enterprise Server, you must first install and run Databridge Host.
Implementing Security for DBEUsers and DBEAdmins Groups
Use the following procedure to create a Windows user group that has administrator privileges in Enterprise Server, but whose members are not required to be Windows Administrators. Users in this group will be able to add new sources, change properties, and delete log files.
By default, only members of the predefined Administrators group have the right to modify the Enterprise Server configuration.
-
In Windows, log on as an Administrator.
-
In the Microsoft Management Console, create a user group called DBEAdmins. Members of this group will have Enterprise Server administrator privileges. Optionally, create a group called DBEUsers. Members of this group will only be able to run Databridge Enterprise to view, but not change the configuration (that is, they won't have administrator privileges). For instructions on creating user groups, see the Windows Help.
-
At a command prompt, change the directory to the working directory:
CD %ProgramData%\Micro Focus\Databridge\Enterprise -
Type the following commands:
icacls Logs /grant DBEUsers:(CI)(W,WA,WEA) icacls Logs /grant DBEAdmins:(CI)(W,WA,WEA,D) icacls Config /grant DBEUsers:(CI)(R,RA,REA) icacls Config /grant DBEAdmins:(CI)(R,RA,REA,W,WA,WEA,D) regedit -
In the Registry Editor window, right-click HKEY_LOCAL_MACHINE\SOFTWARE\Micro Focus\Databridge\Enterprise\6.6 and choose Permissions.
-
Click Add.
-
In the Enter the object names to select dialog box, type
DBEAdmins, and click[OK]. -
Check the Allow box next to Full Control and click
[OK].
Running Enterprise Server in Browse Mode
To view or configure Databridge Enterprise, you must run Enterprise Server in browse mode. In Windows, from the Start menu, click All Programs > Micro Focus Databridge 6.6 > Databridge Enterprise > Configure Enterprise.
If you are running under Windows Server 2012 R2 or later and have defined the DBEAdmins group as described in the Implementing Security for DBEUsers and DBEAdmins Groups section, you must right-click the Configure Enterprise shortcut and choose Run as Administrator in order to perform any configuration tasks.
Databridge Enterprise loads. The left side of the window shows the DBEnterprise machine and known DBServer machines, and the right side shows the Enterprise Server sources.
If MCP disks don't appear in the Enterprise Server window under the Enterprise Server system, see Troubleshooting.
Before you can access DMSII data, you must connect to the host where the Databridge Server accessory (DBServer) is installed.
To connect to Databridge Server
-
From the Databridge Enterprise window, click the DBServer button.
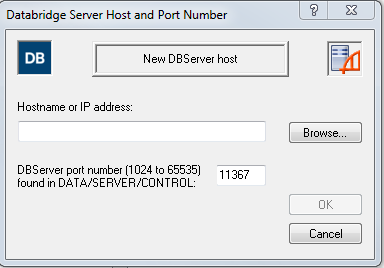
The Databridge Server Host and Port Number dialog box appears.
-
Type the host name or IP address for the remote mainframe on which DBServer is running. If the server is visible in Windows, click
[Browse]to navigate to it. -
Type the port number. This is set by the TCP/IP port parameter within the DBServer configuration file.
-
Click
[OK].If the connection is successful, the new server appears in the left pane in the Databridge Enterprise window. From there, you can view DMSII properties (of data sets, data item, and so on) for any source in the DBServer parameter file.
More information
Creating or Importing an Enterprise Server Source
Before you can replicate DMSII data, you must create an Enterprise Server source (also referred to as a base source) from the MCP server that contains DMSII data. A base source is the same as the SOURCE defined in the DBServer parameter file.
After you create a base source, you can filter it by creating a local source from the base source. You can then assign a number of filters for that local source. If filters are implemented in DBGenFormat, sources are filtered on the MCP server before the local filters are applied.
Note
DBGenFormat is a host utility that creates translation, filter, and format routines. The GenFormat utility interprets the GenFormat parameter file to generate ALGOL source code patches, which are included in the tailored Support Library.
This procedure describes how to create an Enterprise Server source by using the user interface. You can also create sources by importing a configuration file. See Importing a Configuration File.
To create a base source
-
Connect to an MCP server or to a Windows computer that is running Databridge (see Connecting to a Host Running Databridge.)
-
In the left pane of the Databridge Enterprise window, under Databridge Sources, click the plus sign (+) next to the host name. Then, click the plus sign (+) next to the DBServer item beneath it to view all available sources on that port.
Note
This process may take a long time, depending on how many sources are defined.
-
Right-click the source for which you want to create a base source and select Add to DBEnterprise.
The base source appears in the right pane of the Databridge Enterprise window, under DBEnterprise Sources, using the same name as the Databridge source. The status area on the bottom of the Databridge Enterprise window notifies you if a source is unavailable or when the data set list is being retrieved, expanded, and so on.
-
Right-click the base source you just created and select Properties.
-
In the Base Source Properties Dialog Box, review and change options as needed, and then click OK.
To import a base source
Use this procedure to import a source that was created in a different working directory location (for example, using a prior version of Enterprise Server).
-
In Enterprise Server, click the [Import] button on the right side of the window.
-
In the Open Databridge Enterprise Configuration File dialog box, click DBEnterprise Configuration, choose DBEnterprise Sources (*.source), browse to the source file, and click
[Open].
More Information
Base Source Properties Dialog Box
Getting there
In the right pane of the Databridge Enterprise window, right-click a base source and click Properties.
This dialog box shows the properties of a base source. The base source name — which is the same as its counterpart source in Databridge Server — appears at the top of this dialog box and cannot be changed.
The options are as follows:
| Add | Click this button to add a new filtered local source that is derived from this base source. When you click the Add button, the Source Properties Dialog Box appears. |
| Imported configuration file | If you imported a configuration file to create this base source, the path and filename appears here. |
| When more audit is available, run | Use this text box to enter the path and filename of the batch file you want to run when Databridge Server notifies Enterprise Server that new audit files are closed and ready for replication. To use this feature, you must also update a few parameters on the mainframe. For instructions, see Set Up a Host-Initiated Enterprise Server or Client Run. |
| As user | The Windows user name required to run the batch file. |
| Password | The associated Windows password required to run the batch file. NOTE: Enterprise Server encrypts user names and passwords and stores them in the registry. |
| Show log and Ask First | These options determine when log files are displayed and whether or not you want to be prompted to view them. For log filenames and directories, see Log Files. Always: select this option to automatically display log files for every Enterprise Server process after Enterprise Server finishes. Select the Ask First check box if you want to be prompted whether to display the log at the end of each process. Never: select this option to not automatically display log files. This option is recommended for unattended servers. Ask First is not available when you select this option. If failure: select this option to automatically display log files only when an error occurs. Select the Ask First check box if you want to be prompted whether to display the log when a failure occurs. |
| Checkpoint | This button opens the Checkpoint Options Dialog Box, from which you can set the frequency with which the Databridge Client commits the updates it receives from Enterprise Server. |
| Cache | This button opens the Base Source Cache Properties Dialog Box, from which you can enable caching. |
| Audit Mirror | This button opens the Audit Mirror dialog box, in which you can configure the audit mirror functionality. After audit mirroring is configured, you can run it as a command-line feature or as an interface option (right-click the base source and choose Start mirroring audit files). For information about the MIRROR command-line feature, see Mirroring DMSII Audit Files. |
| Extract Workers | This numeric setting specifies the maximum number of threads Enterprise Server can create when extracting data during a clone. |
| Remove | This button removes this base source from your Enterprise Server installation. It also removes any local (filtered) sources derived from this base source. |
User Credentials Dialog Box
This dialog box is displayed when a Databridge Server source specifies a key (password). To access this source, you must supply the key.
After you successfully log on to this source, Databridge Enterprise Server will encrypt and store this key for future logons.
Data Set Properties Dialog Box
Getting there
From the Databridge Enterprise window, expand a data set, and then right-click a data item.
The properties in this dialog box are for information only and can't be edited.
| Item number | The data item number, a unique number that is assigned by DMSII. |
| Type | The data item type as described in DASDL (for example, alphanumeric, thirty characters). |
| Format | Indicates information that's been specified to DBGenFormat so that the client knows the format of the data, such as date. See the Databridge Host Guide for a complete description of the formats available. |
| Length | Indicates the length of the data item measured in half bytes (also referred to as digits). |
| Offset | The distance between the item and the start of the record (measured in half bytes). |
| Occurs | The number of different times the data item is repeated in the DMSII record. |
| Subscripts | The number of subscripts that are required due to each level of occurs. For example, if a data item occurs four times in a GROUP, and that GROUP occurs five times within a larger GROUP that occurs seven times, three subscripts would be required. |
| Raw offset | When selected, indicates that the data item doesn't appear in the formatted record. The offset is the location of the link item in the unformatted audit record. Only used in links. |
Variable Format Properties
Getting there
- From the Databridge Enterprise window, expand a variable format data set.
- Right-click the variable format icon
 and click Properties.
The properties in this dialog box are for information only and can't be edited.
| Structure # | The unique number of the data set. As data sets are added in DASDL updates, each is assigned the next available number. |
| Record type | The unique number that identifies this particular variable format. |
| Record size | The size of the record, measured in words and bytes. |
Set Properties Dialog Box
Getting there
In the left pane of the Databridge Enterprise Server window, under a data set, right-click a set and click Properties.
The properties in this dialog box are for information only and can't be edited.
| Structure # | The unique number of this set. As sets are added in DASDL updates, each is assigned the next available number. |
| Target | The name of the data set to which this refers. |
| Duplicates | When selected, indicates that more than one record or row may have the same key value. |
| Key change OK | When selected, indicates that a program can change the key value of an existing record on the host. In this case, you would want to include before and after images in updates sent to the client to provide records that refer to previous key value. |
| Subset | When selected, indicates that this is a subset. A Subset is an index into a data set. A subset does not necessarily have an entry (key + pointer) for every record in the data set. Subsets are used to access selected members of a data set and to represent relationships between data set records. Subsets typically contain fewer entries than normal sets. An automatic subset is any subset that contains a WHERE clause and is maintained by DMSII. A manual subset is any subset that is maintained by an application. |
Creating a Local Source
You may want to apply additional filters to the data available in a base source. You can do that by creating a local source and defining filters for that local source. This task is optional.
To create a local source
-
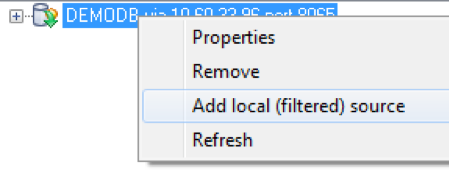
In the right pane of the Databridge Enterprise window, under DBEnterprise Sources, right-click the base source for which you want to create a local source and click Add local (filtered) source.
-
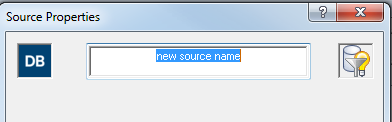
In the Source Properties dialog box, type the name for this local source. The source name must be a valid name that Databridge Clients can use in a Windows or a UNIX command session. It can include alphanumeric characters, hyphens, and underscores, but no spaces or other symbols.
The Mark all data sets buttons are disabled until you click [OK] and create the source. When you first create a local source, all of its data sets, except the restart data set, are included.
-
Review and change options in the Source Properties Dialog Box as needed. When you're done, click [OK].
Note
If the [Save] button in the Databridge Enterprise window is enabled, you have made changes that have not been written to disk and therefore are not yet in effect. To put your changes into effect, click the [Save] button.
More information
Source Properties Dialog Box
Getting there
In the right pane of the Databridge Enterprise window, right-click a local (filtered) source, and click Properties.
This dialog box shows the properties of a local, filtered source.
The options are as follows:
| Source Name | In the text box at the top of the dialog box, enter the name you want to give this local source. This name will appear in the Enterprise Server source tree. |
| Base source | Indicates the base source from which this local source is derived. |
| Filter name | The name you entered when you created this source. |
| Generated | The date and time when you created this source. |
| Imported configuration file | If you imported a configuration file to create this source, the path and filename appear here. |
| Show log and Ask First | These options determine when log files are displayed and whether or not you want to be prompted to view them. For log filenames and directories, see Log Files. Always: select this option to automatically display log files for every Enterprise Server process after Enterprise Server finishes. Select the Ask First check box if you want to be prompted whether to display the log at the end of each process. Never: select this option to not automatically display log files. This option is recommended for unattended servers. Ask First is not available when you select this option. If failure: select this option to automatically display log files only when an error occurs. Select the Ask First check box if you want to be prompted whether to display the log when a failure occurs. |
| Checkpoint | This button opens the Checkpoint Options Dialog Box, from which you can set the frequency with which the Databridge Client commits the updates it receives from Enterprise Server. |
| Cache | This button opens the Base Source Cache Properties Dialog Box, from which you can enable caching. |
| Mark all data sets | The icons in the Mark all data sets section are disabled until you actually create the source by clicking [OK]. Click the Include button to replicate all records from all data sets in the source. Click the Exclude button if you want to specify each data set individually for replication. |
| Extract Workers | This numeric setting specifies the maximum number of threads Enterprise Server can create when extracting data during a clone. |
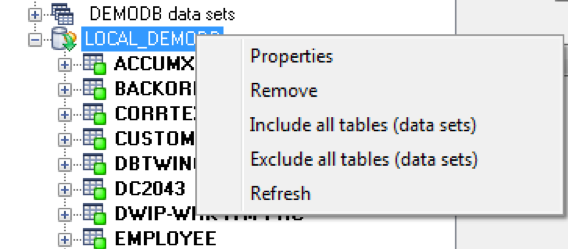
Filtering a Local Source
Creating filters for local sources is an easy way to add and change filters without making any changes on the mainframe. When you first create a local source, all of its data sets except for the restart data set are included.
There are two approaches to filtering: Include all of the tables for a local source (the default) and then filter out the rows you don't need. Or, exclude all of the tables and use filtering conditions to pull in the rows you want. The appearance of the data set icon will change, depending on your selections (see Icon Descriptions).
This task is optional.
To filter local sources
-
Right-click a local source and select an option to include or exclude all tables (data sets).
-
Within the local source, filter a data set by right-clicking it and selecting one of the following:
- Select the option to include or exclude all rows of the data set.
- Select Edit WHERE filter to define a filtering condition in the Row Filter Dialog Box. Type a filtering clause in the WHERE box, or click data items and functions and then click the adjacent arrow to add them to the WHERE box.
-
When the WHERE box reflects the filtering conditions you want, click [OK].
If the filter has no syntax errors, it is added to the data set (and the status icon changes to yellow).
-
When you are finished creating filters, click [Save] to save your work.
After you set up filters, you can use a Databridge Client to define, generate, and replicate a database using the Enterprise Server local source.
Row Filter Dialog Box
Getting there
-
In the right pane of the Databridge Enterprise Server window, expand a source to show its data sets.
-
Right-click a data set, and do one of the following:
- Select Properties, and in the Data Set Properties dialog box click the Row filter button.
- Select Edit WHERE filter.
Use this dialog box to specify filtering conditions for each data set.
The options are as follows:
| WHERE | In this text box, enter an expression that defines the filtering conditions you want. The expression can include typed values and items from the Data items and Functions lists. |
| Data items | These are available data items that can be filtered. To add a data item to the WHERE text box, select it and then click the adjacent arrow button, or double-click the item in the list. |
| Functions | These are available functions you can use in the filter. To add a function to the WHERE text box, select it and then click the adjacent arrow button, or double-click the item in the list. |
Connecting a Databridge Client to Enterprise Server
Use one of the following procedures to connect Databridge Client to Enterprise Server.
To connect via the Client Console
If you run the Databridge Client from the Client Console, use the Console to connect to Enterprise Server.
-
In the Client Console, in the Explorer tab, right-click the service and choose Add Data Source.
-
In the Add Data Source dialog box, in the SOURCE Name box, type the name of the Enterprise Server source.
-
In the SQL Server or Oracle section, for Data Source, type the name that you've created for the relational database.
-
For Host name, type the IP address or the name of the computer on which Enterprise Server is running.
-
For Port, type the Enterprise Server port number. This number appears in the Databridge Director dialog box.
-
Click [Finish].
To connect the Client via a command session
If you run Databridge Client from a command line, type the following command:
dbutility define datasource hostname portnumber
| Where | Is |
|---|---|
| datasource | One of the following:
|
| hostname | The IP address or name of the PC on which Enterprise Server is installed. |
| portnumber | The port number for Enterprise Server. To confirm this port number, in the Enterprise Server window, click the DBDirector button. The port number appears in the Databridge Director dialog box. |
Host Options and Enterprise Server
Many options and settings in the DBEngine and DBServer parameter files apply to DBEnterprise. Some can be overridden and some don’t apply at all. The following table summarizes the direct effect of various host options on DBEnterprise.
| Host Option | Direct Effect in DBEnterprise |
|---|---|
| Audit |
Determines audit file title prefix |
| Audit job | N/A |
| Audit level | N/A |
| Audit no wait | Wait/don’t wait for missing audit file |
| Audit on | Determines where to find the audit files |
| Authorized usercode | Client must be run by the specified user |
| Available | Restricts access to certain times |
| Checkpoint client | Can be overridden in Checkpoint Properties |
| Client host | Client must be run on the specified machine |
| Clone | DBEnterprise always does online clones |
| Convert reversals | Converts reversals to normal updates if true |
| Database | Title of DESCRIPTION file on the host |
| Dynamic names | N/A |
| Enterprise Workers | Determines number of Reader threads during a clone |
| Filter | Name of filter in DBSupport |
| Key | Client must supply the password |
| Links | N/A |
| Manual compile | N/A |
| Mirrored | N/A |
| Notify | N/A |
| Print statistics | N/A |
| Priority | N/A |
| Property level | N/A |
| Read active audit | DBEnterprise always reads the active audit |
| Readahead | N/A |
| Stop | Can be overridden by client |
| Support | Name of DBSupport library |
| Transform | Name of transform in dynamic link library or DBSupport |
| Usercode | N/A |
| Workers | N/A |
Databridge Server Host and Port Number Dialog Box
Getting there
From the Databridge Enterprise window, click the DBServer button.
The options are as follows:
| Hostname or IP address | Type the host name or IP address for the remote mainframe on which DBServer is running, or for a PC on which another copy of Enterprise Server is installed. If the server is visible in Windows, click the Browse button to navigate to it. |
| DBServer port number (1024 to 65535) found in DATA / SERVER / CONTROL | Type the port number. This is set by the TCP/IP port parameter within the DBServer configuration file. For Enterprise Server, the port is set during installation, but can be changed later in the Databridge Director Dialog Box. |
Set Up a Host-Initiated Enterprise Server or Client Run
Enterprise Server supports a protocol that permits a program or job running on the Unisys MCP server to trigger a run of the Databridge Client or Enterprise Server when audit files become available.
To set up host-initiated runs of Enterprise Server
-
Open the DBServer parameter file, DATA/SERVER/CONTROL, and add the following NOTIFY option for each SOURCE declaration that you want to include. (A SOURCE can have multiple NOTIFY options and multiple SOURCEs can NOTIFY the same PORT.)
NOTIFY [=] "host" PORT portnumberwhere host is the host name or IP address of the Enterprise Server and portnumber is the Enterprise Server port on which Databridge Director is listening.
Example:
 SOURCE BANKDB:

 NOTIFY "192.168.1.100" PORT 8099

notify "myserver.mycompany.com" port 8007 -
Save and close the DBServer parameter file.
-
Using a text editor, open the notification command file installed with Enterprise Server (Notify.cmd). (The default location for Notify.cmd is \Program Files\Micro Focus\Databridge\7.0\Enterprise.)
-
In the file, uncomment either the command to run Enterprise Server or the command to run dbutility, and then save the file with a new name.
-
Right-click an Enterprise Server source, and select Properties.
-
For the When more audit is available, run option, click Browse, and select the notification command file that you edited in step 4.
Note
If you use an Enterprise Server configuration file to create your sources, add the path and filename of the batch file to each remote or local source in the configuration file. For example:
on notify,
run "C:\Program Files\Micro Focus\Databridge\6.6\Enterprise\MySourceNotify.cmd"
When Director receives the connection request from DBServer, it initiates Enterprise Server. Enterprise Server runs the specified batch file and passes the MCP server host name, SOURCE, and AFN on the command line.
You can use the batch file to do things other than run Enterprise Server or a Databridge Client. For example, you could set it up to append a message to a text file or to run other programs.
-
Use one of the following Databridge host WFLs that will notify DBServer:
-
WFL/DATABRIDGE/COPYAUDIT – Change the line near the top to read:
WANTNOTIFY = TRUE -
WFL/DATABRIDGE/NOTIFY – For the string parameter, type the database name.
For example:
START WFL/DATABRIDGE/NOTIFY ("BANKDB")When either WFL notifies DBServer that an audit file is available for processing (by opening a port file with YOURNAME = "DBSERVERNOTIFY"), DBServer opens the port file on the Enterprise Server indicated by the NOTIFY option and sends a brief message containing the SOURCE name and AFN.
-