Sample - BankDemo in Azure
The BankDemo application is a more advanced application than the ACCT example. It has more programs and maps, and more interestingly, can be configured to use HCOSS to access the samples database.
This walkthrough will take you through the steps required to build and deploy the BankDemo application into an Azure database hosted deployment using a local machine architecture. It will use HCOSS to access the applications database.
If you do not want to use HCOSS to access the database, ignore the HCOSS configuration steps.
- Create the BANKDEMO database.
- Open and log in to the Azure management portal.
- Connect to the database instance where you would like to host the region and BANKDEMO database.
- Create a database called BANKDEMO in your chosen Azure database server.
- Open SQL server Management Studio, or the SQL Server Object Explorer in VS 2013 or later.
- Select the BANKDEMO database as the default database.
- Open the %PUBLIC%\Documents\Micro Focus\Enterprise Developer\samples\Mainframe\CICS\DotNet\BankDemo\SQL\BankDemoCreateAzure.SQL file.
- Execute the SQL.
The required tables will be created.
- Build the application in Enterprise Developer for Visual Studio.
- Open Enterprise Developer for Visual Studio.
- Open the bankdemo.sln.
- Select the relevant project to build:
- If using HCOSS, make BankDemo the startup project.
- Open the project properties:

- Select the COBOL properties (1).
- Click Build Events (2).
- Enter the DSN name configured in the HCOSS tool below, e.g. BANKDEMO (3).
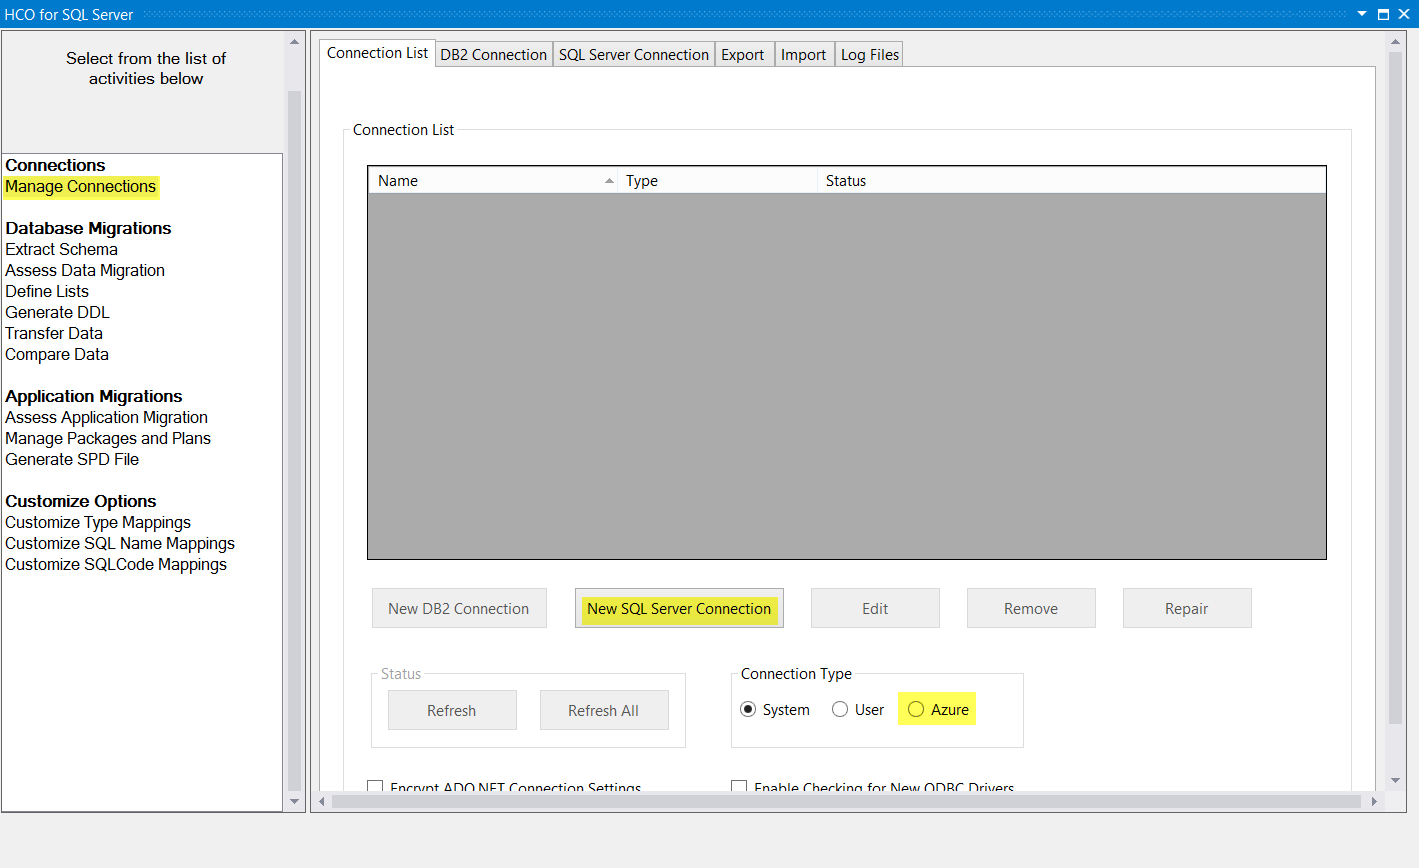
- Open the HCO for SQL Server Tools.
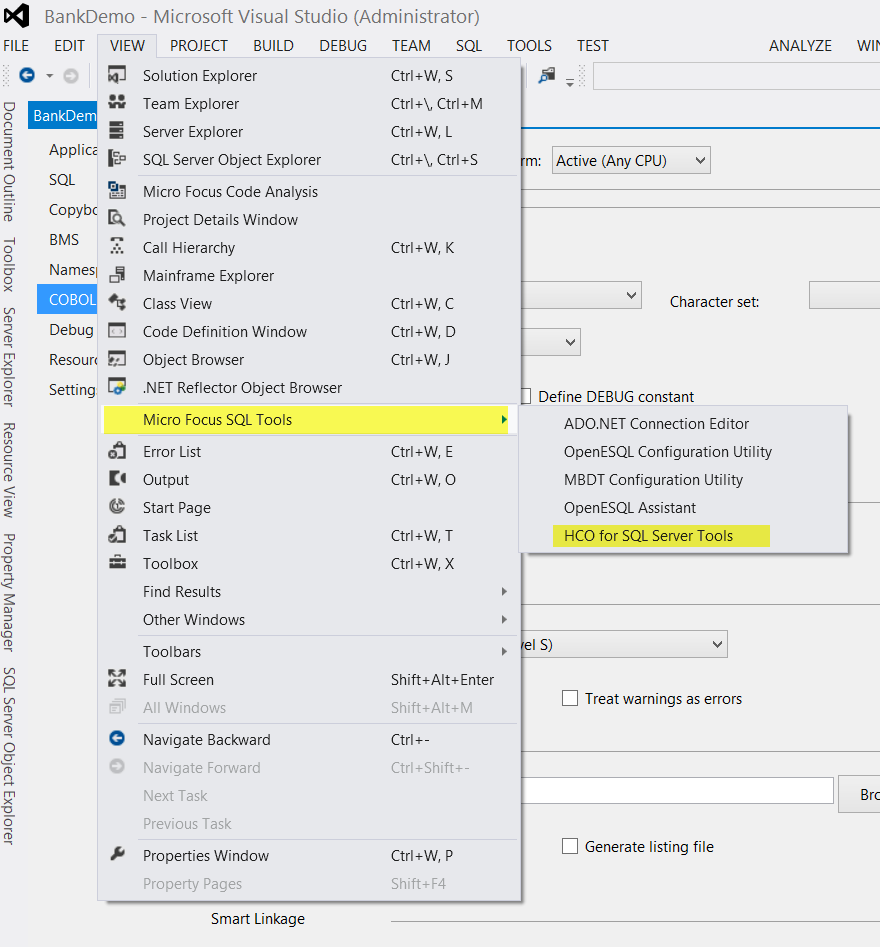
- Select the
Manage Connections activity from the list, click the
Azure radio button and click
New SQL Server Connection in the connection list dialog.
- Configure the connection data.
- Enter BANKDEMO as Data Source Name.
- You can only use SQL Server Login. Enter the correct username and password to access the Azure database instance.
- Enter the TCP address of the Azure database instance. e.g. tcp:sfcgreio.database.windows.net.
- Check Use a database other than the default database.
- Select BANKDEMO from the database dropdown list.
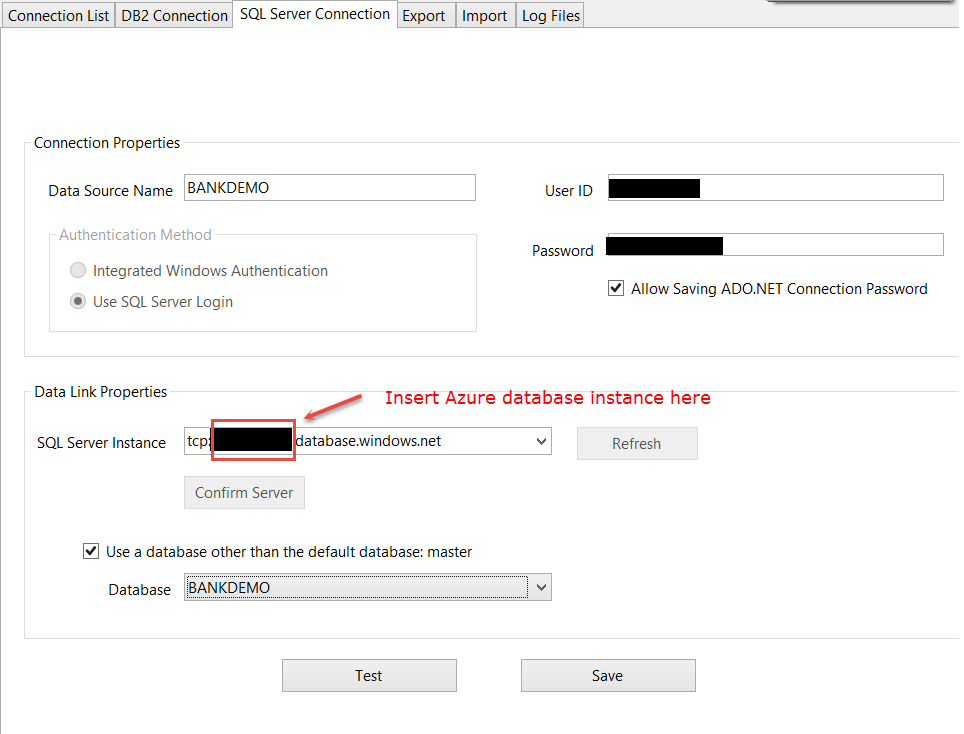
- Click Save.
- Open the project properties:
- If not using HCOSS, make BankDemo2 the startup project.
- If using HCOSS, make BankDemo the startup project.
- Build the project.
The project should build with no errors or warnings. For the HCOSS version, the post-build event will perform the bind to the configured database.
-
Note: This step is optional and is presented to show how to manually perform the bind step.The bind is normally done by the post-build event during the project build for the HCOSS project.
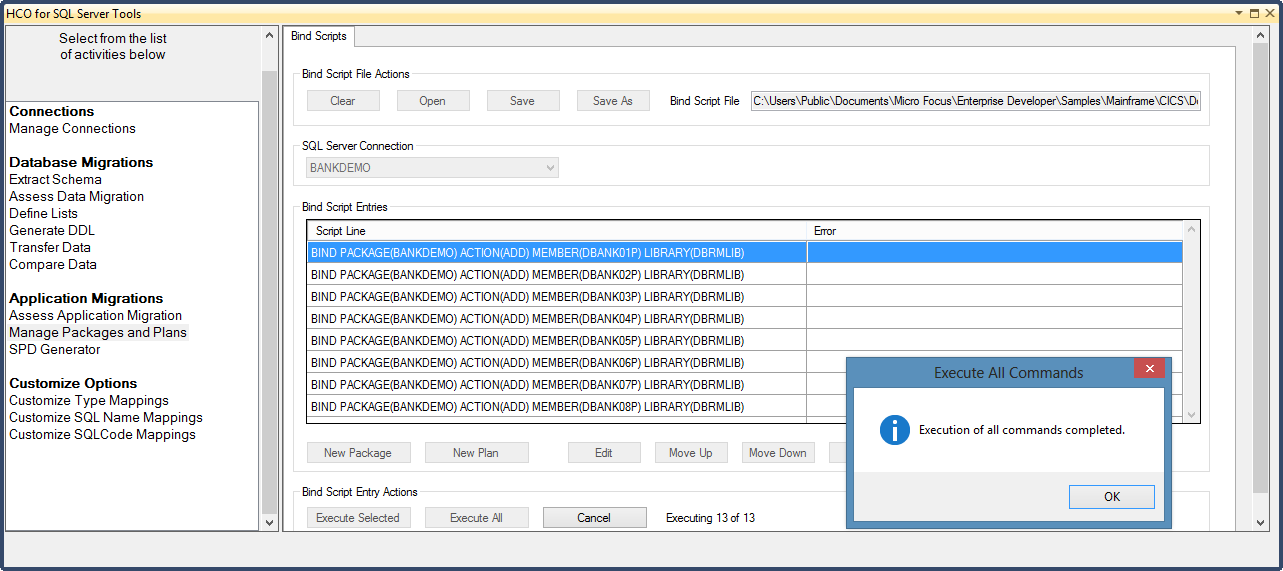
- Select the
Manage Packages and Plans activity from the Activities list in the left pane.
- Make sure that the Bind Scripts tab is selected.
- In the Bind Script File Actions, click Open and open %PUBLIC%\Documents\Micro Focus\Enterprise Developer\Samples\Mainframe\CICS\DotNet\BankDemo\BankDemo.hcodsn.
- Select BANKDEMO from the SQL Server Connection dropdown.
- Click
Execute All.
This will bind the binaries generated when you built the project to the Azure Database hosted BANKDEMO database.
- Select the
Manage Packages and Plans activity from the Activities list in the left pane.
- Package and deploy the
Enterprise Server for .NET system to Azure.
- Open the Enterprise Server for .NET Administration UI and configure a deployment project for BANKDEMO as per the instructions found at Creating A New Deployment Project.
- Make sure that the listener endpoints, etc are correct.
- Make sure that there is a connection string for the user BANKDEMO database as well. It is sufficient to just add BANKDEMO in simple editing mode, and the tool will generate the advanced connection strings for you. If you wish to edit or change the connection strings themselves, enable advanced editing mode.
Save and publish the deployment to Azure (Publishing And Control of a Deployment.).
- Deploy the system transactions and the BANKDEMO application into the cross region database.
- Open an Enterprise Developer command prompt as Administrator.
- Navigate to the %PUBLIC%\Documents\Micro Focus\Enterprise Developer\Samples\Mainframe\CICS\DotNet\BankDemo directory.
- Deploy the bankdemo application into the cross region database.
- Make sure that your deployment configuration contains database connection strings for the master and cross region database
similar to those supplied in the ESDEMO deployment example.
If you wish to change the database connection string default, make sure that the Advanced edit mode is activated in the Options menu of the Azure service configuration panel.
- Run bankdemodbdeploy <AzureDatabaseName >, e.g. bankdemodbdeploy wai3yvmxx1.
It is well worth looking at these two batch files to understand how files are uploaded to the database. This knowledge is invaluable to deployment when developing your own deployment scripts.
- Make sure that your deployment configuration contains database connection strings for the master and cross region database
similar to those supplied in the ESDEMO deployment example.
- Create the BANKDEMO region.
These steps are not detailed, as most of the process has been previously described in other tutorials.
- Open the
Enterprise Server for .NET Administration UI.
- Create a new CICS Region called BANKDEMO, hosted in the Azure database.
- Configure an XA resource definition for the bankdemo database as described in
Configuring XA resources.
- An XA resource definition will be used to define how the region is to connect to the database.
- Ensure that the application plan field in the XA resource definition is set correctly (BANKDEMO in this case).
There is no need to set the application plan in the region definition file.
- Select the region definition file from the cross region database. It was deployed in the previous step.
- It is called region_bankdemo_db.config.
- If using HCOSS , edit the region definition or PCT entry and set the XA resource name to the name of the XA resource you created above.
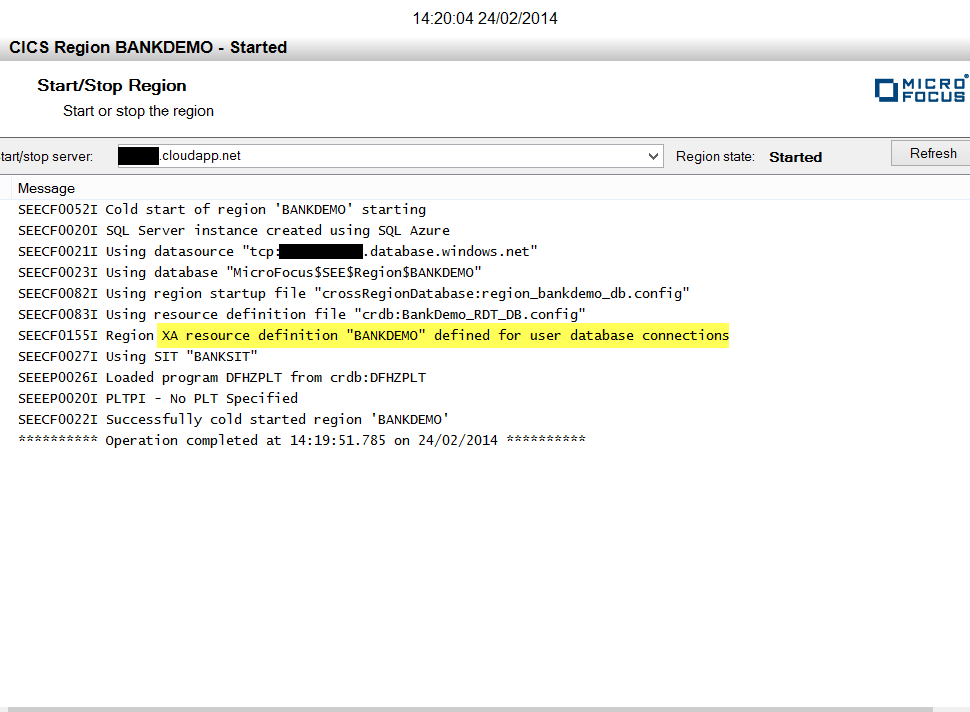
- Start the region, making sure that the start/stop server name points to xxx.cloudapp.net, where xxx is the service name to which you deployed the Azure project.
- Ensure the system picks up the XA resource definition correctly, and the DFHPLT transaction was loaded from the database,
and not from disk.
- Open the
Enterprise Server for .NET Administration UI.
- Run Bankdemo.
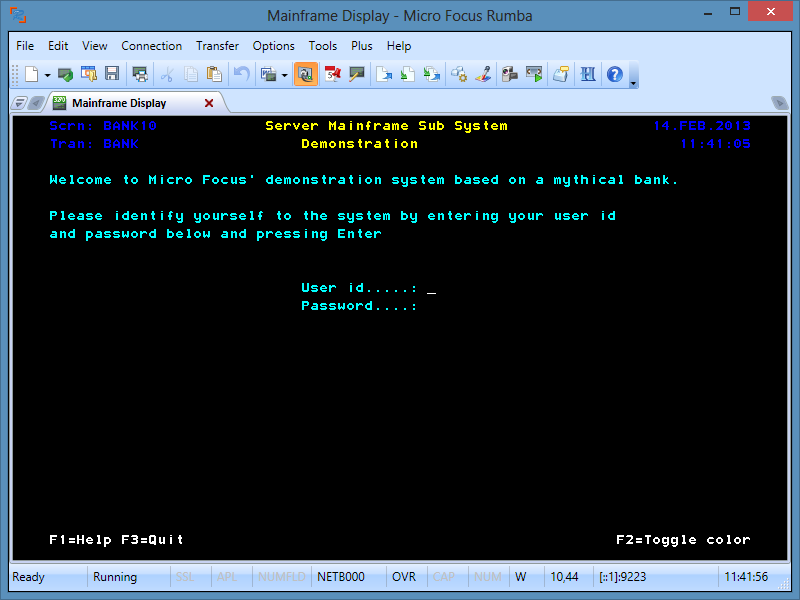
- Connect a TN3270 terminal to the listener port in Azure which you configured to be associated with BANKDEMO.
For example:
mycics.cloudapp.net port 9123
You should be presented with a blank screen, with a flashing cursor.
- Type 'bank' and click
Enter.
You will be presented with the initial login screen.
- Enter an account, in the format B000xx, e.g. B0001 and anything in the password field.
You will be presented with the first screen (BANK20) in the demonstration application.
- Tab to a field, enter a character and click Enter.
- Look at the console view in the administration tool, and notice that the transactions are being loaded from the Azure database as opposed to disk.
- Connect a TN3270 terminal to the listener port in Azure which you configured to be associated with BANKDEMO.