Creating a Project and Adding the Source Files
The source files of the demonstration application are stored in subfolders named after the file type (for example, bms, cbl, copybook, jcl) in the C:\MFETDUSER\Bankdemo\Sources directory.
Creating a Project for the BankDemo application
You use the BankDemo project supplied with the sample to create your project in the Eclipse workspace that has the same settings as the sample project:
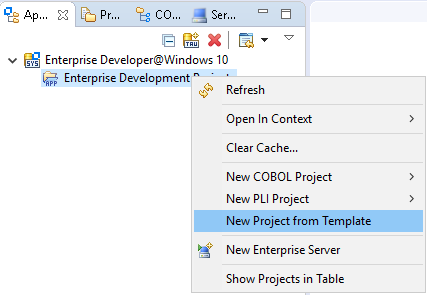
- In the Application Explorer view, right-click Enterprise Development Projects, which is the node for the standard application.
- Click
New Project from Template.
- Click
Retrieve next to
Template Path.

- Browse to the %PUBLIC%\Documents\Micro Focus\Enterprise Developer\Samples\Mainframe\Bankdemo\Workspace\Bankdemo folder, and click Select Folder.
- Type
Bankdemo in the project name field and click
OK.
Eclipse displays a message about some changes in release 5.0 related to how Enterprise Developer stores some of the compiler options. This is an informational message only. Click OK to continue with the tutorial.
This creates a copy of the Bankdemo project in your Eclipse workspace and adds the project to the application in the Application Explorer view. If the Bankdemo project entry is not displayed in the tree view, refresh the Enterprise Development Projects entry.
- Expand the Bankdemo project in the
Application Explorer view.
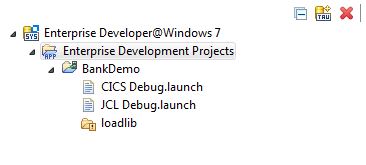
The Bankdemo Project
Your project is pre-configured so that the build process creates the output files in a location that is used by the Enterprise Server logical server. To check which folder will include the built files:
- In the Application Explorer view, right-click the Bankdemo project, and click Properties.
- Expand Micro Focus, Build Configurations and then click Link.
- Note that the Output path field points to the loadlib directory which will be created in the project directory at build time.
- You can cancel the project properties dialog box.
Adding the Demo Source Files
In most cases, to add files to an Eclipse project, you use the Import command. This creates local copies of file sources in the workspace. Optionally, you can leave the source files in the original location and create links to them. To do this:
- In Application Explorer view, right-click the Bankdemo project, and click > Folder.
- Click Advanced and check Link to alternate location (Linked Folder).
- Browse to C:\MFETDUSER\BankDemo\Sources, and click OK.
- Click
Finish.
This adds the folders storing the source files to your project as linked resources:
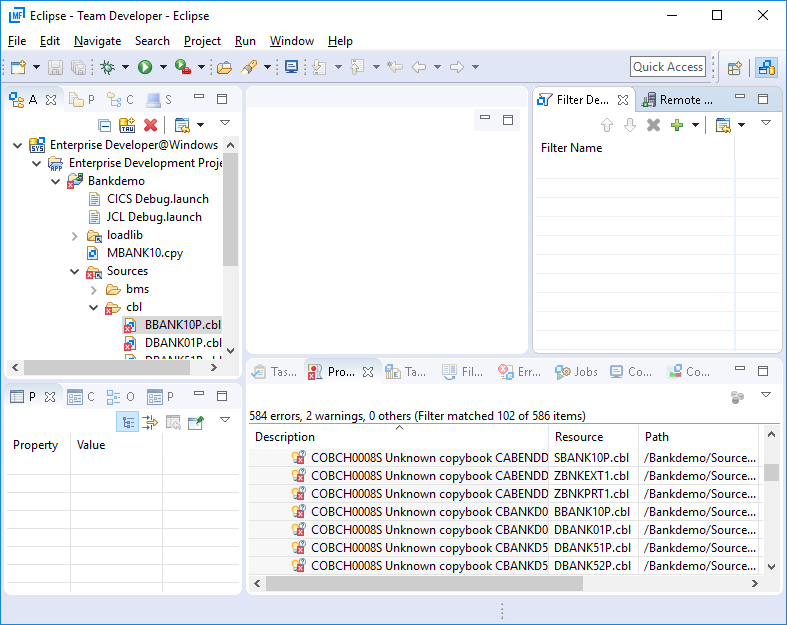
By default, Eclipse is set to build projects automatically (see ), so it immediately compiles the files you have just added.
Check the Console and Problems views and see that some of the programs failed to compile. In Application Explorer view, you can select a program and check the error and warning count property in the Properties view to indicate that there are compilation problems.
The errors are due to the correct copybook paths not being specified in the project properties.
Setting Compiler Directives
To perform a scan of the COBOL programs in your project to determine and then set the appropriate Compiler directives:
- Right-click
Bankdemo and click
Determine Directives.
The IDE performs a scan of the files and shows a report of what directives for dialect and for CICS must be set on the programs in your project in order for them to compile cleanly.
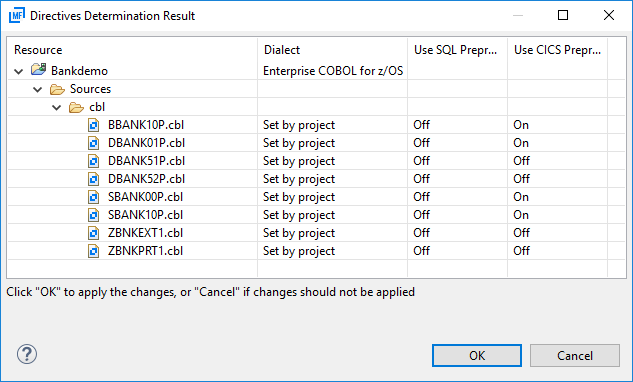
- Click
OK to set the directives.
If you are prompted to delete some user files, choose No.
Setting the missing Compiler directives triggers a full rebuild of the project. There are still some errors in the COBOL sources due to the fact that the project cannot resolve the paths to the copybook files.
Specifying the Copybook Paths for the Project
To specify the copybook paths for the project:
- In Application Explorer view, right-click the Bankdemo project, and click Properties.
- Expand Micro Focus, and then click Build Path.
- Click the Dependency Paths tab and ensure Type is set to COBOL Copybook Paths.
- Check the
Bankdemo/Sources/copybook entry in the list, and then click
Apply and Close.
Eclipse rebuilds the project and now all COBOL programs should compile cleanly.
Adding Data Files
The demonstration application includes a number of data files used. To see how you can edit data files, you only need to look at one of these files so you do not need to add a folder for it to the project. To add the data file to your project:
- In the Application Explorer view, right-click the Bankdemo project and click .
- Click Advanced and check Link to file in the file system.
- Browse to the C:\MFETDUSER\BankDemo\System\catalog\data folder.
- Select EBC.BNKACC.DAT, and then click Open.
- Click
Finish.
This adds the file to the Bankdemo project and also automatically opens it in the Micro Focus Data Files Tools utility. You can close the utility for now.
- Repeat steps 1 to 5 to add the following files to the project:
- EBC.BANKACC.PRO
- EBC.BNKACC.STR
Summary
You created an Eclipse project and added references in it to the COBOL files, the copybooks, the BMS and the JCL files of the demonstration program.
Next, you are going to edit some of these source files.